Meta (Facebook)
Find the pixel ID
Follow this guide by Meta (Facebook) Create and install a Meta (Facebook) pixel
Implemented events
| Meta (Facebook) event | e-commerce | WooCommerce | implemented |
|---|---|---|---|
| Add payment info | ✔️ | ✔️ | |
| Add to cart | ✔️ | ✔️ | ✔️ |
| Add to wishlist | ✔️ | ✔️ | ✔️ |
| Complete registration | |||
| Contact | |||
| Customise product | |||
| Donate | |||
| Find location | |||
| Initiate checkout | ✔️ | ✔️ | ✔️ |
| Lead | |||
| Purchase | ✔️ | ✔️ | ✔️ |
| Schedule | |||
| Search | ✔️ | ✔️ | ✔️ |
| Start trial | |||
| Submit application | |||
| Subscribe | ✔️ | ✔️ | ✔️ (pro) |
| View content | ✔️ | ✔️ | ✔️ |
The AddPaymentInfo event has not been implemented since in a standard WooCommerce setup there is no save button or next step before hitting the purchase button. Hitting the purchase button is the next step, and the event that we want to track.
Meta (Facebook) Conversion API (CAPI)
Available in version 1.10 and above
This is a feature only available for users of the Pro version. Get the Pro version here.
The Meta (Facebook) Conversion API (CAPI) is Meta's (Facebook's) server side event reporting mechanism. It complements the browser pixel and helps to measure events that under certain circumstances can get lost by the browser pixel. Since accurate event reporting is helpful for campaign optimization, Meta (Facebook) CAPI is an important tool for performance marketers. You'll find more info about CAPI in the official documentation here and here.
Using the Meta (Facebook) Conversion API (CAPI) will increase the load on your server. Regular Meta (Facebook) pixel implementations don't require interaction with the shop server on every Meta (Facebook) event. The browser sends all of those directly to Meta (Facebook). But, the Meta (Facebook) Conversion API is different. In addition to every browser API call each event (AddToCart, ViewItem, Purchase, etc.) has also to be sent by the shop server to the Meta (Facebook) servers. This leads to a significantly higher load on the server. If you're required to use the Meta (Facebook) Conversion API and your server comes to its limits (increased rate of server errors) then you will have to upgrade your server capacity.
Setting up Meta (Facebook) CAPI
-
Get a Meta (Facebook) CAPI access token: instruction
-
Paste the access token into the advanced section for Meta (Facebook) within the plugin.
Once the access token has been saved into the configuration, Meta (Facebook) CAPI is active.
User Transparency Settings
By default, the Pixel Manager sends the minimum required amount of data to Meta (Facebook) with each CAPI hit. Also, the plugin doesn't process anonymous visitors. Those are visitors who block the Meta (Facebook) pixel and where no
fbpcookie is set. (Read more about thefbpcookie here). You can change those settings in accordance with your shop policy and the laws under which your shop has to operate.
- Process anonymous hits: Our plugin doesn't send a CAPI hit if a visitor is blocking the Meta (Facebook) pixel. If you enable this setting the Pixel Manager will send an anonymized CAPI hit to Meta (Facebook). It will generate a random
fbpID and a randomuser_agent, which are the required parameters for a valid CAPI hit.
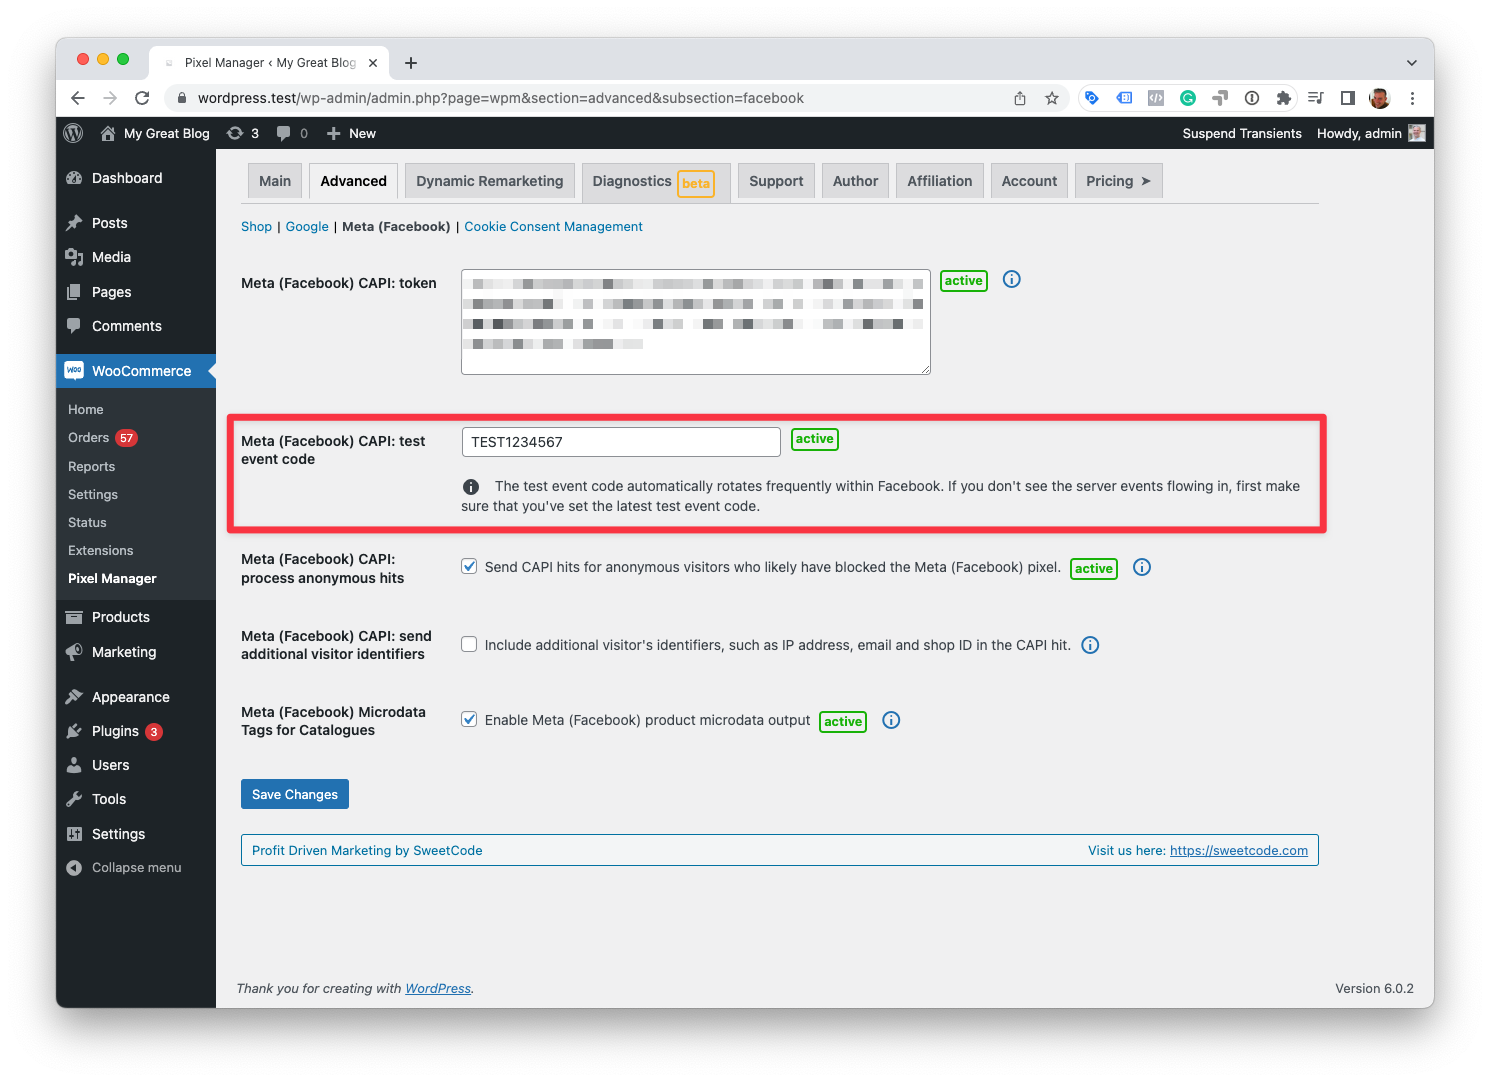
Testing
The test event code filter hast been deprecated and replaced by a settings field in the plugin settings from version 1.25.1
The test_event_code can suddenly change. So make sure to double-check if the right one is set for each testing session.
In order to test the events using the Test Events Tool the Pixel Manager offers settings field to save the latest test event code.
In case you suspect that something is wrong with the API call to the Meta (Facebook) server, or you simply want to see the response from the Meta (Facebook) server, the following filter is for you. It will output the API request response into the WooCommerce log file for Meta (Facebook) CAPI. You can view the log file under WooCommerce > Status > Logs > wpm-facebook-capi. Or you can open the file on the server. It is saved under /wp-content/uploads/wc-logs/.
add_filter('pmw_send_http_api_facebook_capi_requests_blocking', '__return_true');
Data Processing Options
Data Processing Options are a way to control how the data is used in the Meta (Facebook) systems and better support shop owners with their California Consumer Privacy Act (CCPA) compliance efforts. You'll find more information in the official documentation.
The following filter is a simple way to add the necessary fields to each CAPI hit. Below settings are just an example. You need to make sure that you are using settings which are inline with your shops' policy regarding CCPA.
add_filter('pmw_facebook_capi_data_processing_options', function () {
    return [
        'data_processing_options'         => ['LDU'],
        'data_processing_options_country' => 1,
        'data_processing_options_state'   => 1000,
    ];
}, 10, 2);
Meta (Facebook) Advanced Matching
When this option is enabled, the Pixel Manager will additionally send several visitor identifiers to Meta (Facebook), such as IP address, shop ID and email. It is optional and will increase the likelihood that Meta (Facebook) will match the hit to an existing Meta (Facebook) user profile. For security reasons the Pixel Manager will hash the data where possible. More info about hashing and visitor identifiers here and here.
Microdata Tags for Catalogues
This feature has been deprecated from version 1.25.1 and upwards.
The reason is that Facebook still doesn't fully support product variations with microdata tags. We have been in communication with Facebook support about this. But the parsing for product variations through microdata tags still has not been implemented by Facebook. Therefore we decided to remove that feature for now. It will stay active and will keep working on shops that have activated microdata tags in the Pixel Manager.
We will bring back microdata tags as soon as Facebook implements a proper way to handle product variations.
In the meantime, please use one of the various feed plugins to upload the Facebook product feed. Most, if not all of them fully support product variations.
A very convenient way to populate the product catalog within Meta (Facebook) is using microdata tags. It uses the Meta (Facebook) pixel and additional tags on product pages to upload the product data to Meta (Facebook). Each time a person visits a product page the product data is uploaded and updated. Additionally, to that Meta (Facebook) crawls the website and retrieves remaining data from the website. More information about this over here.
In comparison to creating a dedicated feed, this method has several advantages:
- It is much simpler to set up. Therefore, less errors can happen.
- Creating the tags takes only a low amount of server resources.
- The tags are cache friendly. No additional cache settings need to be made.
On the other hand dedicated feed plugins have several disadvantages:
- Feed plugins sometimes fail running. E.g. if WP Cron has problems.
- They can run into timeout issues for shops with many products.
- They are harder to debug.
- If no proper cache exclusions are being set, the server will always deliver cached versions of the feed.
As always, using one or the other method has trade-offs. Using microdata tags relies on constant traffic to the product pages or the Meta (Facebook) crawler to crawl the products in order to keep an updated catalog. If this is not a big concern for the person running the ads, then microdata tags are the better solution.
Setup
- Within the plugin open the advanced settings for Meta (Facebook) and activate the Microdata Tags for Catalogues.
- Head over to your Meta (Facebook) commerce manager and select your catalogue.
- Open the Catalogue tab and select Data sources.
- (Select Add items.) If a drop-down appears, select Add multiple items.
- Select Pixel and select Next.
- Select the pixel you want to connect and then Next.
- If you wish, select Add filters to limit the items that your pixel updates. Select Next. (Usually its best not to limit the items. Therefore, don't use the filter unless you have a good reason to.)
- Select Add trusted websites and enter the website domains that you trust to use as sources for your item information. Don't include the http:// or www. For example, enter jaspersmarket.com. If you want your pixel to use multiple country-specific websites, enter each one. Select Save and then Next.
- Select your default currency. This is the currency that your catalogue will use if prices for items on your website don't include a 3-letter ISO 4217 currency code, such as USD or EUR. Select Next.
Your connected pixel now appears in Data sources. It may take up to 24 hours to be ready. When the pixel is ready, it updates your catalogue each time someone interacts with a product page on your website, typically within 15 minutes of the interaction. If you remove any items from your website, they'll be deleted from your catalogue after seven days.
Supported Events
Here's a list of supported events.