Google User ID
This is a feature only available for users of the Pro version. Get the Pro version here.
The Google User ID feature enables cross-device attribution for logged-in users. When enabled, the Pixel Manager passes the WordPress user ID to Google services, allowing Google to associate the same user across different devices and sessions.
This improves conversion measurement accuracy because Google can attribute conversions to the correct user even when they switch between devices (e.g., browsing on mobile, purchasing on desktop).
Which Google services receive the User ID?
When enabled, the User ID is sent to:
- Google Analytics 4 (GA4) — browser-side via the
gtagconfig and server-side via the GA4 Measurement Protocol - Google Ads — browser-side via conversion and remarketing events
Setup
- Make sure you have GA4 and/or Google Ads active in the Pixel Manager.
- In the Pixel Manager, open Tracking Pixels → Google (Ads & GA4) and turn on User ID Feature.
That's it. The Pixel Manager will automatically send the User ID for all logged-in users.
The User ID is only sent for logged-in users. Guest checkouts do not include a User ID.
Activate User-ID in Google Analytics 4
To take full advantage of the User ID data, you should also activate the User-ID feature in your GA4 property:
https://support.google.com/analytics/answer/9213390
This unlocks the User-ID Exploration report in GA4, which provides cross-device insights for your logged-in users.
Enhanced Conversions
This is a feature only available for users of the Pro version. Get the Pro version here.
The diagnostics report in Google is delayed. If it shows one or several warnings, please wait a few days, sometimes up to two weeks, and recheck before contacting our support.
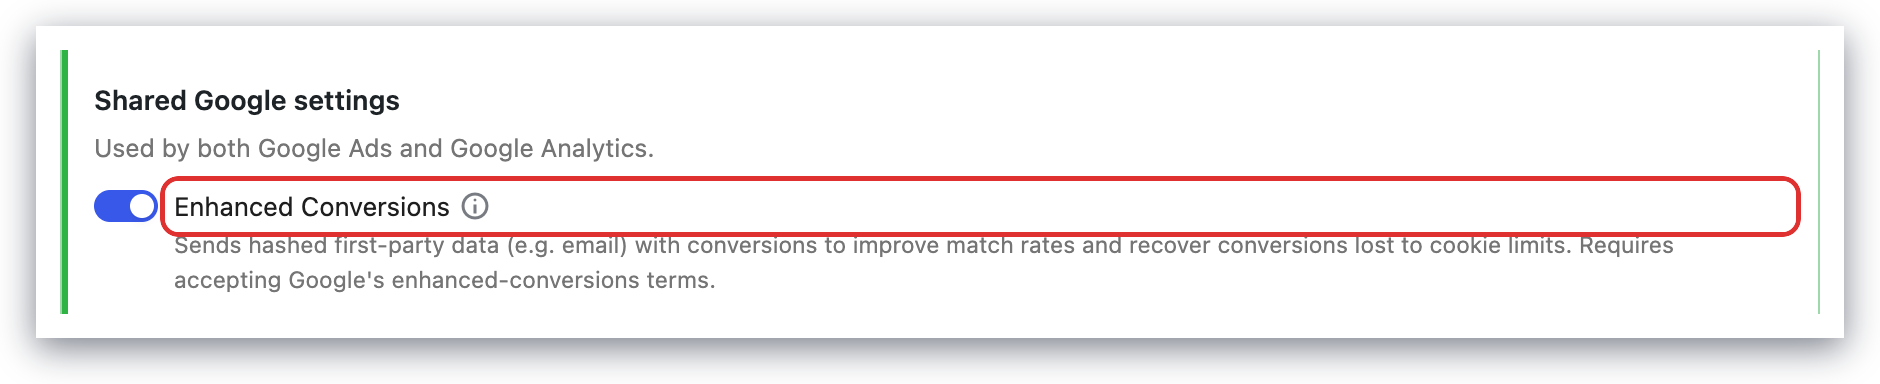
Enhanced Conversions is a feature that can improve the accuracy of your conversion measurement. It supplements your existing conversion tags by sending hashed first-party conversion data from your shop in a privacy-safe way.
Setup
Setup instructions:
-
Enable Google Enhanced Conversions in the Pixel Manager.
-
Activate Enhanced Conversions in your Google account.
This can be done either in Google Ads and/or GA4.
A. Activation in GA4: https://support.google.com/analytics/answer/14078702
B. Activation in Google Ads: https://support.google.com/google-ads/answer/9888656
Validate your implementation
To verify if your enhanced conversions implementation is working correctly, navigate to your conversion page (you may have to complete a test order to do this), and follow these steps.
- Right click on your web page.
- Select Inspect.
- Select the Network tab.
- Enter your conversion ID or conversion label into the search bar.
- Find the network request that's going to "googleadservices.com/pagead/conversion/" (or "google.com/pagead/1p-conversion/" on some browsers).
- In the Headers part of the Network request, scroll to “Query String Parameters”. Here, you should find that there is a parameter “em” with a hashed string as the value. If you see the "em" parameter, this means that the enhanced conversions tag is correctly picking up and hashing the enhanced_conversion_data object.

Google Tag Gateway for advertisers
This feature is available for all users of the free and the Pro version from version 1.48.0 and up. The built-in local proxy is available from version 1.53.0 and up.
Google Tag Gateway for advertisers lets you deploy a Google tag using your own first-party infrastructure, hosted on your website's domain. By serving tags from your own domain, you can significantly improve the accuracy and resilience of your measurement signals. According to Google, advertisers who configured Google Tag Gateway for advertisers saw an 11% uplift in signals. Read more about the Google Tag Gateway for advertisers here.
How it works
The Pixel Manager includes a built-in local proxy that makes setting up the Google Tag Gateway simple — no external CDN or special server configuration required. Just set a measurement path in the Pixel Manager settings, and you're done.
If you want to reduce server load, you can optionally use Cloudflare, which handles all requests at the CDN level — meaning no requests hit your server at all.
Automatic handler detection: The Pixel Manager automatically detects the best available handler and uses it in the following priority order:
| Priority | Handler | How it works | Performance |
|---|---|---|---|
| 1 | CDN Proxy (Cloudflare) | Requests handled at CDN edge, no server load | ⚡ Fastest |
| 2 | Standalone Local Proxy | Standalone PHP file, bypasses WordPress core | 🚀 Fast |
| 3 | WordPress Proxy | WordPress core request processing | 🐢 Slower |
Automatic fallback: If the CDN proxy (Cloudflare) is not available, the Pixel Manager automatically falls back to the standalone local proxy. If that fails, it falls back to the WordPress proxy. If for any reason none of these work, the Pixel Manager falls back to the standard Google CDN. This ensures your tracking is never impaired.
When you enable or disable a CDN proxy (such as Cloudflare), it may take up to 24 hours before the Pixel Manager detects the change. The handler detection is cached for performance. During this period, the Pixel Manager will continue using the previously detected handler.
The Google Tag Gateway for advertisers doesn't route all traffic through your domain. It will still use the Google domain for some traffic. Most events will be routed through your domain. (This is documented by Google here. Screenshot).
Basic setup (local proxy)
Setting up the Google Tag Gateway is simple:
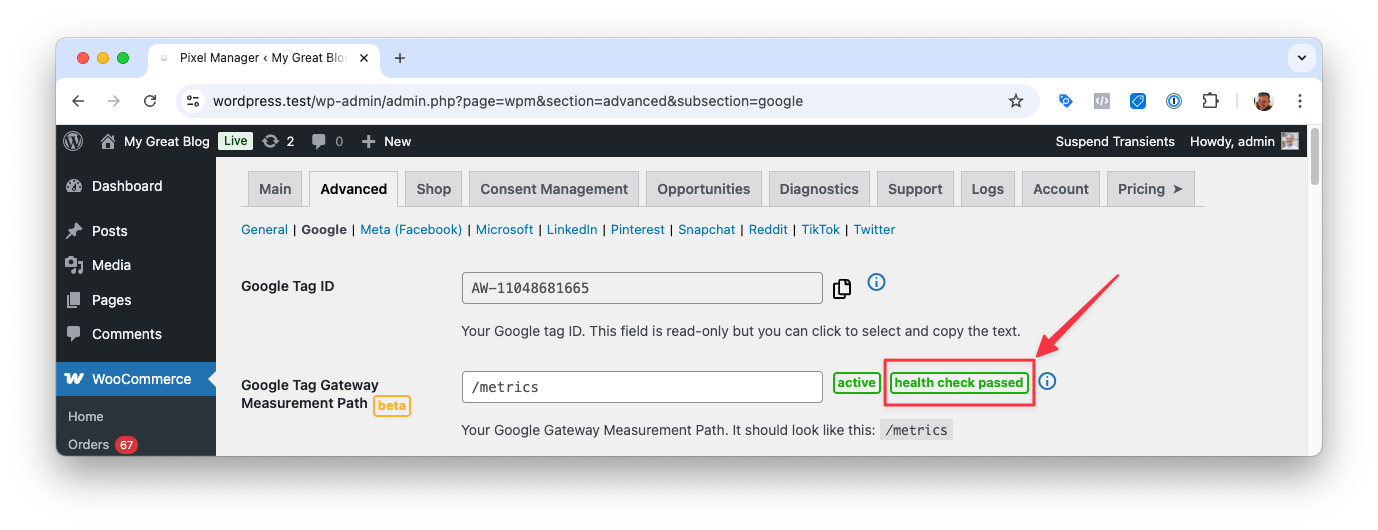
- In the Pixel Manager, open Tracking Pixels → Google (Ads & GA4) and locate the Tag Gateway measurement path field (under Show advanced settings).
- Choose a path that is not already in use on your site. For example,
/metrics. - Save the settings.
Done! The Google Tag Gateway for advertisers is now active on your website using the built-in local proxy.
The Pixel Manager uses a standalone proxy by default, which runs as a standalone PHP file and bypasses WordPress entirely. This means each tracking request uses minimal memory (~1-2 MB) compared to WordPress core (~15-25 MB).
For high-traffic sites or budget hosting, consider using the Cloudflare setup instead, as it handles all requests at the CDN level without touching your server at all.
Optional: Setup using Cloudflare
If you want to reduce server load even further, you can use Cloudflare to handle all Google Tag Gateway requests at the CDN level. This is optional but recommended for high-traffic sites.
Cloudflare must be set up in proxy mode (orange cloud enabled). If you are using Cloudflare in DNS-only mode (grey cloud), the Google Tag Gateway for advertisers will not work through Cloudflare's native integration.
- In the Pixel Manager, open Tracking Pixels → Google (Ads & GA4) and locate the Tag Gateway measurement path field (under Show advanced settings).
- Choose a path that is not already in use on your site. For example,
/metrics. - Copy the path.
- Go to your Cloudflare account: https://dash.cloudflare.com/
- If you have multiple accounts, select the account that you want to use.
- Don't select a specific domain yet. Just select the account. On the left side, you will see a menu. Click on Tag Management > Google Tag Gateway.
- Then click on the domain you want to set up the Google Tag Gateway for advertisers for.
- Click the Configure button.
- Paste the path you copied from the Pixel Manager into the Measurement Path field.
- Go back to the Pixel Manager and copy the Google tag ID.
- Go back to Cloudflare and paste the Google tag ID into the Google tag ID field.
- Keep the rest of the settings as they are. Don't enable
Set up tag - Click the Save button.
Done! The Google Tag Gateway for advertisers is now set up to use Cloudflare.
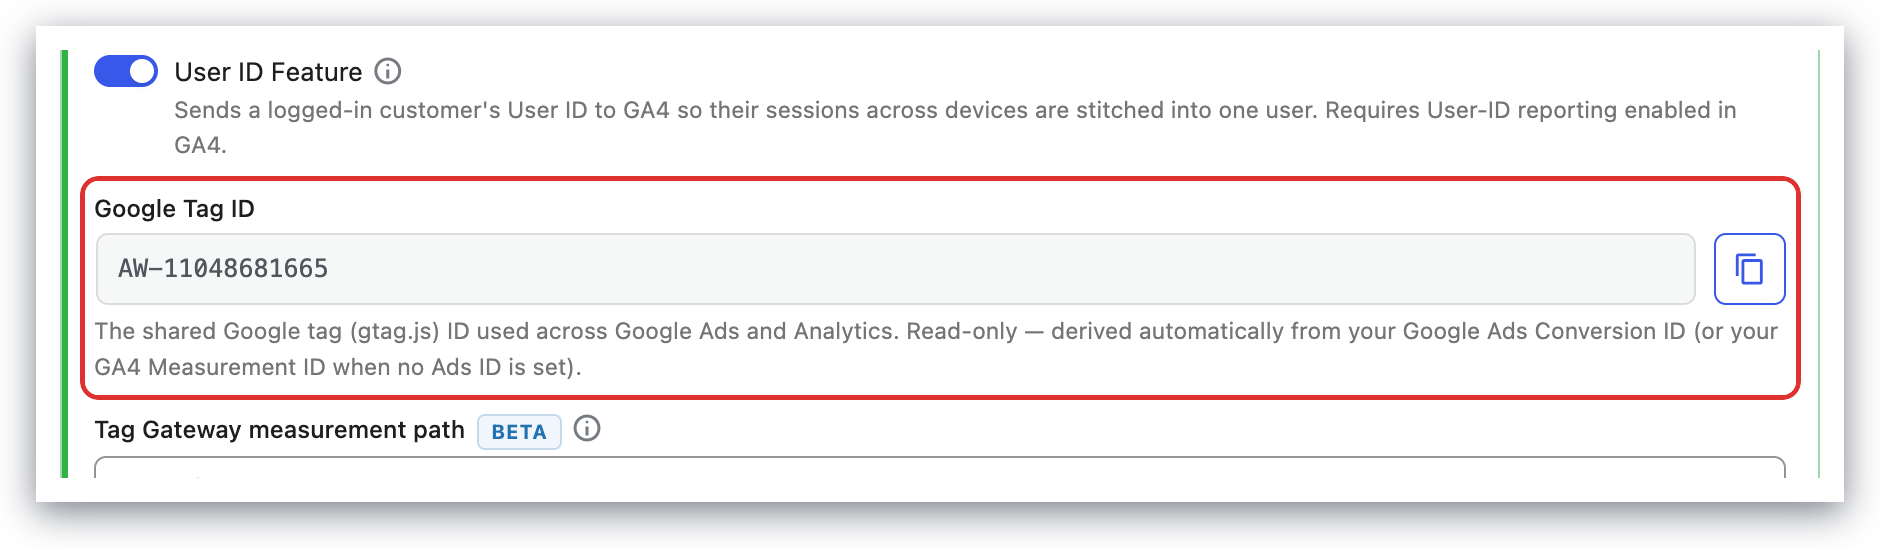
Google tag ID
The Pixel Manager will provide you with a Google tag ID. This is the ID that you need to use in your CDN, load balancer, or web server. You can find the Google tag ID in the Pixel Manager under Tracking Pixels → Google (Ads & GA4) in the Google Tag ID field (under Show advanced settings).
The Google tag ID may look different depending which Google products you have activated in the Pixel Manager.
If you need to override the Google tag ID in the Pixel Manager, you can do this using the following filter: Google tag ID filter.
If you ever change the Google settings and disable/enable Google Ads or GA4, check if the Google tag ID is still correct. If you're using Cloudflare, you'll need to update it there as well.
Measurement path
You must reserve a path on your website domain for serving the tag. This path is set in the Pixel Manager under Tracking Pixels → Google (Ads & GA4) in the Tag Gateway measurement path field (under Show advanced settings). If you're using Cloudflare, you'll also need to set the same path in Cloudflare.
Choose any path that isn't already in use on your site. To reduce the likelihood of conflicting with a path already on the site, you can choose any combination of letters and numbers, or if you want a more readable path, you can choose to use a word such as /metrics, /securemetric, /analytics, or any other word you want.
Requirements for the path:
- The path must not already be in use on your site.
- The path must not be the root path
/. - It may not exceed 100 characters.

Health Check
The health check in the settings shows if the Google Tag Gateway is set up correctly.
Don't worry if the health check fails. The Pixel Manager will automatically fall back to the regular Google tag. This means your tracking will keep working, but you won't benefit from the Google Tag Gateway until the issue is resolved.
Once the issue is fixed, simply refresh the page in the Pixel Manager and the health check will be re-run.
The health check only works if outgoing requests are allowed. If something is blocking outgoing requests, such as custom configuration, a plugin, or your hosting provider, the health check may show as failed even if everything is set up correctly. You can do the health check manually by going to the following path in your browser: https://yourdomain.com/your-measurement-path/healthy. If the page shows the text ok, the Google Tag Gateway is working correctly.
Verify
There are several ways to verify if the Google Tag Gateway for advertisers is working correctly.
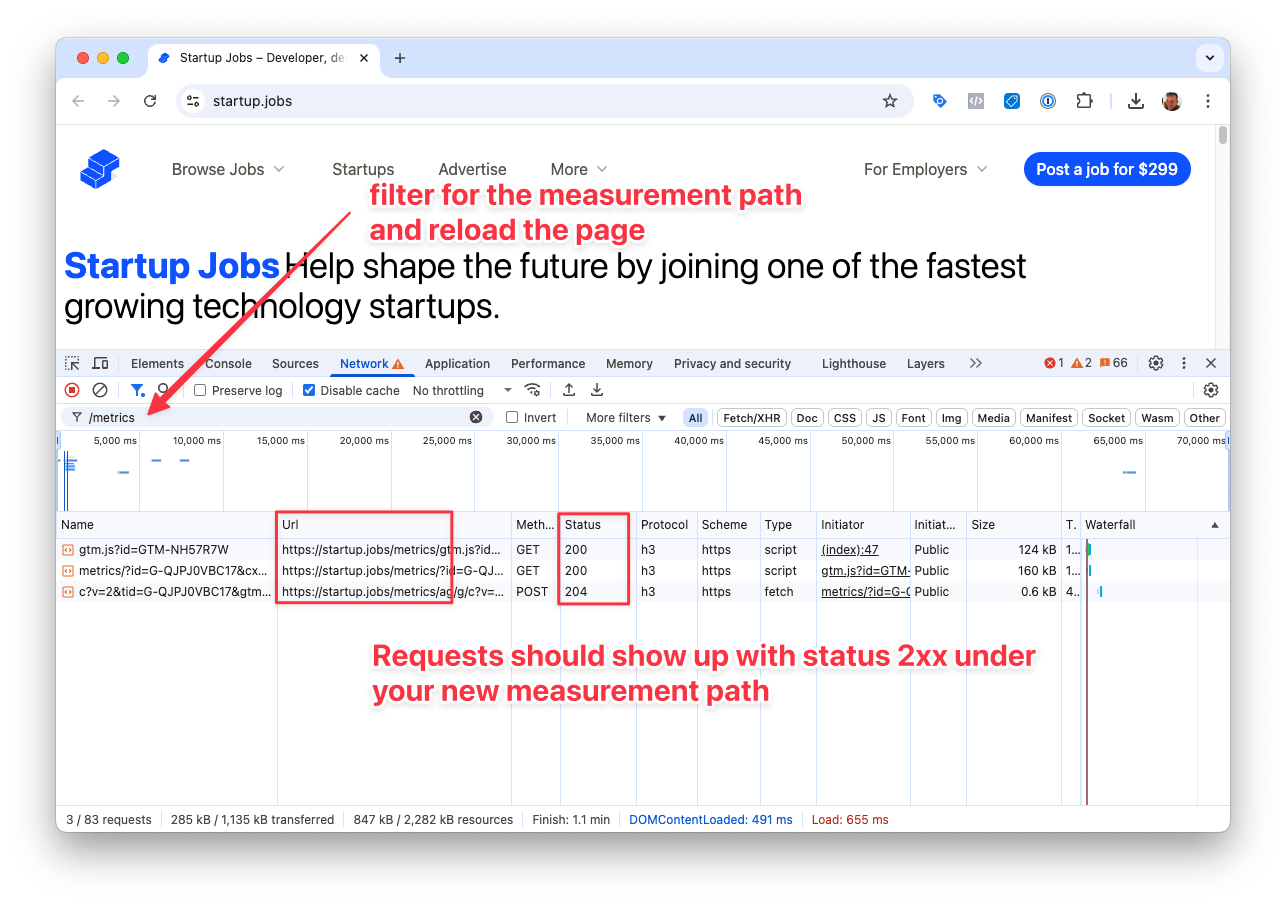
Check network requests
Open the developer tools in your browser and check the network requests. Set a filter for the path you set in the Pixel Manager. For example, if you set the path to /metrics, set a filter for /metrics. Then reload the page and check if any requests are going to the path you set in the Pixel Manager.
Use the Pixel Manager Console Debugger
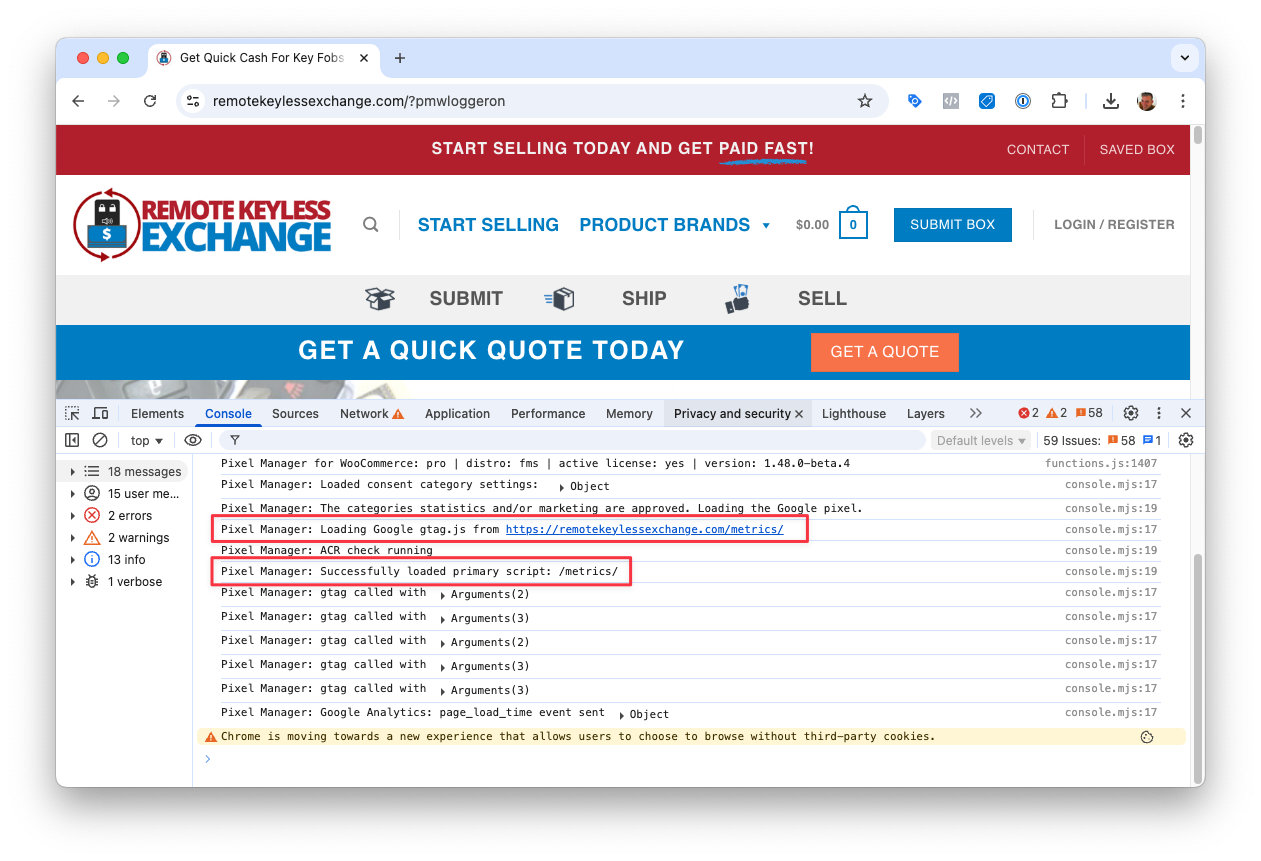
Open your website and append ?pmwloggeron to the URL like so https://yourdomain.com/?pmwloggeron. This will enable the Pixel Manager Console Debugger.
Then open the developer tools in your browser and check the console. You should see two messages.
The first one shows from which path the Google tag is loaded like this: Pixel Manager: Loading Google gtag.js from https://yourdomain.com/metrics.
The second message shows if the script was loaded successfully like this: Pixel Manager: Successfully loaded primary script: /metrics/.
If you see both messages, the Google Tag Gateway for advertisers is working correctly.
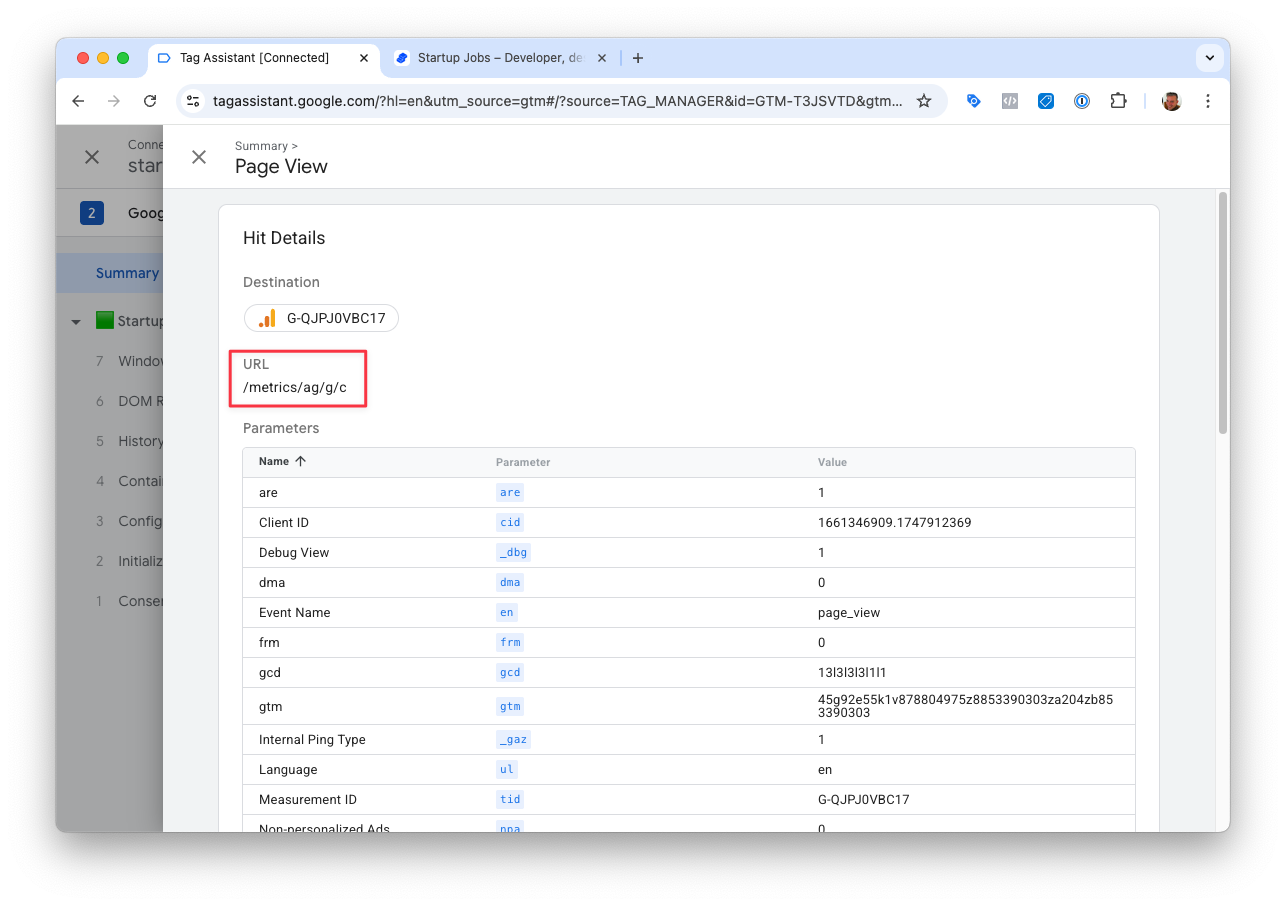
Google Tag Assistant
You can also use the Google Tag Assistant to verify if the Google Tag Gateway for advertisers is working correctly.
Open the Google Tag Assistant https://tagassistant.google.com/ and click on the Add domain button. Enter your domain and click Connect. Your domain will automatically be loaded in a separate tab.
Find a PageView event in the list and click on it.
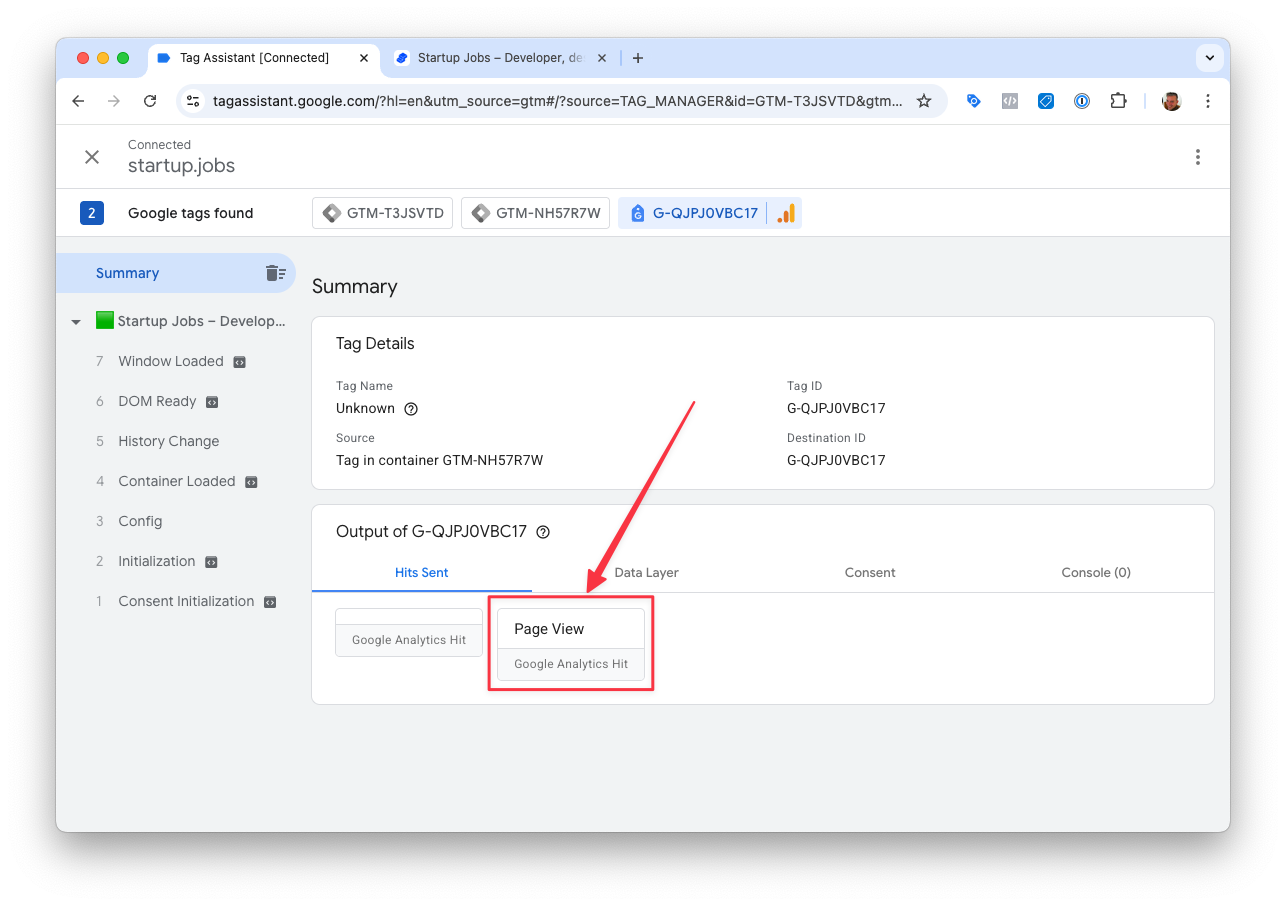
It will show that it was loaded through your measurement path. (e.g. /metrics/).