Meta (Facebook)
How to configure the Meta (Facebook) pixel in the Pixel Manager: finding your pixel ID, running several pixels, the Conversions API, advanced matching, catalogue microdata and domain verification.
Meta Events Manager has several switches that let Meta collect events by itself, next to the ones the Pixel Manager sends. Two of them are a common cause of duplicated and wrongly valued conversions. Which to turn off, which to leave alone: Meta Events Manager settings.
Find the pixel ID
Follow this guide by Meta (Facebook) Create and install a Meta (Facebook) pixel
Multiple Meta (Facebook) pixels
Available in version 1.64.0 and above
The Pixel ID field in the settings holds one pixel, and for the vast majority of shops that is all that is needed. If you run campaigns from several Meta (Facebook) ad accounts, the recommended solution is still to share one pixel with the other ad accounts instead of installing a second one, because a single data source keeps all conversions, audiences and learnings together.
When sharing is not possible, for example because an agency cannot be added to your Business Manager, a partner brand needs its own data source, or you are running an old and a new pixel in parallel during a migration, additional pixels can be added programmatically with the pmw_facebook_pixel_identifiers filter.
Here is what the Pixel Manager does with those pixels:
- Browser events: every pixel is initialized separately, and every browser event, from page views to add to cart and the purchase, is sent to all of them. There is no event or page that only reaches the main pixel.
- Conversion API (Pro): an additional pixel that carries its own Conversion API access token also receives all server-side events, including purchases, the generic server-side events and the subscription lifecycle events, each with its own optional test event code. A pixel without a token receives browser events only.
- Server-Side Proxy (Pro): if the Server-Side Proxy is active, the additional pixels are part of the configuration that the Pixel Manager syncs to SweetCode Cloud, and the proxy sends each event to every pixel.
- Deduplication: browser and server-side events share one event ID per event, and Meta deduplicates per pixel. So each pixel records every event exactly once, no matter how many pixels you add.
- Advanced matching and consent: the advanced matching identifiers and your consent settings apply to all pixels alike. Access tokens stay on the server and are never exposed in the browser.
- Diagnostics: the debug info and the Meta Business Category Event Restrictions and Meta Event Setup Tool checks cover every configured pixel, not only the one from the settings.
Each additional pixel multiplies the requests to Meta. A second pixel doubles the browser requests, and if it carries a Conversion API token, it also doubles the server-side requests and the load they cause on your server. Only add the pixels you really need, and consider the Server-Side Proxy to move the server-side load off your shop server.
The mobile bridge for hybrid mobile apps (mobileBridge) is only set up for the pixel that is configured in the settings.
Implemented events
| Meta (Facebook) event | e-commerce | WooCommerce | implemented |
|---|---|---|---|
| Add payment info | ✔️ | ✔️ | ✔️ |
| Add to cart | ✔️ | ✔️ | ✔️ |
| Add to wishlist | ✔️ | ✔️ | ✔️ |
| Complete registration | |||
| Contact | |||
| Customise product | |||
| Donate | |||
| Find location | |||
| Initiate checkout | ✔️ | ✔️ | ✔️ |
| Lead | |||
| Purchase | ✔️ | ✔️ | ✔️ |
| Schedule | |||
| Search | ✔️ | ✔️ | ✔️ |
| Start trial | |||
| Submit application | |||
| Subscribe | ✔️ | ✔️ | ✔️ (pro) |
| View content | ✔️ | ✔️ | ✔️ |
Business category event restrictions
Meta blocks conversion events for pixels that belong to a business category it treats as sensitive. Health and wellness is the most common one: medical devices, medical alert systems, supplements, pharmacies, clinics, therapy services and similar shops are affected.
For a restricted pixel, Meta's own fbevents.js library silently discards events such as AddToCart, InitiateCheckout, AddPaymentInfo and Purchase, while PageView and ViewContent keep working. There is no error message, and the Conversions API does not bypass the restriction. This looks like a plugin problem but cannot be fixed on the website side. It has to be resolved in Meta Events Manager.
The Pixel Manager (1.64.0 and higher) detects this and names the blocked events in the browser console and in the debug report under Meta Business Category Event Restrictions.
Full diagnosis and solution: Meta silently drops AddToCart, InitiateCheckout and Purchase (restricted business category).
Meta (Facebook) Conversion API (CAPI)
Available in version 1.10 and above
This is a feature only available for users of the Pro version. Get the Pro version here.
The Meta (Facebook) Conversion API (CAPI) is Meta's (Facebook's) server side event reporting mechanism. It complements the browser pixel and helps to measure events that under certain circumstances can get lost by the browser pixel. Since accurate event reporting is helpful for campaign optimization, Meta (Facebook) CAPI is an important tool for performance marketers. You'll find more info about CAPI in the official documentation here and here.
Using the Meta (Facebook) Conversion API (CAPI) will increase the load on your server. Regular Meta (Facebook) pixel implementations don't require interaction with the shop server on every Meta (Facebook) event. The browser sends all of those directly to Meta (Facebook). But, the Meta (Facebook) Conversion API is different. In addition to every browser API call each event (AddToCart, ViewItem, Purchase, etc.) has also to be sent by the shop server to the Meta (Facebook) servers. This leads to a significantly higher load on the server. If you're required to use the Meta (Facebook) Conversion API and your server comes to its limits (increased rate of server errors) then you will have to upgrade your server capacity.
You can offload Meta CAPI events from your WooCommerce server to the edge using the Server-Side Proxy. This reduces server load and improves tracking accuracy by routing events through a first-party subdomain.
Setting up Meta (Facebook) CAPI
-
Get a Meta (Facebook) CAPI access token: instruction
-
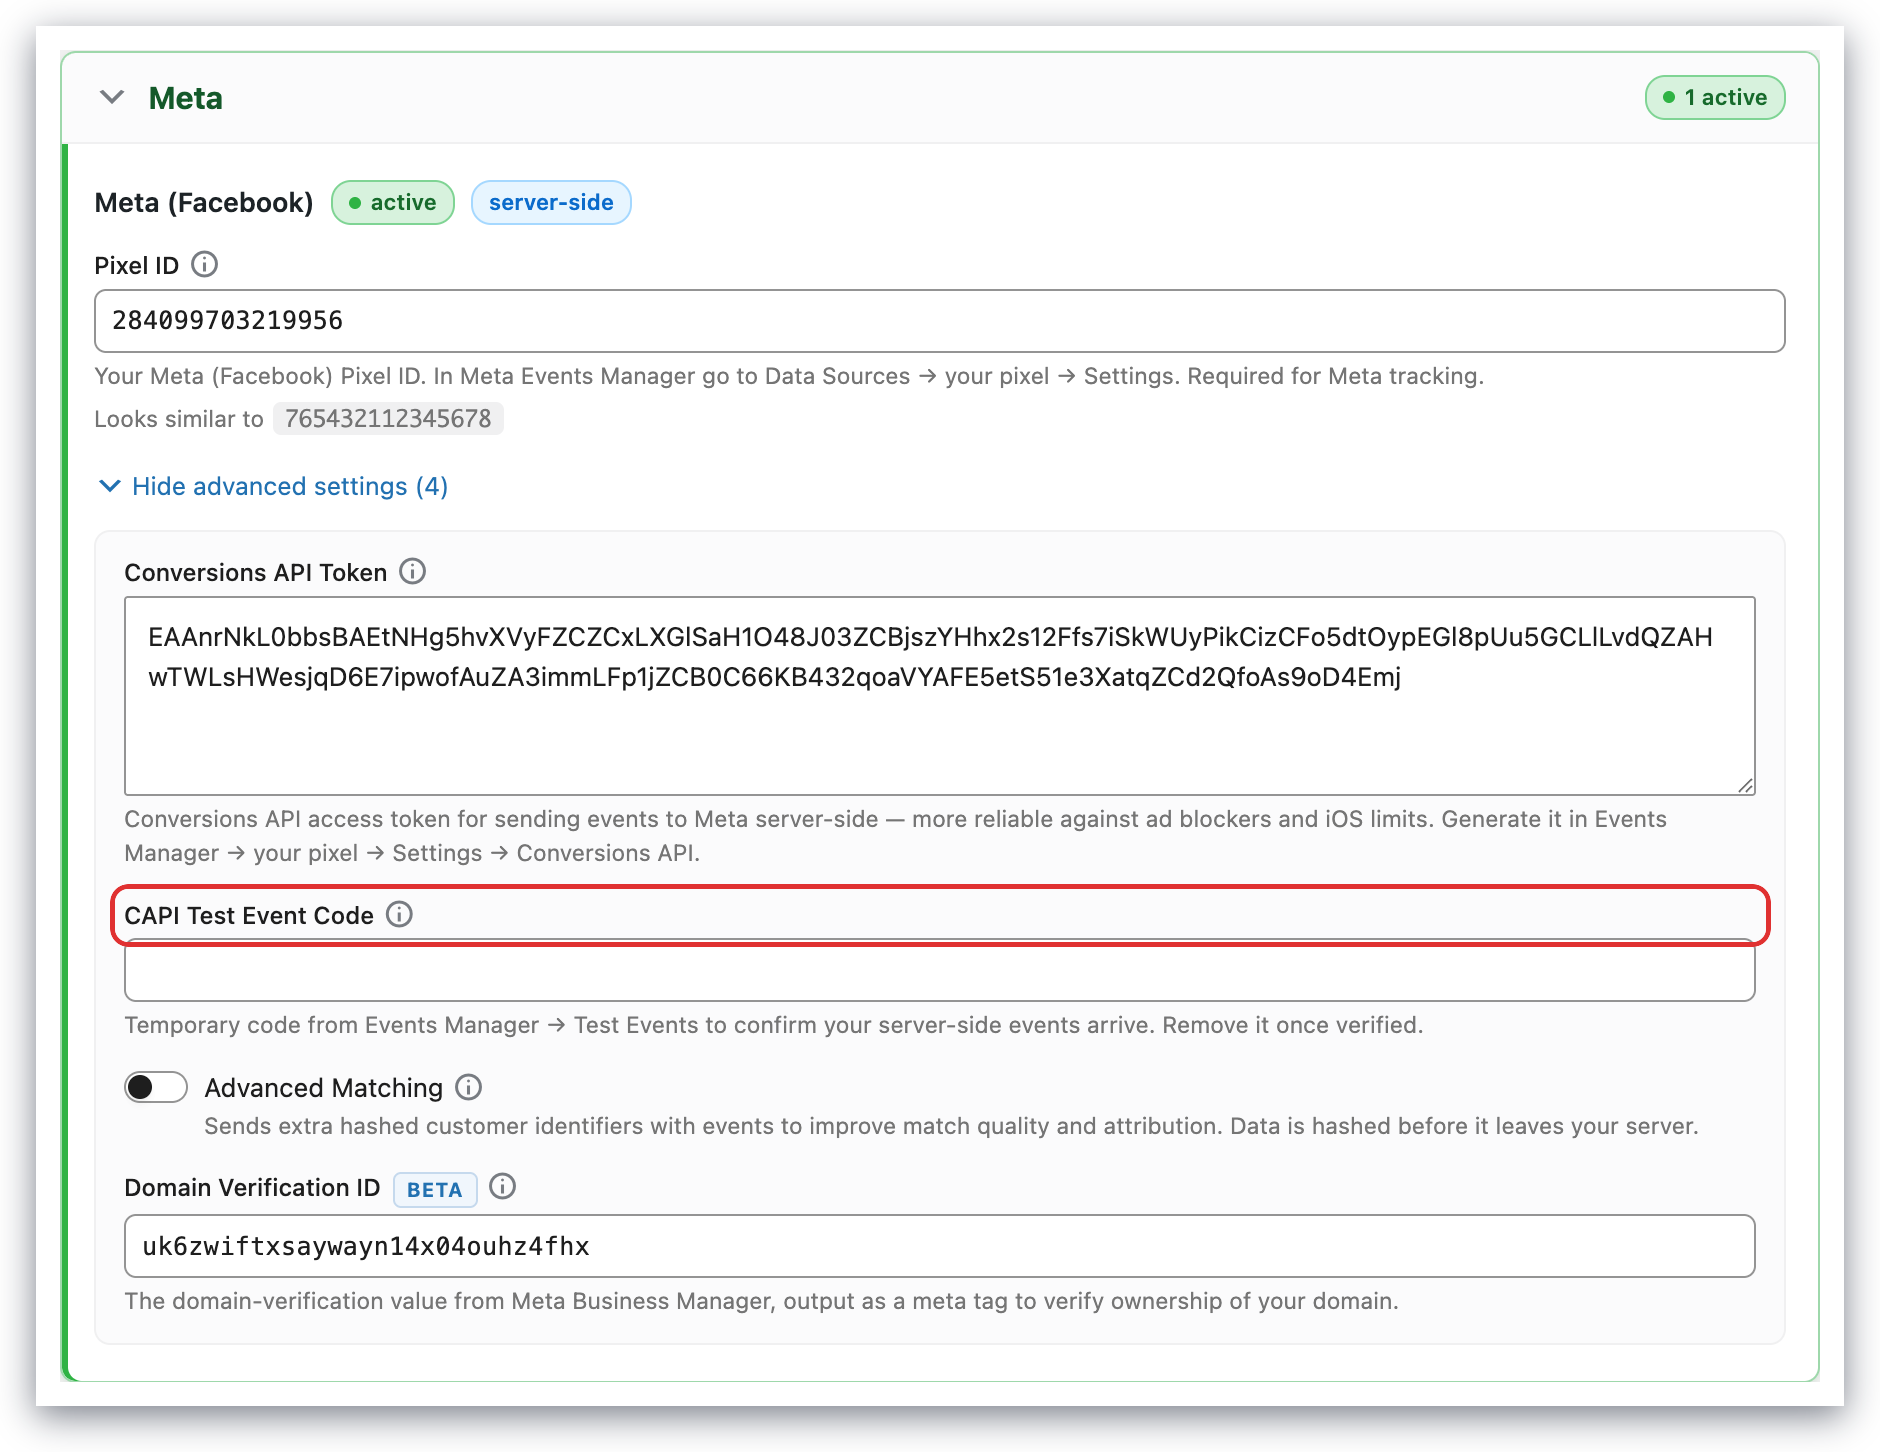
In the Pixel Manager, open Tracking Pixels → Meta and paste the access token into the Conversions API Token field.
Once the access token has been saved into the configuration, Meta (Facebook) CAPI is active.
Meta offers its own server-side relay, the Conversions API Gateway (called OpenBridge in the pixel configuration). It works differently from the Pixel Manager's Conversions API: it copies every event your browser pixel fires and delivers it to Meta a second time through the server channel. Because it can only mirror what the browser already sent, it adds nothing for the orders where the browser pixel is blocked, which are the very orders server-side tracking exists to recover.
Running both leaves two server-side senders on one pixel and makes the intake numbers in Events Manager hard to read. Check Events Manager → Settings → Integrations for a Conversions API Gateway entry and disconnect it. Full diagnosis: Meta's Conversions API Gateway sends a second server event for every browser event. The Gateway is one of several dataset settings worth checking once: Meta Events Manager settings.
User Transparency Settings
By default, the Pixel Manager sends the minimum required amount of data to Meta (Facebook) with each CAPI hit. (Read more about the
fbpcookie here). You can change those settings in accordance with your shop policy and the laws under which your shop has to operate.
Why the first server-side event can be sent with a short delay
If you watch the network traffic very closely, you may notice that the very first server-side (CAPI) event of a brand-new visit can be sent with a small delay, up to one second, while every other event is sent right away. This is intentional, and it is worth understanding why.
When the Meta pixel loads in the browser, Meta's own script (fbevents.js) creates a small first-party browser cookie called _fbp. This cookie is one of the strongest matching signals Meta has: it lets Meta connect a server-side event back to the same browser that Meta already recognizes, which directly improves your Event Match Quality and attribution. The Pixel Manager reads this cookie and attaches it to the server-side events it sends to Meta.
On almost every page view, the _fbp cookie already exists, so there is no delay at all. The cookie is only missing in two situations:
- The very first page view of a brand-new visitor, in the brief moment before Meta's script has finished setting the cookie.
- Sessions where the browser does not keep the cookie, for example a fresh Chrome Incognito window, or a browser with strict privacy settings or certain ad blockers.
In those cases, the Pixel Manager waits up to one second for the cookie to appear before sending the server-side event, so it can include the _fbp identifier and give Meta the best possible match. This wait only ever affects the invisible server-side (CAPI) send. It never holds back the browser pixel or any other tracking. Your browser-side events, page view, add to cart, purchase, and so on, always fire immediately.
A few points worth knowing if you track this meticulously:
- The wait is capped at one second. If the cookie still has not appeared by then (for example because the browser blocks it entirely), the server-side event is still sent, just without the
_fbpidentifier. No event is ever dropped because of this. - The delay is a one-time thing per visit. Once the
_fbpcookie exists, every following server-side event is sent instantly with the cookie included. - For deduplication and attribution, missing
_fbpon a single first event is harmless. Meta matches the browser event and the server event using a shared event ID, and the cookie is present on the rest of the visit.
In short: the only thing that can be affected is the timing of the first server-side event in a session where the Facebook cookie is not yet (or not at all) available, and even then the event is always sent. This is a deliberate trade-off in favor of the highest possible match quality for Meta CAPI.
Testing
The test event code filter hast been deprecated and replaced by a settings field in the plugin settings from version 1.25.1
The test_event_code can suddenly change. So make sure to double-check if the right one is set for each testing session.
In order to test the events using the Test Events Tool the Pixel Manager offers a settings field to save the latest test event code, in the Pixel Manager under Tracking Pixels → Meta in the CAPI Test Event Code field.
Server-side events only reach the Test Events window when they carry a test event code, and the field is deliberately empty in production. So a normal order will never appear in Test Events, and that is expected rather than a sign of a missing event. Set a code for the duration of the test, then clear it again. To confirm a single live order instead, use Events Manager → your event → Event deduplication; the Sampled activities tab is a sample and regularly shows nothing at all. More on reading those views: How to read Meta's browser-received and server-received event counts.
In case you suspect that something is wrong with the API call to the Meta (Facebook) server, or you simply want to see the response from the Meta (Facebook) server, the following filter is for you. It will output the API request response into the WooCommerce log file for Meta (Facebook) CAPI. You can view the log file under WooCommerce > Status > Logs > wpm-facebook-capi. Or you can open the file on the server. It is saved under /wp-content/uploads/wc-logs/.
add_filter('pmw_send_http_api_facebook_capi_requests_blocking', '__return_true');
Data Processing Options
Data Processing Options are a way to control how the data is used in the Meta (Facebook) systems and better support shop owners with their California Consumer Privacy Act (CCPA) compliance efforts. You'll find more information in the official documentation.
The following filter is a simple way to add the necessary fields to each CAPI hit. Below settings are just an example. You need to make sure that you are using settings which are inline with your shops' policy regarding CCPA.
add_filter('pmw_facebook_capi_data_processing_options', function () {
    return [
        'data_processing_options'         => ['LDU'],
        'data_processing_options_country' => 1,
        'data_processing_options_state'   => 1000,
    ];
}, 10, 2);
Meta (Facebook) Advanced Matching
When this option is enabled, the Pixel Manager will additionally send several visitor identifiers to Meta (Facebook), such as IP address, shop ID and email. It is optional and will increase the likelihood that Meta (Facebook) will match the hit to an existing Meta (Facebook) user profile. For security reasons the Pixel Manager will hash the data where possible. More info about hashing and visitor identifiers here and here.
Send Facebook Login ID
Available in version 1.65.0 and above
This is a feature only available for users of the Pro version. Get the Pro version here.
Right below Advanced Matching sits Send Facebook Login ID. When it is enabled, the Pixel Manager adds Meta's fb_login_id to the Conversions API events of customers who signed in to your shop with their Facebook account. Unlike the hashed email address, that identifier is deterministic: it was issued by Meta in the first place, so there is no matching guesswork involved.
The Pixel Manager does not add social login to your shop. It reads the identifier out of the social login plugin you already run, and seven of them are supported. The setting is off by default, follows the Advanced Matching setting, and only helps when the Facebook app of your login plugin lives in the same Meta Business Manager as your pixel.
Full details, the list of supported plugins and the honest picture of what it does for your Event Match Quality score: The Facebook Login ID.
Microdata Tags for Catalogues
This feature has been deprecated from version 1.25.1 and upwards.
The reason is that Facebook still doesn't fully support product variations with microdata tags. We have been in communication with Facebook support about this. But the parsing for product variations through microdata tags still has not been implemented by Facebook. Therefore we decided to remove that feature for now. It will stay active and will keep working on shops that have activated microdata tags in the Pixel Manager.
We will bring back microdata tags as soon as Facebook implements a proper way to handle product variations.
In the meantime, please use one of the various feed plugins to upload the Facebook product feed. Most, if not all of them fully support product variations.
A very convenient way to populate the product catalog within Meta (Facebook) is using microdata tags. It uses the Meta (Facebook) pixel and additional tags on product pages to upload the product data to Meta (Facebook). Each time a person visits a product page the product data is uploaded and updated. Additionally, to that Meta (Facebook) crawls the website and retrieves remaining data from the website. More information about this over here.
In comparison to creating a dedicated feed, this method has several advantages:
- It is much simpler to set up. Therefore, less errors can happen.
- Creating the tags takes only a low amount of server resources.
- The tags are cache friendly. No additional cache settings need to be made.
On the other hand dedicated feed plugins have several disadvantages:
- Feed plugins sometimes fail running. E.g. if WP Cron has problems.
- They can run into timeout issues for shops with many products.
- They are harder to debug.
- If no proper cache exclusions are being set, the server will always deliver cached versions of the feed.
As always, using one or the other method has trade-offs. Using microdata tags relies on constant traffic to the product pages or the Meta (Facebook) crawler to crawl the products in order to keep an updated catalog. If this is not a big concern for the person running the ads, then microdata tags are the better solution.
Setup
- Within the plugin open the advanced settings for Meta (Facebook) and activate the Microdata Tags for Catalogues.
- Head over to your Meta (Facebook) commerce manager and select your catalogue.
- Open the Catalogue tab and select Data sources.
- (Select Add items.) If a drop-down appears, select Add multiple items.
- Select Pixel and select Next.
- Select the pixel you want to connect and then Next.
- If you wish, select Add filters to limit the items that your pixel updates. Select Next. (Usually its best not to limit the items. Therefore, don't use the filter unless you have a good reason to.)
- Select Add trusted websites and enter the website domains that you trust to use as sources for your item information. Don't include the http:// or www. For example, enter jaspersmarket.com. If you want your pixel to use multiple country-specific websites, enter each one. Select Save and then Next.
- Select your default currency. This is the currency that your catalogue will use if prices for items on your website don't include a 3-letter ISO 4217 currency code, such as USD or EUR. Select Next.
Your connected pixel now appears in Data sources. It may take up to 24 hours to be ready. When the pixel is ready, it updates your catalogue each time someone interacts with a product page on your website, typically within 15 minutes of the interaction. If you remove any items from your website, they'll be deleted from your catalogue after seven days.
Supported Events
Here's a list of supported events.
Domain Verification
Meta (Facebook) may require to verify your domain in order to use the Meta (Facebook) Conversion API. You can do this by adding a meta tag to the header of your website. The Pixel Manager will automatically add the required meta tag to the header of your website. In general it is recommended to verify your domain in order to use the Meta (Facebook) tracking features fully.
- Go to your business settings.
- Select Brand safety and then Domains.
- Select Add and enter your domain name.
- Select Add domain.
- Select Meta-tag verification and copy the meta tag.
- In the Pixel Manager, open Tracking Pixels → Meta and paste the meta tag into the Domain Verification ID field.
- Select Verify.
- Flush the cache of your website. The meta tag needs to be available on the front end of your website in order for Meta (Facebook) to verify it.
- Once the domain is verified, you can use the Meta (Facebook) Conversion API.

