Troubleshooting
First Step: Use the Console Logger
Before troubleshooting manually, enable the Console Logger to see exactly what's happening with your tracking:
- Add
?pmwloggeronto your page URL - Open browser DevTools (F12) → Console tab
- Look for Pixel Manager output showing events, pixel calls, and errors
The Console Logger will immediately show you:
- ✅ Which events are firing (or not firing)
- ✅ What data is being sent to each pixel
- ✅ Consent status and script loading issues
- ✅ Detailed error messages
Complete Console Logger Guide →
General
Where can I report a bug or suggest improvements?
Please post your problem in the WordPress support forum for this plugin: Support forum
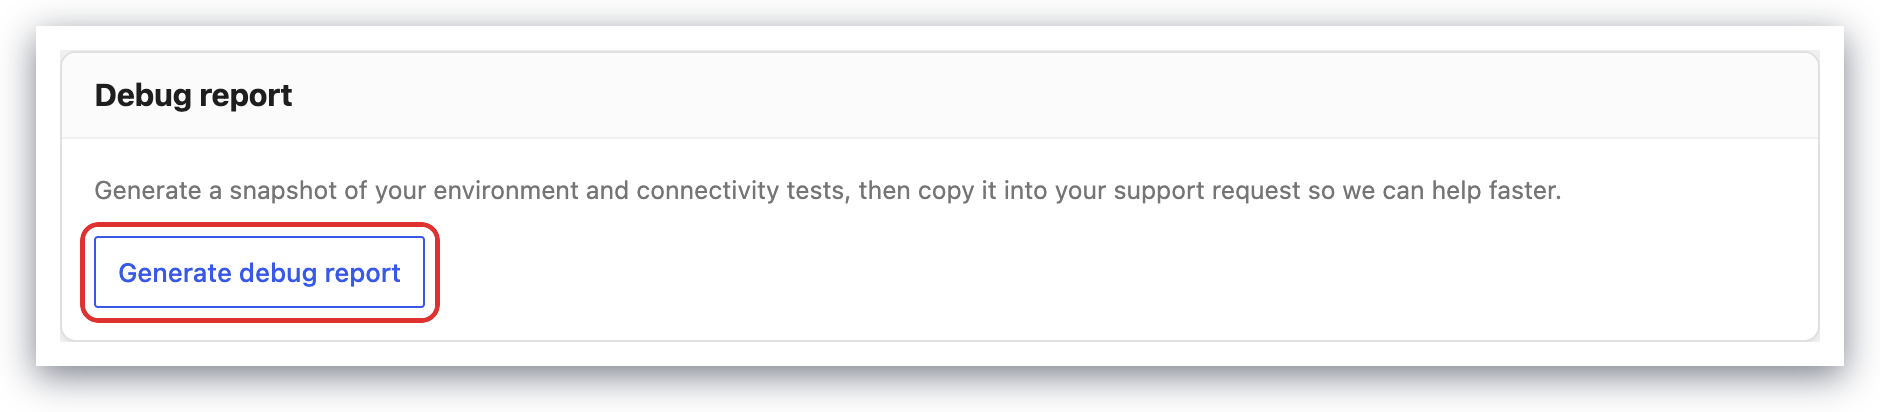
Alternatively, you can send a request to [email protected]. If you do, in the Pixel Manager open Support → Debug report, click Generate debug report, then copy and paste it into the email.
The most common issues in case the pixels don't work
- Caching: If you run some caching layer, the server might still serve cached versions of the pages. You will need to delete the cache.
- Minification, combination, and concatenation: Some minification and combination plugins mangle up the injected JavaScript code to an extent, that the tracking pixels stop working. You will need to turn minification, combination, and concatenation off and try again.
If only some events are missing while others still work, the cause is usually more specific than the two above. For the Meta pixel in particular, if PageView arrives but AddToCart, InitiateCheckout and Purchase never do, see Meta silently drops AddToCart, InitiateCheckout and Purchase (restricted business category). In that case, Meta is blocking the events and no website-side change can fix it.
Is pmw_get_cart_items slowing down my website?
Short answer: No
Long answer:
First some information on what pmw_get_cart_items is doing.
While a visitor is browsing a shop he might add some products to the cart. Each time he uses the minicart to modify his selection, by adding or removing products, we need to make sure to have all product information handy in order to send pixel events with all relevant data to Google, Meta (Facebook), etc. Unfortunately, it is not possible to include this information on page load within the HTML code, because caching mechanisms could serve outdated data to the browser. That's why we need a mechanism like
pmw_get_cart_itemsthat will fetch all the current product data for the minicart from the server.
And now to the question if pmw_get_cart_items is slowing down the website.
Some users have noticed in the network tab of their browsers that the pmw_get_cart_items call adds one more request, which on slow servers can take even more than a second to fulfill. It is using the standard WordPress Ajax function to fetch the product data.
But is this not slowing down the website?
The pmw_get_cart_items call happens after the browser has signaled the load event, which happens after all content has already been successfully loaded.
The load event is fired when the whole page has loaded, including all dependent resources such as stylesheets and images.
Reference: Mozilla MDN Web Docs
PageSpeed measures the loading time of your page starting from the initial request to when the last embedded resource (JS, CSS, images, etc.) has finished loading. So that’s essentially when $(window).load() is triggered.
Reference: Lèse Majesté's answer on Stackoverflow
So the pmw_get_cart_items doesn’t slow down the download or rendering of a WooCommerce shop in any way.
My theme shows a script code on the front end that shouldn't be there
The Pixel Manager uses a script output to track products in a way that works with every caching system.
It outputs that code wrapped in a <script></script> tags which is fully compliant HTML code.
Because the code is wrapped in <script></script> tags the theme should ignore the code and not output it visibly to the front end.
There is nothing we can do from our side. You have to ask the theme developer to update the theme to ignore all code that’s wrapped in <script></script> tags.
Elementor Related Products and Upsell Products Widgets
This has been fixed in version 3.9.0 of Elementor Pro. Please update to that version (or higher).
In its current version the Elementor Related Product and Upsell Product Widgets don't properly process the <script> output created by the Pixel Manager for WooCommerce. It should be hidden and not visible. This is an issue that only can be fixed by the creators of the Elementor Related Products and Upsell Product Widgets as described in the following troubleshooting article.
Luckily there is a workaround for users of the Elementor Related Products Widget. Instead of using the built-in Elementor Related Products Widget, you can use the shortcode [related_products limit="X"]
Similarly, for replacing the Elementor Upsell Products Widget you can use this code published by bekarice: https://gist.github.com/bekarice/a3305c18d32b4de9d8b7
We already have placed a bug report on Elementor's GitHub issue tracker: https://github.com/elementor/elementor/issues/16934
The bug report shows another way for the users to fix the problem, enabling them to keep using the Elementor widgets. But it can't persist over Elementor updates, so you need to keep updating this with every Elementor update. Use it at your own risk.
We'd recommend that you give the issue a thumbs up or add your own comment so that the Elementor developers see how frequently that problem happens and increase the priority of that issue.
We're in direct contact with Elementor, but at the moment we can't say for sure if and when they are going to fix this on their end.
The Purchase Confirmation Page Doesn't Load and Shows a Blank Page
If a blank page shows up when trying to load the purchase confirmation page the reason is typically too low allocated memory. The Pixel Manager runs a few queries on the purchase confirmation page which use more memory than on other pages. If in the shop configuration the memory limit is too low, this problem can occur. The solution is simple. Increase the memory limit in your configuration.
Make sure that the memory limit is well above your maximum memory allocation.
Add one of the following lines to the configuration file wp-config.php
define('WP_MEMORY_LIMIT', '256M');
define('WP_MEMORY_LIMIT', '512M');
define('WP_MEMORY_LIMIT', '1024M');
Here's a support article on WooCommerce that also shows other ways how to increase the memory limit.
The purchase confirmation page loads very slowly when the Pixel Manager is enabled
The Pixel Manager runs a few queries on the purchase confirmation page to evaluate if the customer is a new customer or an existing customer. It also determines different types of customer lifetime values for that customer. Those queries, on some shops, can take a long time to execute.
The simplest way to fix this is to add high-performance indexes to the tables. One of our tests improved the query speed by a factor of 133!
Use the Index WP MySQL For Speed plugin to add those high-performance indexes to your shop too. It will not just help on the purchase confirmation page but on every page of your shop.
Read more about this optimization in our blog article about adding high-performance indexes.
Why I can’t verify my site on Hotjar?
The plugin configuration for Hotjar is really simple. In the Pixel Manager, open Tracking Pixels → Hotjar, paste the Site ID from Hotjar’s tracking code into the Site ID field, and you’re good to go.
However, sometimes, there will be instances where your site can’t be verified. Usually, it’s because of these things:
- Cookie Banner - make sure that you have disabled the cookie banner when verifying your site on Hotjar. This sometimes blocks the cookies coming from Hotjar as well causing it not to verify successfully
- Explicit Consent Mode - having Enable Explicit Consent Mode turned on in the Pixel Manager under Consent → Explicit consent will also not allow cookie tracking on your site. Just like the Cookie Banner, this will also cause your site’s verification to be unsuccessful
- You’re logged in while verifying - You also have to do the verification while you’re logged out on your WordPress Dashboard, so your site will be tracked.
- Server-side caching - Make sure to clear all server-side cache after each configuration so the Hotjar verifier will not load a cached version.
Duplicate jQuery library causes random issues
Problem
The theme, or a plugin, or custom code loads an additional jQuery library that overwrites the events the Pixel Manager hooks into.
WordPress for a long time was shipped with an old version of jQuery. Therefore, some theme developers or shop managers loaded an additional, newer jQuery library in the HTML source. But, if done incorrectly, this would overwrite all events a plugin like the Pixel Manager has hooked into, rendering all event listeners useless.
Luckily WordPress, since version 5.5, is shipped with the most modern jQuery library. This means the additional jQuery library can be safely removed.
Verification
- Open the development console
- Search the entire source code using OPT+CMD+F (on a Mac) for the following string:
jQuery requires a window with a document - If you get two results then the jQuery library is duplicated and is causing issues.
Solution
Remove the additional jQuery library. Keep the jQuery library that WordPress is injecting.
Render issues that show Pixel Manager JavaScript code on the front-end
In rare cases you might run into rendering issues on the front end which visibly show JavaScript code that is injected by the Pixel Manager into the page source.
This typically starts with the following line:
window.pmwDataLayer.products = window.pmwDataLayer.products || {};
There are two known cases where this problem appears.
-
Users of the Elementor Pro widget for related and upsell products. For them, we have an own support article with a workaround: Elementor Render Issue
-
The theme is using a front end JavaScript library which makes a mistake when rendering the code that the Pixel Manager injects into the product templates. The Pixel Manager injects the following three HTML elements into the page source:
<meta>,<input type="hidden">and<script></script>. All those HTML elements are invisible elements by definition and should not be visibly rendered. However, some JavaScript helper libraries don't account for those invisible elements and render some or all of them visibly nonetheless.
This needs to be fixed by the developers of those render libraries. The Pixel Manager cannot work around this issue.
Add-to-cart (or other forms) silently fails when consent is denied
Symptom signature
- A click or form submission (most often add-to-cart, but also custom forms or AJAX flows) does nothing.
- The page reloads or navigates to the same URL with
?_gl=…appended. - The browser Network tab shows zero requests reaching the server for the failing action; no
add-to-cart=IDPOST, no AJAX call. - No JavaScript errors are thrown.
- The issue only reproduces when all of the following are true: a Consent Management Platform (CMP) is active (e.g. Cookiebot), the visitor has denied consent, and the Pixel Manager's Google Consent Mode with
url_passthroughis enabled. It works correctly when consent is granted, when the CMP is disabled, or when the Pixel Manager is disabled.
Diagnostic test
Open DevTools → Network and try the failing action again.
- If no request fires at all, the failure is on the client side. URL passthrough or a competing event listener (express checkout buttons, custom theme JS) is the most likely cause.
- If the request fires but errors, this is a server-side or response-handling issue and unrelated to URL passthrough.
Cause
Google Consent Mode's url_passthrough feature appends a _gl=… parameter to outbound URLs (links and form actions) when consent is denied, so cross-domain session continuity is preserved without cookies. Some themes and plugins ship custom click or form handlers that don't tolerate the modified action URL. The handler may drop the POST body, convert the submission to GET, or abort it entirely.
Higher-risk environments to check:
- Themes with custom product-page add-to-cart JavaScript handling.
- Pages where multiple plugins compete for the cart form click event, such as WooCommerce Payments express checkout, PayPal smart buttons, or instant-search/checkout enhancers like FiboSearch.
Fix
Disable URL passthrough with the following filter:
add_filter('pmw_google_url_passthrough', '__return_false');
The cart and other forms will work again under denied consent. The trade-off is the loss of cross-domain session stitching for consent-denied visitors. For single-domain stores the practical impact is effectively zero. See the url_passthrough documentation for details.
Why the Pixel Manager doesn't auto-fix this
Extra URL parameters should never break a site. UTM parameters, gclid, fbclid, and _gl are all standard outbound additions made by ad platforms, email tools, and search engines. A theme or plugin that breaks on _gl will eventually break on the others too. The fix belongs in the offending theme or plugin, not in the Pixel Manager.
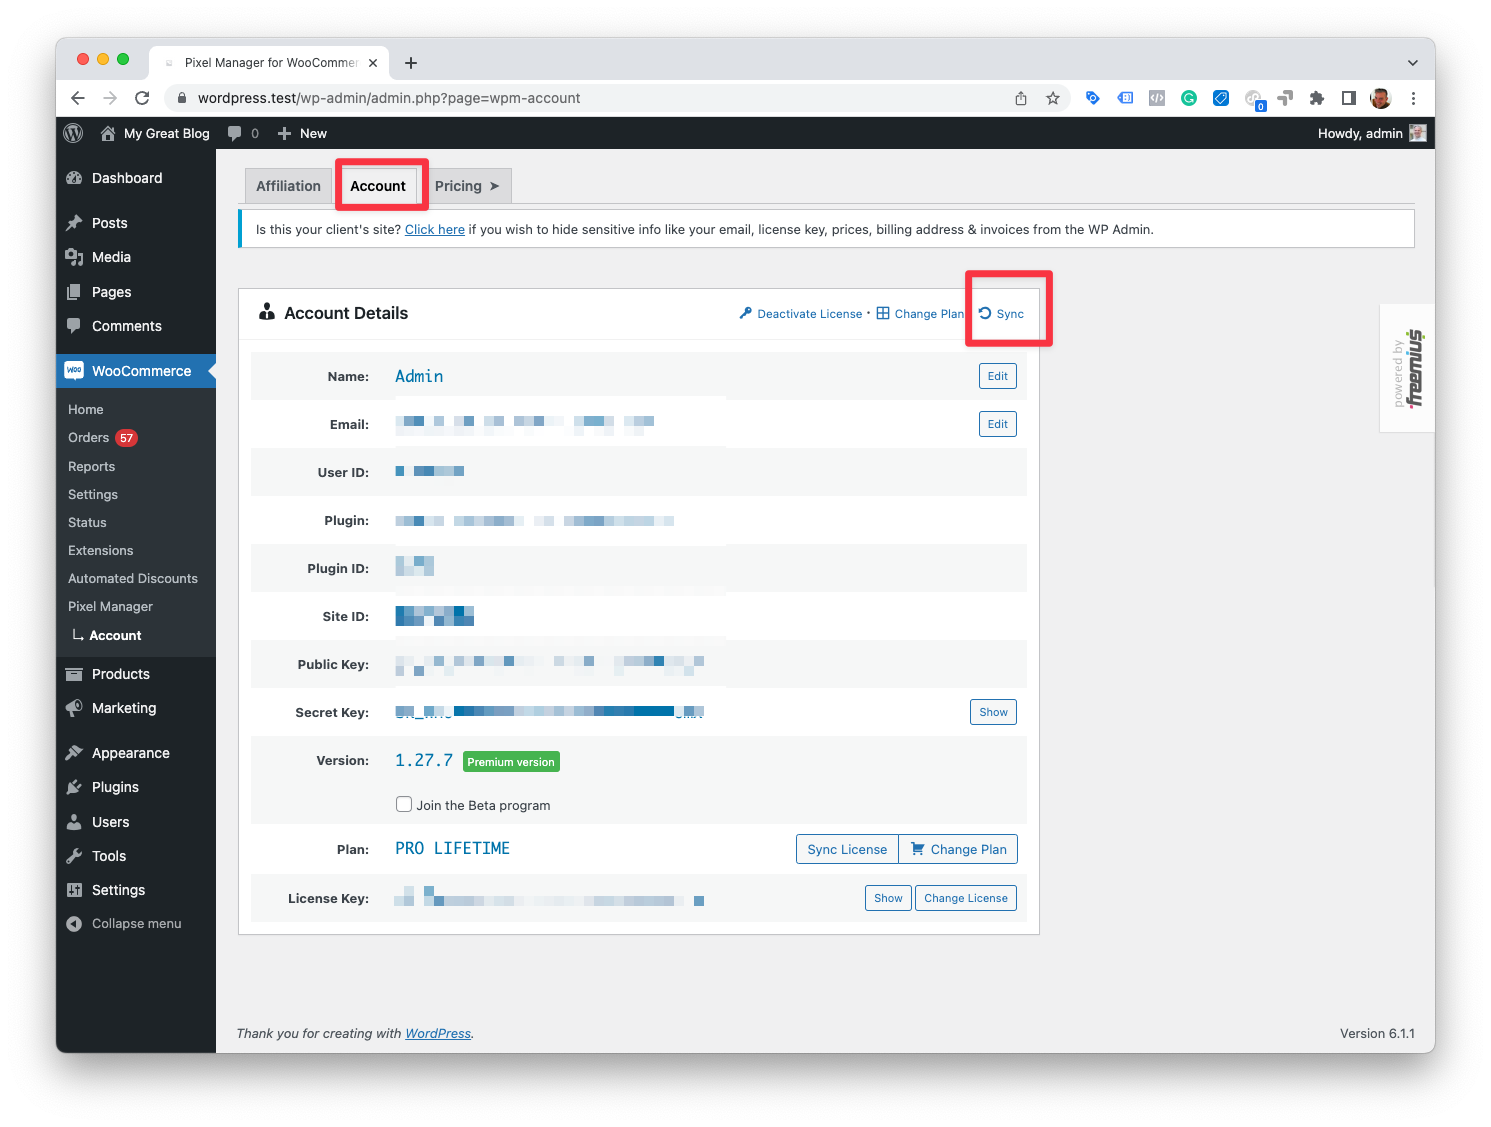
Updates not visible
Sometimes it can happen that updates don't show up anymore, despite the subscription still being active.
Sync the license manually
Go to the Account tab of the plugin and click the Sync button. This will sync the license and might fix the issue already. If it doesn't continue with the next approach.
Full Reset
Sometimes manually syncing the license or deactivating and reactivating the plugin will not help. In that case a full reset should help.
- Download the Freemius Fixer plugin from here: https://github.com/Freemius/freemius-fixer
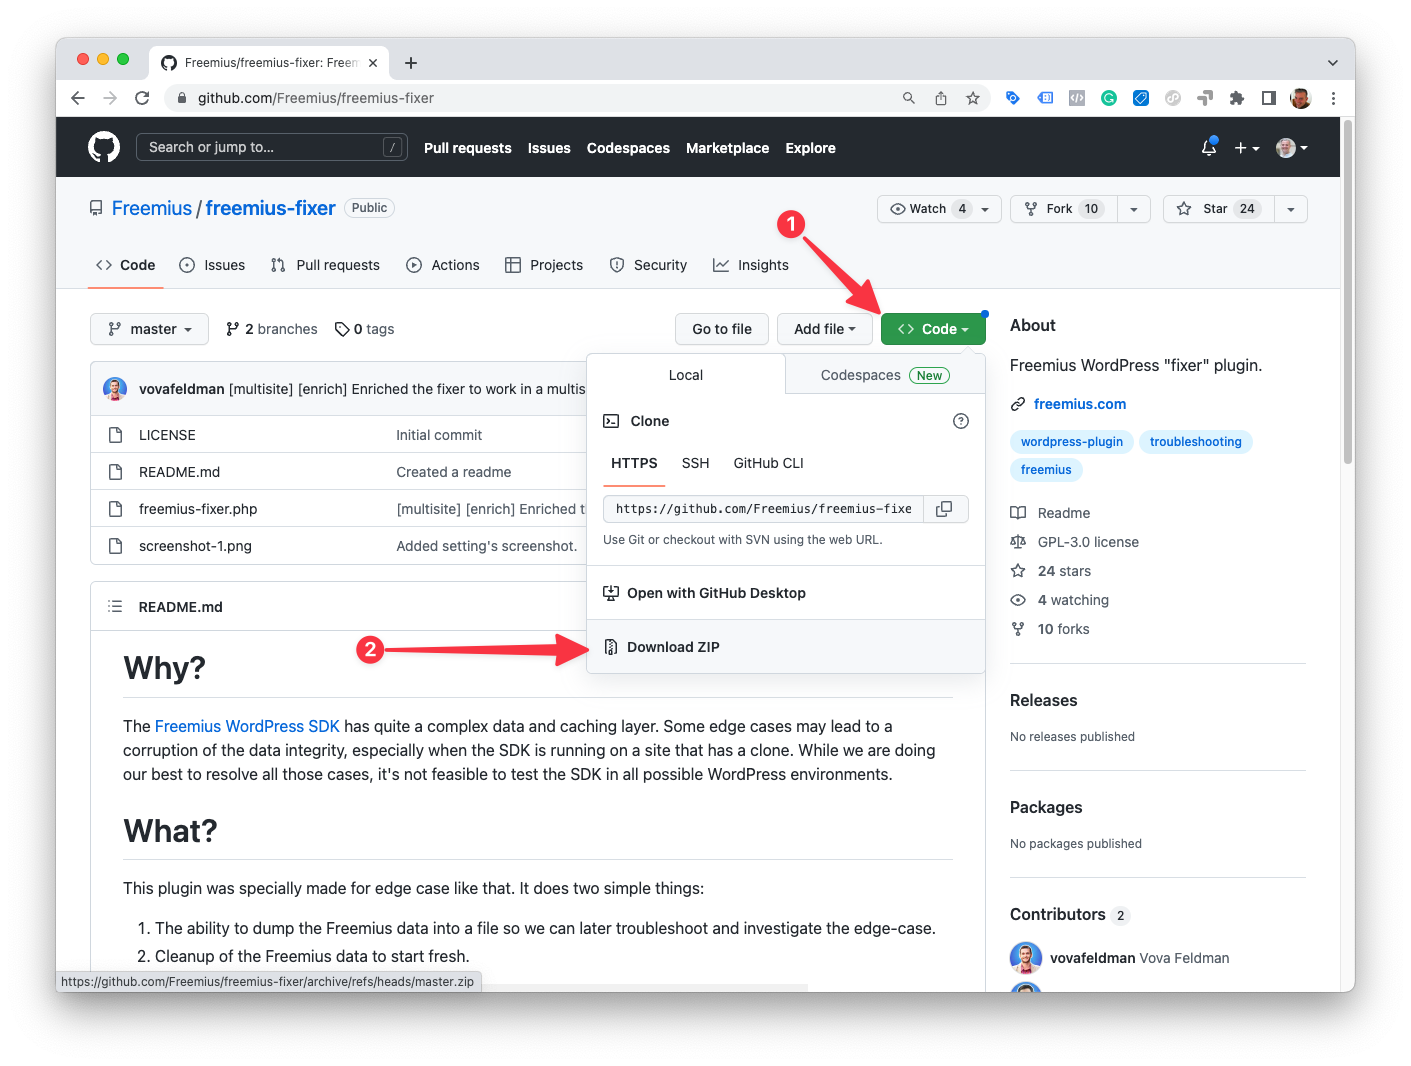
-
Install the plugin on your website.
-
Run the Freemius Fixer.
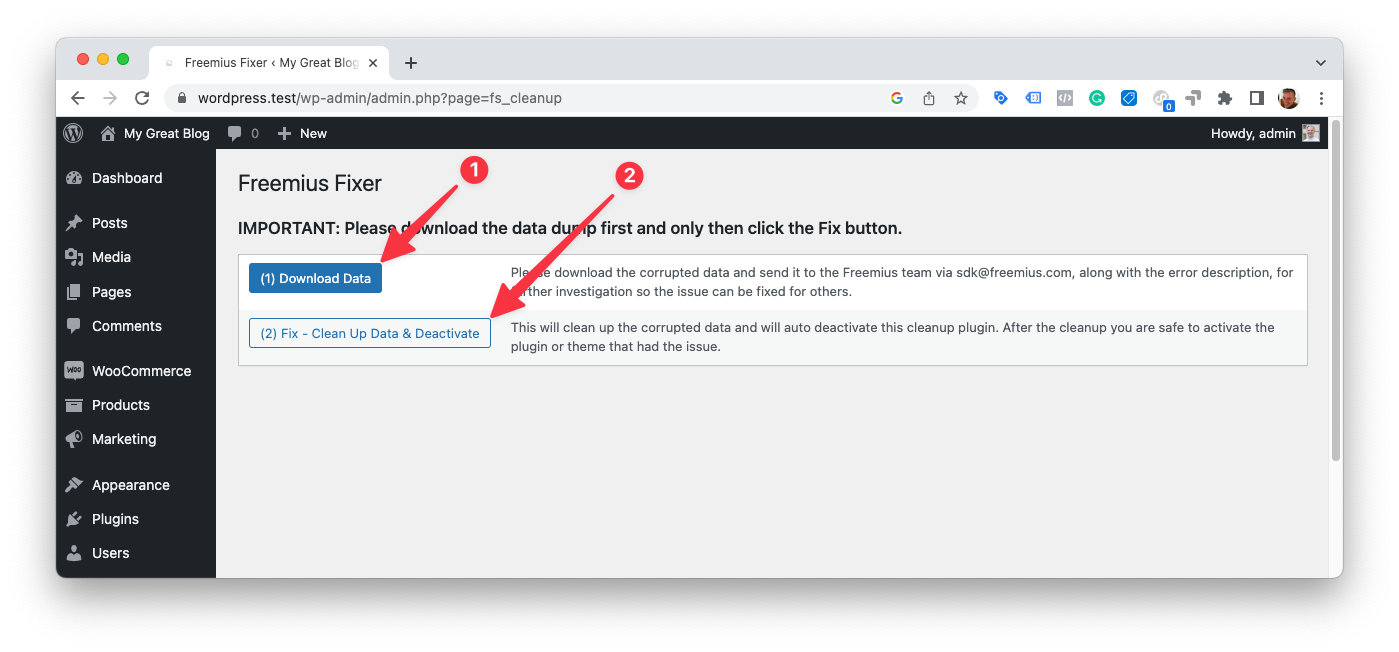
- Now you will have to add your license back to the Pixel Manager by going to the Account page of the Pixel Manager. If you don't have it on file you can always log into your account and get it from there: https://sweetcode.com/freemius-account/
The REST endpoints for the Pixel Manager are not working
In some edge cases it can happen that the wp-json REST endpoints for the Pixel Manager stop working and return a 404.
Typically, this happens when switching from pretty links to non-pretty links in the WordPress permalink settings and if the website uses caching.
Clearing all server-side cache (caching plugin, server cache, CDN cache, etc.) should fix that issue.
The Pixel Manager doesn't recognize custom order paid statuses.
The Pixel Manager uses the WooCommerce order paid status to determine if an order has been paid. If you use a custom order paid status, the Pixel Manager will not recognize it.
You can use the following filter to add a custom order paid status to the Pixel Manager:
add_filter('woocommerce_order_is_paid_statuses', function ($statuses) {
  $statuses[] = 'custom-paid-status';
  return $statuses;
});
Action Scheduler
The Pixel Manager ships with the Action Scheduler library. It helps to compile reports at night, because they can take a long time to process.
In rare cases the Action Scheduler tables are bloated, locked and can cause the entire website to go down. It seems to be an ongoing issue that's not limited to users of the Pixel Manager: https://clicknathan.com/web-design/woocommerce-actionscheduler-table-error/
There are various ways to deal with this. All of them have essentially the goal to clean up and fix the Action Scheduler tables.
Remove unnecessary records such as failed, cancelled and completed jobs
Only do this if you know how to restore a database backup.
-
Take a backup of your database
-
Open your database and run the following SQL statements.
If your tables use a custom prefix other than wp_, adjust the prefix in the statement.
DELETE FROM `wp_actionscheduler_actions` WHERE `status` = 'canceled';
DELETE FROM `wp_actionscheduler_actions` WHERE `status` = 'failed';
DELETE FROM `wp_actionscheduler_actions` WHERE `status` = 'complete';
Locked database
Only do this if you know how to restore a database backup.
It can happen that the Action Scheduler is messed up so much, that the database is constantly locked by Action Scheduler reads/writes. As a result you can't access the database and fix the issue. Here's how deal with this problem.
-
Take a backup of your database.
-
Open the
wp-config.phpfile, take a note of the database password, delete the password in the file and save the file. The website will not be able to access the database anymore. The database should now be accessible again. -
Get your fixes done.
-
Add the database password back to
wp-config.php.
Drop current tables and replace them with fresh ones
Only do this if you know how to restore a database backup.
-
Take a backup of your database.
-
Download the following file by right-clicking on it and selecting "Save link as": replace-as-tables.sql and save it under the name
replace-as-tables.sqlon your local computer. -
Import the file into your database. If you use the default WordPress prefix
wp_in your database it will replace the existing tables. -
Now you have fresh Action Scheduler tables. If you're using the default WordPress prefix
wp_you're done. The tables are fixed. If you use a custom prefix, please continue with the next step. -
Drop the old tables manually.
-
Take the following SQL statement and replace
custom_prefix_with the prefix you're using in your database. Then run the SQL statement.
RENAME TABLE
    wp_actionscheduler_logs TO custom_prefix_actionscheduler_logs,
    wp_actionscheduler_groups TO custom_prefix_actionscheduler_groups,
    wp_actionscheduler_claims TO custom_prefix_actionscheduler_claims,
    wp_actionscheduler_actions TO custom_prefix_actionscheduler_actions
- Now you have fresh Action Scheduler tables with the correct prefix and everything should be working again.
Further Action Scheduler Support
The Action Scheduler is maintained by the Automattic team. If you need further support, please contact them directly: https://woocommerce.com/contact-us/
Call to undefined function as_has_scheduled_action()
If you get the following error message:
Call to undefined function ... as_has_scheduled_action() in...
It means that you're using a third-party plugin with an outdated version of the Action Scheduler library.
The Pixel Manager ships with the latest version of the Action Scheduler library that contains the as_has_scheduled_action() function.
The Action Scheduler is packaged within many plugins. When loaded the Action Scheduler automatically loads the latest version of the Action Scheduler library. However, this only works reliably from version 3.2.1 onwards.
Here's the WooCommerce troubleshooting article on this issue: Deconflicting Different Versions of Action Scheduler
There is a safeguard in the Pixel Manager that prevents using the function as_has_scheduled_action() if it is not available. But, it may happen that in a later version of the Pixel Manager we forget to add that safeguard (as this already happened in the past). If you're reading this article, we probably have forgotten again and need a slap on the wrist. Please contact us and we will fix it immediately.
Meta (Facebook)
Server Sending Invalid Match Key Parameters
The way the Pixel Manager generates and sends the match key parameters prevents a mismatch to happen. Either they are sent correctly and matched by the Pixel Manager, or they are not sent at all.
The usual explanation for this warning is one or several of the following:
-
You recently enabled Meta (Facebook) CAPI. In that case, Meta (Facebook) sometimes unfortunately mixes up old with new values and generates this warning. Fortunately, this transitory situation is only temporary and resolved just by waiting a few days. In this case, the recommendation is to simply dismiss the warning. If the warning shows up again have a look at the other possible reasons. If you think all of them don’t come into question feel free to contact our support.
-
You are running a second instance of the Meta (Facebook) pixel through another plugin or custom code. If that is the case then that code is missing the correct match keys and causes the warning. Please disable additional Meta (Facebook) plugins and/or remove additional custom Meta (Facebook) code. Then dismiss the warning in Meta (Facebook). If the warning reappears go ahead and contact our support.
-
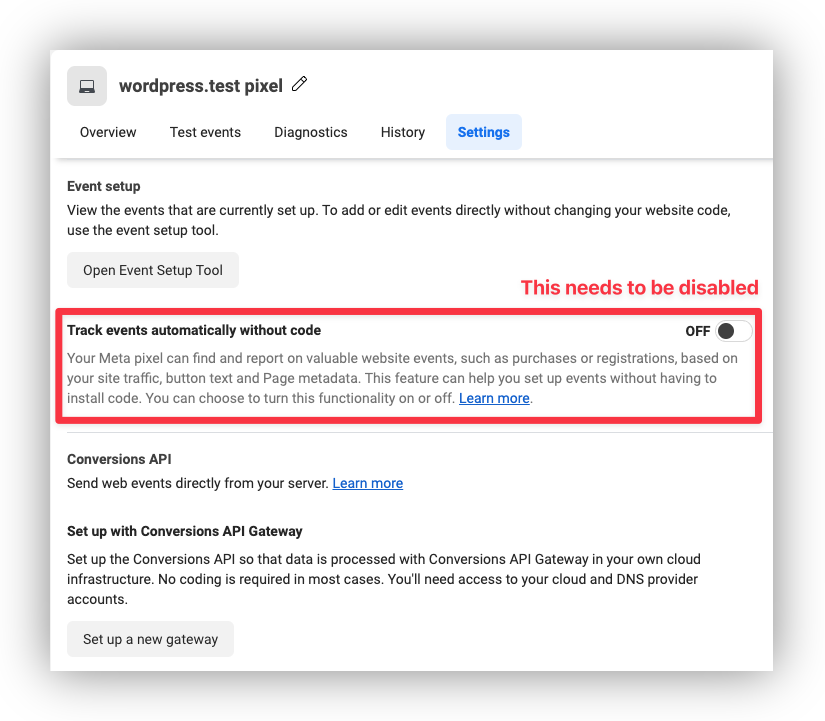
You've enabled Facebook to track events automatically without code. You need to disable that feature in the Facebook events manager.
Purchase Event delay from the server (Conversion API)
Under normal conditions, the plugin sends the purchase event immediately to Meta (Facebook). But, when a payment for the order fails, no purchase event is sent through the Conversion API. Only when the payment on that order is recovered at a later point in time, then the purchase event will be sent to Meta (Facebook). This can lead to a Purchase Event delay from server warning. It can be safely ignored.
Potentially violating Personal data sent to Meta (Facebook)
This happens when Meta (Facebook) detects URL parameters that potentially contain personal data (PII) in the path of the URL.
Example: http://example.com/account/reset-password?username=johndoe
In this case, Meta (Facebook) detects that username probably contains personal information, issues a warning, and redacts the information like this: http://example.com/account/reset-password?username=_removed_
Our plugin does not add any information to the URL path. The only information that the Pixel Manager is sending through the browser pixel is product and order data. The source of this warning is URL paths generated by the server and must be fixed there.
Meta (Facebook) in some cases is "trigger-happy" and issues a warning, although there is no personal data in the URL path.
Example: http://example.com?_ip=123456
In this case, _ip=123456 resembles an IP address, but in your case, it might be something completely different. When you are sure it is no personal information you can safely ignore the warning.
I am getting "Failed to load resource: net::ERR_BLOCKED_BY_CLIENT"
This is usually caused by an ad blocker in the browser.
In order to fix this temporarily disable the ad-blocker or switch to another browser that doesn't have an ad-blocker enabled.
Read more about this here
Duplicate Purchase event caused by Meta's automatic event detection
Quick summary: If you see a duplicate Purchase event in Meta Events Manager, and the duplicate event ID looks like pmw_xq9m1b4a3uqdcc61_26495490706760077, the duplicate is fired by Meta's fbevents.js, not by the Pixel Manager. Fix it in Meta Events Manager by turning off Track Events Automatically Without Code.
If automatic event detection is already off in Events Manager and you still see duplicates, this entry does not apply — jump to Duplicate events persist even with automatic event detection disabled (fbevents.js library bug) and run the quick URL-parameter test described there.
Symptom
Two Purchase events arrive in Meta Events Manager for the same order:
- The legitimate one fired by the Pixel Manager, with an event ID in the format
pmw_<order_id>— for examplepmw_145741. - A second one with an unusual event ID that combines a random string with a long numeric suffix — for example
pmw_xq9m1b4a3uqdcc61_26495490706760077. The random middle part matches the format the Pixel Manager uses for non-purchase events (pmw_<16 base36 chars>), but the numeric suffix is appended by Meta.
The second event is not fired by the Pixel Manager. It is fired by Meta's own fbevents.js script as part of a feature Meta calls Track Events Automatically Without Code (also referred to as automatic event detection, microdata events, or inferred events).
Why this happens
When the Meta pixel loads, it requests a configuration from Meta at https://connect.facebook.net/signals/config/<pixel_id>. That configuration controls several behaviors of the pixel, including inferredEvents, microdata, automaticMatching, and openbridge (Meta's managed CAPI Gateway).
If automatic event detection is enabled for the pixel in Events Manager, fbevents.js scans the page's structured data (Schema.org JSON-LD, OpenGraph tags, microdata attributes) and DOM shortly after PageView fires. When it detects an ecommerce signal on an order confirmation page, it fires its own additional Purchase event to Meta. This event is constructed inside fbevents.js and never goes through the Pixel Manager's code path.
The event ID format pmw_<random>_<number> is a Meta-internal pattern: Meta's pixel code takes the most recent event ID it has seen on the page (typically the Pixel Manager's PageView event ID, which uses the random format) and appends its own internal sub-event counter or hash. This is why the duplicate event ID appears to inherit the Pixel Manager's namespace, even though the Pixel Manager did not create it.
This is by design from Meta's side. The Pixel Manager cannot prevent it from within its own code path, because the duplicate originates inside fbevents.js after the Pixel Manager has already handed off to it.
How to identify this specific cause
Open the order confirmation page (for example /checkout/order-received/...) with Chrome DevTools open. In the Network tab, filter for facebook.com/tr and facebook.com/privacy_sandbox/pixel/register/trigger (Meta uses both endpoints depending on browser and Privacy Sandbox settings).
Examine the eid query parameter on each ev=Purchase request:
eid=pmw_<order_id>(e.g.pmw_145741) → legitimate Pixel ManagerPurchase.eid=pmw_<16 chars>_<long number>(e.g.pmw_xq9m1b4a3uqdcc61_26495490706760077) → Meta auto-detected duplicate.
If both appear, the case described on this page applies.
If the duplicate event ID does not start with pmw_, the duplicate is coming from a separate pixel integration on your site (another plugin, a GTM tag, custom theme code, etc.). That's a different problem — audit the installed plugins and any GTM containers loaded on the order confirmation page.
Solution 1: Turn off automatic event detection in Meta Events Manager (recommended)
This is the cleanest fix because it stops the duplicate at the source and applies to every site that uses this pixel.
- Sign in to Meta Business Manager.
- Open Events Manager.
- In the left sidebar, select Data Sources and click the relevant Facebook pixel.
- Click the Settings tab.
- Scroll to the section labeled Track Events Automatically Without Code (sometimes shown under Event Setup).
- Toggle it off and save.
After a short propagation delay (usually minutes), Meta stops sending the automatic event detection configuration to the pixel on page load, and the duplicate Purchase stops firing.
Solution 2: Disable autoConfig in site code
Use this if you cannot or do not want to change the Meta Events Manager setting — for example, on a pixel managed by another team, or when the change should live with the site code rather than the Meta configuration.
Add the following snippet so it runs before the Pixel Manager initializes the Facebook pixel. The cleanest way is via a small WordPress mu-plugin, or hooked into wp_head at an early priority in the theme's functions.php:
<script>
  !function(){
    var w = window;
    w.fbq = w.fbq || function(){(w.fbq.q = w.fbq.q || []).push(arguments)};
    w.fbq('set', 'autoConfig', 'false', 'YOUR_PIXEL_ID_HERE');
  }();
</script>
Replace YOUR_PIXEL_ID_HERE with the actual pixel ID. The call queues onto fbq before the Pixel Manager initializes the pixel; when fbevents.js processes the queue, it honors the autoConfig setting and skips loading the server-delivered configuration that drives automatic event detection.
If you run additional Meta pixels through the pmw_facebook_pixel_identifiers filter, the autoConfig setting is per pixel. Repeat the fbq('set', 'autoConfig', 'false', ...) line once for every pixel ID you want to cover.
Solution 2 is more aggressive than Solution 1. While Solution 1 turns off only the automatic event detection feature, Solution 2 disables the entire server-delivered plugin configuration from Meta. This also turns off:
- Automatic Advanced Matching DOM scraping — Meta's pixel scanning the page for additional matching keys such as emails in forms. The Pixel Manager's own advanced matching from order data continues to work.
- Meta-managed CAPI Gateway /
openbridge— if the pixel is configured to send a server-side copy through Meta's managed gateway. Users who rely on the Pixel Manager's built-in Server-to-Server / Conversions API feature are not affected, because that is a separate code path. Users who relied (sometimes unknowingly) on Meta's managed CAPI Gateway would see that data stream stop. - Microdata-derived enrichment of legitimate events (extra
custom_datafields scraped from page markup). For Pixel Manager users this is usually negligible because the Pixel Manager already supplies rich event data. SubscribedButtonClickand microdata events (auto-fired engagement events that some advertisers use for audience building).- Future Meta pixel features delivered through
pluginConfigwill not reach the pixel until you update the snippet or remove theautoConfigdisable.
Because of these broader side effects, Solution 1 is preferred for most users. Solution 2 is documented because it is sometimes necessary, but the two are not equivalent.
If neither solution stops the duplicates
If you've already disabled automatic event detection (Solution 1) or disabled autoConfig in code (Solution 2) and duplicate Purchase events still appear, the cause is most likely a separate, well-known intermittent bug in Meta's fbevents.js tracking library itself — not the automatic event detection feature. Continue to the next entry and run the one-URL test described there to confirm and fix it.
Why the Pixel Manager doesn't auto-fix this
The duplicate is fired from within Meta's fbevents.js after the Pixel Manager has already handed off to it, so the Pixel Manager cannot intercept it from its own code path. The Pixel Manager could expose an autoConfig-disable toggle, but the broader side effects listed above mean it would not be safe to enable by default for all users. The Pixel Manager already uses standard event ID conventions (pmw_<order_id> for purchases and pmw_<random> for other events), which is what makes these Meta-generated duplicates easy to identify in the first place.
Duplicate events persist even with automatic event detection disabled (fbevents.js library bug)
When to use this entry: Use this when you have already ruled out the more common causes — no other Meta pixel implementations on the site, and Track Events Automatically Without Code is already turned off in Meta Events Manager (see the previous entry) — and duplicates still appear. This is a known intermittent bug in Meta's fbevents.js tracking library. The fix is to load an older, known-good version of fbevents.js. There is a one-URL test you can run on the order confirmation page to confirm the cause in under a minute.
It has proven to be difficult to convince Meta (Facebook) support to fix this. Luckily the Pixel Manager has a built-in workaround.
Quick test: load an older fbevents.js from the URL
You can confirm whether this bug is the cause by loading an older version of Meta's fbevents.js library just for one page load, by appending a query parameter to the URL of the page where you see duplicates (typically the order confirmation page, e.g. /checkout/order-received/...).
- Pick an older version to test against. Version
2.9.84has proven to work in our tests. We track a few historical versions in this repository: https://github.com/alewolf/fbqevent.js - Append
fbevents-version=2.9.84to the page URL — for example:
https://example.com/checkout/order-received/12345/?key=...&fbevents-version=2.9.84
- Open the page and watch Meta Events Manager or the browser Network tab. If the duplicate
Purchaseevents stop, you have confirmed it is a tracking-library bug. If they continue, it is something else — go back and re-check duplicate pixel implementations on the site, or the automatic event detection entry.
Permanent fix
Once the URL test confirms the cause, use the following filter to force the Pixel Manager to always load that older fbevents.js version for every visitor:
add_filter('pmw_facebook_fbevents_script_version', function () {
	return '2.9.84';
});
Make sure to clear all server-side cache (caching plugin, page cache, CDN) after adding the filter, otherwise visitors will keep getting the cached page with the current fbevents.js URL.
Even when automatic event detection is already off in Events Manager, this URL test is worth running early in any duplicate-events investigation — it takes seconds and rules in or out the most common remaining cause.
Extra events caused by Meta's Event Setup Tool rules
Quick summary: If Meta Events Manager shows extra Purchase, AddToCart, InitiateCheckout, or other standard events that fire when a visitor clicks a button — with no event ID and usually no value — the events are fired by point-and-click Event Setup Tool rules stored on the pixel in Meta Events Manager, not by the Pixel Manager. Remove the rules in Events Manager under Data sources → select your pixel → Settings → Event setup → Manage.
The Pixel Manager (version 1.64.0 and higher) detects these rules automatically and shows a warning in the Opportunities tab and in the debug report when active rules are found on your pixel.
Symptom
Event counts in Meta Events Manager are inflated, and purchase values are wrong or missing. Looking closer, extra standard events fire whenever a visitor clicks a specific button — for example a Purchase event on every click of the place-order button, even when the payment fails and no order is created. The extra events carry no event ID, so Meta cannot deduplicate them against the correctly tracked events the Pixel Manager sends, and they usually carry no value or a value scraped from the page.
Why this happens
Meta's Event Setup Tool lets anyone with access to the pixel define events by pointing and clicking on elements of the website — typically "fire a Purchase when a button containing this text is clicked". These rules were often set up long ago, by an agency, or during an earlier tracking setup attempt, and merchants rarely know they still exist.
The rules are not stored on your website. They are stored on the pixel itself and delivered to every browser through the pixel's public configuration file at https://connect.facebook.net/signals/config/<pixel_id>, as estRules (event rules) and iwlExtractors (value extraction rules that scrape amounts out of the page's HTML). When a rule matches, fbevents.js fires the event directly, completely outside the Pixel Manager's code path.
Because these rule-based events have no event ID, deduplication is impossible. The result is systematic double counting: one correct, deduplicated event from the Pixel Manager, plus one rogue event from the rule. A Purchase rule bound to the place-order button is the worst case, because it fires on every click attempt, including failed payments, and typically without the order value.
How to identify this specific cause
- Pixel Manager 1.64.0 and higher: open the Pixel Manager and check the Opportunities tab. If active Event Setup Tool rules are found on your pixel, a warning card lists the affected event names per pixel. The same information appears in the debug report under Meta Event Setup Tool.
- Manually: open
https://connect.facebook.net/signals/config/<pixel_id>(replace<pixel_id>with your pixel ID) in a browser and search the file forestRules. Rules with"rule_status":"ACTIVE"and a"derived_event_name"fire the named event. Also search foriwlExtractors, which lists value extraction rules. - In the Network tab: on the page where the extra event fires, open Chrome DevTools, filter for
facebook.com/tr, and click the button in question. Rule-fired requests carry acd[cs_est]=trueparameter and noeidin the Pixel Manager'spmw_format.
Solution: remove the rules in Meta Events Manager
- Sign in to Meta Business Manager and open Events Manager.
- In the left sidebar, select Data Sources and click the relevant pixel.
- Click the Settings tab.
- Scroll to the Event setup section and click Manage.
- Delete or deactivate all rules listed there. The Pixel Manager already tracks all shop events with deduplication and accurate values, so none of these rules are needed.
After a short propagation delay (usually minutes, at most until the configuration cache expires), the pixel configuration no longer contains the rules and the rogue events stop.
The autoConfig snippet from Solution 2 of the automatic event detection entry also stops Event Setup Tool rules, because it prevents fbevents.js from loading the server-delivered configuration that carries them. Removing the rules in Events Manager is still the better fix, because it stops the rogue events for every site and integration that uses the pixel.
Facebook Ads Manager shows more conversions than WooCommerce orders
This is one of the most common questions we receive. Before anything else, establish the ground truth: Ads Manager applies attribution modeling (attribution windows, view-through credit, delayed restatements) on top of the raw events, so only Meta Events Manager can tell you whether an event actually fired more than once. Pick one known order, find its Purchase events in Events Manager (match by time and value), and count them. Exactly one deduplicated event per order means the tracking is correct and the discrepancy is Ads Manager reporting behavior. More than one event means real duplication; work through the following checklist in order:
-
Check for duplicate pixel implementations. Make sure only one plugin or code snippet fires the Meta pixel on your site. If you're running Pixel Manager alongside another Meta tracking plugin or have manual pixel code in your theme, remove the duplicates. Use Meta Events Manager → Test Events to verify.
-
Disable Automatic Events in Meta Events Manager. Go to Events Manager → your Pixel → Settings → turn off Automatic Events (sometimes labeled Track Events Automatically Without Code). This Meta feature fires events on top of your existing pixel implementation and can inflate conversion numbers. If you can pattern-match the duplicate event ID against the format
pmw_<16 chars>_<long number>, this is almost certainly the cause — see the dedicated entry for the full diagnosis. -
Remove Event Setup Tool rules. Point-and-click rules stored on the pixel fire extra events on button clicks, without an event ID and usually without a value. The Pixel Manager (1.64.0+) warns about these in the Opportunities tab — see the dedicated entry.
-
Verify CAPI deduplication. If you're using both the browser pixel and the Conversions API, check that events in Events Manager show as "Deduplicated." If they don't, ensure that one plugin handles both sides. The Pixel Manager automatically generates matching
event_idvalues for proper deduplication. Splitting browser pixel and CAPI between different tools is a common cause of double-counting. See also: Facebook CAPI Deduplication and Match Key Parameters. -
Check which events you're counting as conversions. In Ads Manager, if your campaign counts both AddToCart and Purchase as conversions, both events appear in the "Conversions" column. Make sure to look at only purchase conversions in Ads Manager, not the aggregate "Conversions" or "Results" column, which may include other events like AddToCart or form submissions.
Keep in mind that Facebook purchase conversions should always be lower than the total number of WooCommerce orders, because Facebook only attributes conversions to ad interactions. If Facebook is reporting more purchase conversions than your total WooCommerce orders, that's a clear signal of a technical issue.
For a comprehensive explanation of all causes, see our blog post: Why Facebook Shows More Conversions Than WooCommerce Orders.
Meta silently drops AddToCart, InitiateCheckout and Purchase (restricted business category)
Quick summary: If Meta Events Manager receives PageView and ViewContent but never AddToCart, InitiateCheckout, AddPaymentInfo or Purchase, and there is no error anywhere, then Meta is most likely blocking those events because of the business category your pixel is classified under. Health and wellness is by far the most common category affected. The block is enforced inside Meta's own fbevents.js library, and the Conversions API (CAPI) does not bypass it. No plugin, snippet or setting on your website can send these events while the restriction is active. It has to be resolved on Meta's side, in Events Manager, by getting the business category corrected or reviewed.
The Pixel Manager (version 1.64.0 and higher) detects the restriction automatically and names the blocked events in the browser console and in the debug report under Meta Business Category Event Restrictions.
Symptom
Tracking looks broken, but only for the lower part of the funnel:
PageViewandViewContentarrive in Meta Events Manager as usual.AddToCart,InitiateCheckout,AddPaymentInfoandPurchasenever arrive, not in Events Manager, not in the Test Events tool, not even for a test purchase you make yourself.- The browser console shows no error. The Pixel Manager console logger (
?pmwloggeron) reports that it fired the event. - In the browser Network tab there is no request to
facebook.com/trfor the missing events, while the requests forPageViewandViewContentare there. - Switching Meta plugins, reinstalling, clearing caches, disabling consent management, or enabling the Conversions API changes nothing.
Because add to cart and purchase are exactly the events shop owners care about, this looks like a plugin bug. It is not. The Pixel Manager calls fbq('track', 'AddToCart', ...) normally, Meta's library accepts the call without complaint and then discards it.
Why this happens
Meta restricts what data it will accept from advertisers in sensitive verticals. When a pixel belongs to a business that Meta has categorized as restricted, most commonly health and wellness (for example medical devices, medical alert systems, supplements, pharmacies, clinics, therapy and mental health services, medical test kits), Meta blocks the lower-funnel conversion events for that pixel and keeps only the more generic ones.
The restriction lives on the pixel, not on your website. Meta delivers it to every browser through the pixel's public configuration file at https://connect.facebook.net/signals/config/<pixel_id>, as an eventValidation entry that lists the blocked event names in restrictedEventNames. Meta's fbevents.js library reads that list and, whenever your site tracks one of those events, drops it before it is sent. Nothing reaches Meta, and nothing is logged as an error.
Two consequences are worth spelling out, because both are frequently assumed to be workarounds and neither is:
- The Conversions API does not help. The restriction is applied to the data source (the pixel and the domain), not to the transport. Server-side events for a restricted event name are received by Meta and then discarded, so sending
Purchasethrough CAPI does not get it counted. Buying a Pro version of any plugin for the sake of CAPI will not fix this. - Renaming or faking the events does not help either. Sending the data as a custom event with a different name may get the event through, but it will not be usable as a standard conversion event for optimization, and misrepresenting restricted data can put the ad account at risk. The correct path is to fix the categorization with Meta.
Pixels in restricted categories often also carry a protectedDataMode entry in the same configuration file, which strips custom parameters from the events that are allowed through. So even the surviving events can arrive with less data than you sent.
How to identify this specific cause
-
Pixel Manager 1.64.0 and higher: open any shop page with
?pmwloggeronappended to the URL and look at the browser console. If the pixel is restricted, the Pixel Manager logs a warning that names every blocked event. The same information is in the debug report (Support → Debug report) under Meta Business Category Event Restrictions. -
Manually, in the pixel configuration: open
https://connect.facebook.net/signals/config/<pixel_id>in a browser (replace<pixel_id>with your own pixel ID) and search the file forrestrictedEventNames. If you find a non-empty list, those event names are the ones Meta blocks. Example of what a restricted pixel looks like:{"unverifiedEventNames":[],"restrictedEventNames":["AddPaymentInfo","AddToCart","AddToWishlist","InitiateCheckout","Purchase"]} -
Manually, at runtime: on any page of your shop, in the browser console, run:
JSON.stringify(fbq.instance.pluginConfig.get('<pixel_id>', 'eventValidation')) -
Control test: in the browser console, track one event from the restricted list and one event that is not on the list, then compare. Only the unrestricted one produces a request to
facebook.com/tr:fbq('track', 'Purchase', {value: 1, currency: 'USD'}) // on the restricted list: no request is sentfbq('track', 'Search', {search_string: 'test'}) // not on the list: request is sentperformance.getEntriesByType('resource').filter(r => r.name.includes('facebook.com/tr')).map(r => r.name)This is the definitive test. It proves that the events are being handed to Meta's library correctly and that the library is the one dropping them.
Solution: check the category and event blocking in Meta Events Manager
The restriction is applied to the data source (your pixel and domain), so it has to be resolved in Meta Events Manager. Meta moves its interface around regularly, so treat the labels below as a guide rather than a fixed path:
- Sign in to Meta Business Manager and open Events Manager.
- Select Data sources and click the affected pixel.
- Open the Settings tab and look for Manage data source categories (click Manage). This is where the business category Meta has assigned to your data source is shown, and where you can self-categorize it.
- Still in Settings, look for Manage event blocking (click Review). This lists the events Meta currently blocks for this data source. The list should match what the Pixel Manager reports in the console and the debug report.
- If the categorization is wrong for your shop, correct it there and, where Meta offers it, request a review. If the categorization is correct, the restriction is a policy decision by Meta and it applies to every tracking solution you could use, including Meta's own.
- While the restriction is active, optimize campaigns on the events Meta still accepts (for example
PageView,ViewContent,Search, or lead events), and use your shop reporting, GA4 or the Pixel Manager's accuracy reports for actual revenue numbers.
Meta applies these restrictions in tiers. The common one blocks the standard conversion events (Purchase, AddToCart, Lead and similar) while leaving the rest working, which produces exactly the symptom described here. A stricter tier stops all event sharing for the domain, in which case even PageView disappears. Ads can keep running and stay approved the whole time, which is why the blocking is so easy to mistake for a broken tracking setup.
Meta's own references: About data source categories in Meta Events Manager and How to manage data source categories in Meta Events Manager.
This is worth checking early whenever a shop in a sensitive vertical reports that "the pixel only tracks page views". It takes one look at restrictedEventNames in the pixel configuration to rule in or out, and it saves days of chasing a plugin, theme or consent problem that does not exist. A useful sanity signal: if the missing events are missing for everyone, including a test purchase you make yourself with no ad blocker, and the successful events still work, the cause is almost never on the website.
Incompatible Plugins
WC Custom Thank You
Plugin homepage: link
The plugin creates a custom order thank-you page for WooCommerce but doesn't follow the WooCommerce standard for the order confirmation page. In order for conversion pixels to fire on the WooCommerce order confirmation page, every WooCommerce theme must implement the correct output for the is_order_received_page() conditional. This is valid for plugins that modify the purchase confirmation page too. On top of that, the WC Custom Thank You plugin has not been updated in a long time and the developer has stopped to answer support requests.
Google Ads
Misconfigured Bidding Strategy
It can happen that Google Ads throws the warning "Misconfigured bidding strategy". The hover text shows "Your campaign is running with limited performance. Set up conversion tracking for your account to improve your performance, spending and see reporting".
Unfortunately, this warning sometimes is thrown even if conversion tracking is set up just fine.
Typically, the warning is thrown on Smart Shopping campaigns. Additionally, conversion tracking for Smart Shopping campaigns has more requirements in order to run well. If those are not met, the same warning is thrown.
- First make sure that conversion tracking has been set up correctly. Double-check the conversion ID and conversion label.
- Make sure that the product ID type is the same as the one you use in Google Merchant Center. The product IDs must match.
- Smart Shopping campaigns require at least 30 conversions within a time frame of the past 30 days. And, in order for them to be able to use the remarketing lists, there must be at least 100 visitors per list in the past 30 days. Once the requirements are matched, the warning will go away.
- Make sure that the bidding strategy uses the the correct budget type. Depending on your settings you might have to use a different budget type. A single budget per campaign generally works fine. But if you're using shared budgets, you must make sure that all campaigns in the same shared budget use the same bidding strategy.
- If you don't think you can match the requirements in the near future it is better to run a standard shopping campaign.
Conversion Adjustment Upload Shows Errors
When checking the conversion adjustment upload report in Google Ads, you see errors like "This conversion does not exist" or "The conversion action specified in the adjustment request cannot be found." You may also receive email notifications from Google or see warnings on your campaigns about conversion adjustment issues.
This is expected behavior. The Pixel Manager includes all refunded and cancelled orders in the conversion adjustment feed, not just orders that came from Google Ads. Google Ads will show errors for orders it can't match to a Google Ads conversion (e.g., orders from organic search, email, or other ad platforms). This is exactly what Google recommends and can be safely ignored.
Google has recently started sending email notifications and displaying campaign-level warnings about these expected errors. Despite looking alarming, they are triggered by the same expected behavior and can be safely ignored. This is an inconsistency on Google's side. Their warning system flags behavior that their own documentation tells you to expect.
How to verify everything is working: Open your upload report in Google Ads (Goals → Conversions → Uploads). You should see a mix of successful and failed rows. Successful rows confirm that adjustments for actual Google Ads conversions are being applied correctly.
If all rows fail, verify that the conversion name in the Pixel Manager matches the Google Ads conversion name exactly, and that the upload runs from the correct Google Ads account. See the Conversion Adjustments setup guide for details.
For a detailed explanation, read our blog post: Why Google Ads Shows Errors for Conversion Adjustment Uploads.
Issue: ID never received
Sometimes Google Ads shows a warning saying the ID was never received. Unfortunately, that warning is shown even in cases, where everything works perfectly fine.
You can check yourself if IDs are being received in the audience report. Switch the graph to > Parameters > ID hits. If you see a graph like the following everything is ok, and you can dismiss the warning and don't need to continue reading further.
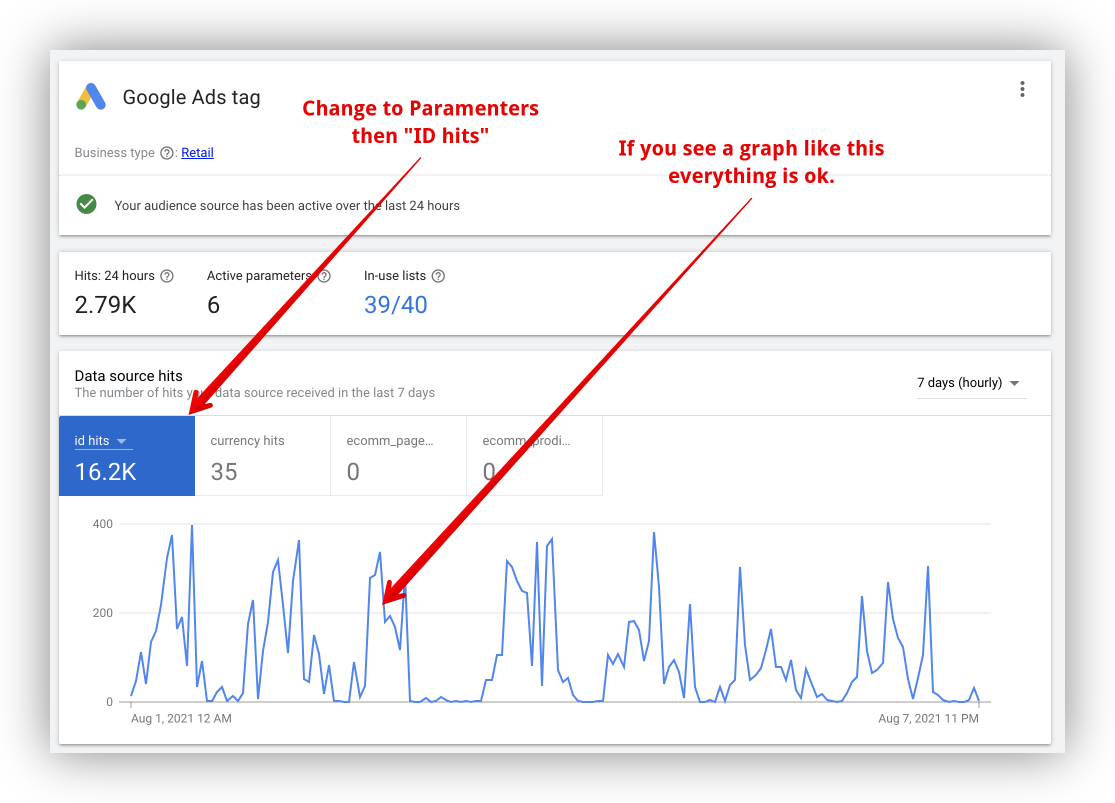
If you see incoming ID hits in the graph and still want to investigate the warning further, please ask Google support.
On the other hand, if you don't see ID hits in the graph, please continue reading.
It doesn't mean that Google Ads is always wrong when it comes to that warning. There are cases where the Google Ads warning can be right. Here is a list of possible causes:
- You've set the wrong conversion ID. Double-check and correct it if necessary.
- When setting up the remarketing audiences you've enabled
retailand thecustomaudience. The plugin can only send the signal for one or the other, not for both (which would not make sense anyway). So one of those verticals never receives an ID (usuallycustom), in which case you will see that warning show up regularly, but usually can dismiss it. Unfortunately thecustomvertical can not be turned off once enabled. - There is some reason that is blocking the remarketing script from sending events correctly, usually some kind of JavaScript optimization plugin.
Make sure that none of the above reasons are causing this problem.
The best way to check if the ID is being sent is to use the Google Tag Assistant
Here's how to check:
-
Open the Google Tag Assistant: tagassistant.google.com
-
In Google Tag Assistant instruct to open one of your product pages.
-
If the product page is a variable product, select the drop-down(s) to choose one variation.
-
Then switch back to the Google Tag Assistant tab.
-
In the middle pane click on dataLayer.
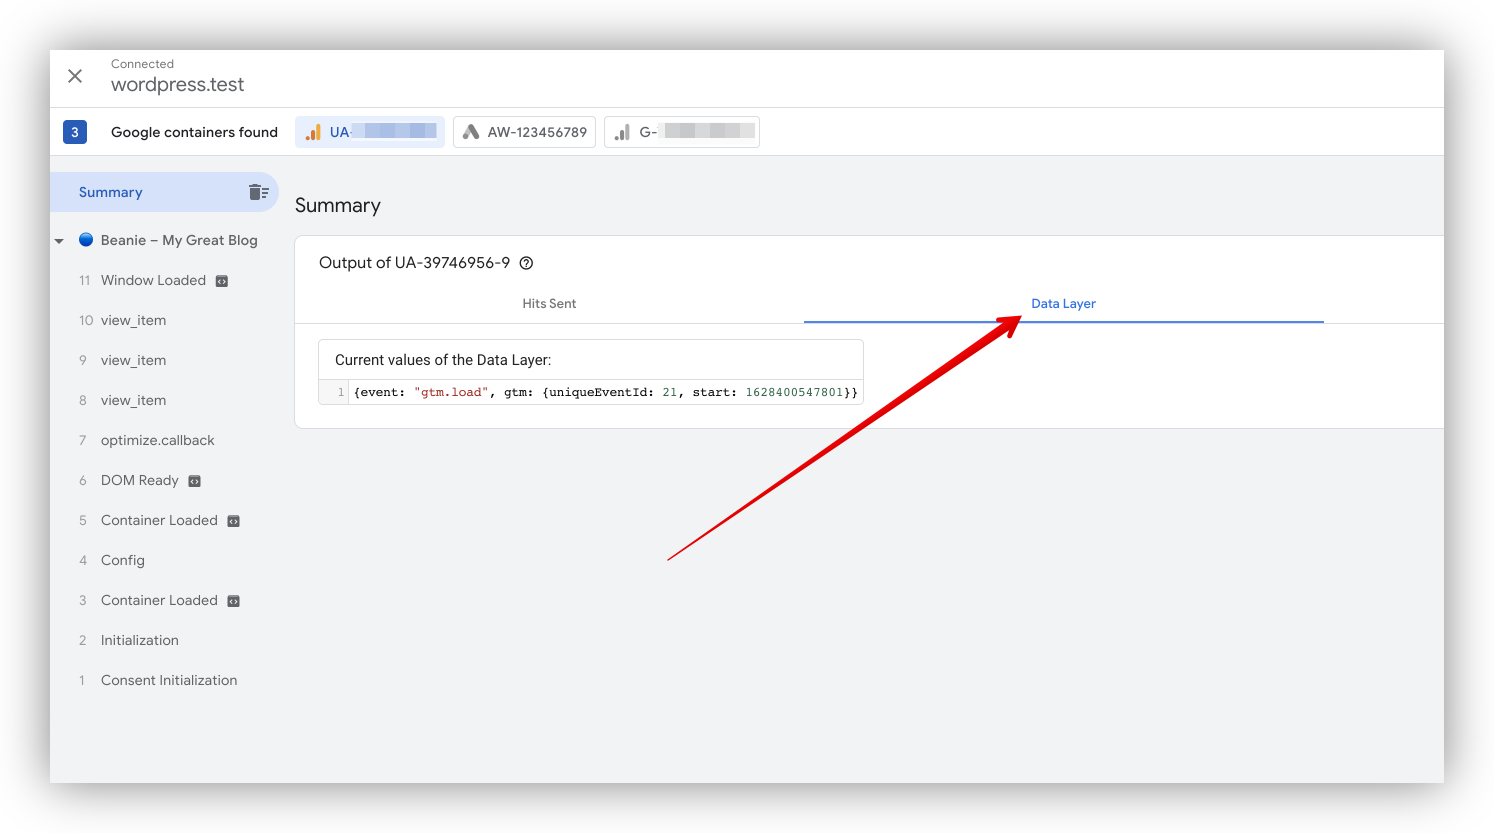
-
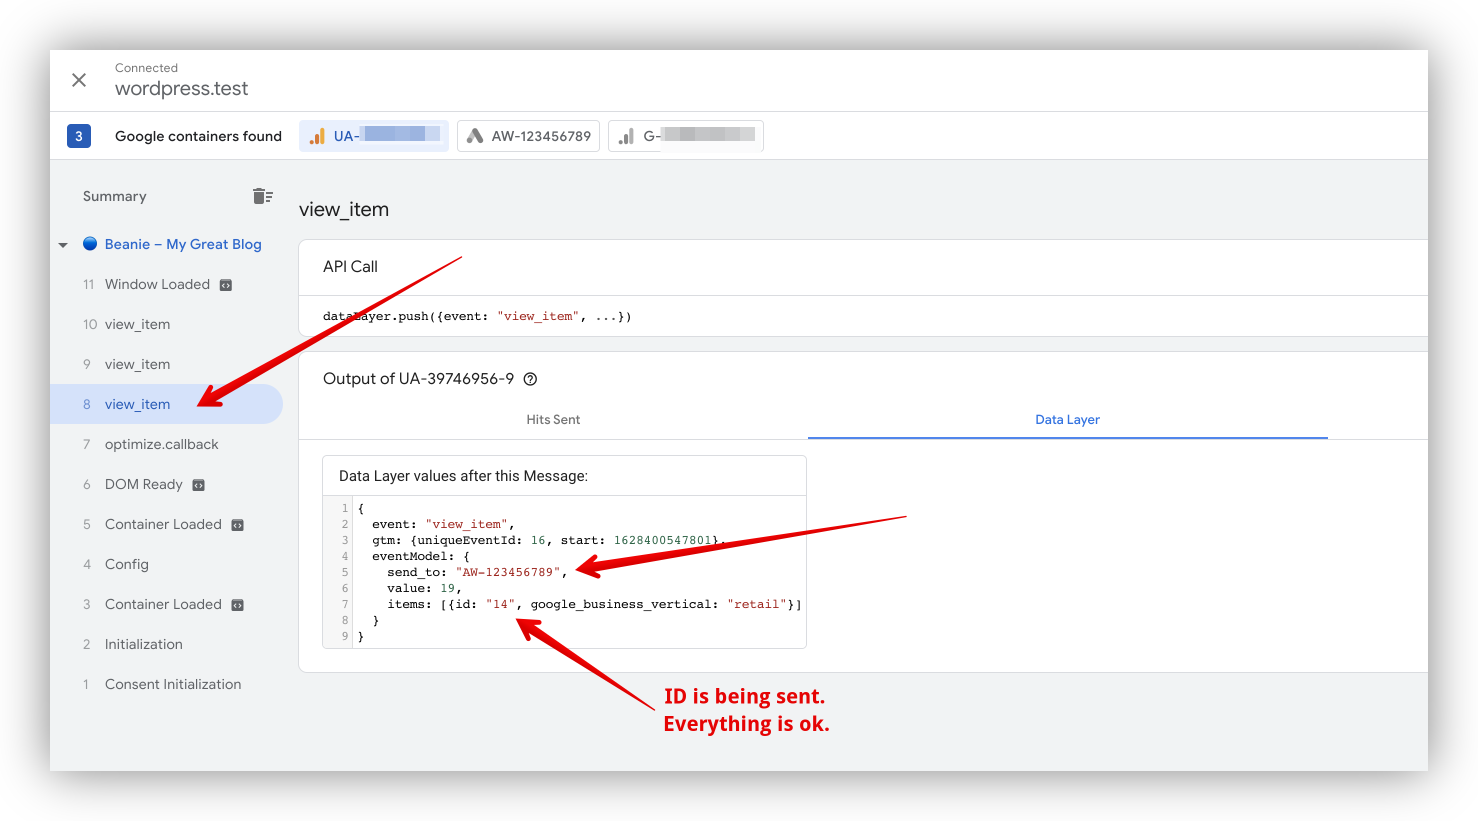
In the left sidebar click on the view_item event. If you've also set up Google Analytics, you will see several view_item events. Click through each of those until you see in the dataLayer the event that is sending events to your Google Ads conversion ID.
-
Once you find the correct event, check if the ID is being sent. If so, all is good. You have proof that the ID is being sent and the warning is wrong. You can dismiss it.
 8. If you like you can also take those results and ask Google Ads support to fix that warning. (It would be a great help for us because we investigate way too many of those false positive warnings.)
The measured conversion value is too high in Google Ads
Situation: The measured conversion value is too high in Google Ads. When comparing the conversion value of each transaction in the Google Ads website report with the actual transaction value in WooCommerce, the Google Ads conversion value is higher than the actual transaction value.
Here's how that might look in the Google Ads website report. When comparing the conversion value with the actual transaction value in WooCommerce, the Google Ads conversion value is higher than the actual transaction value:
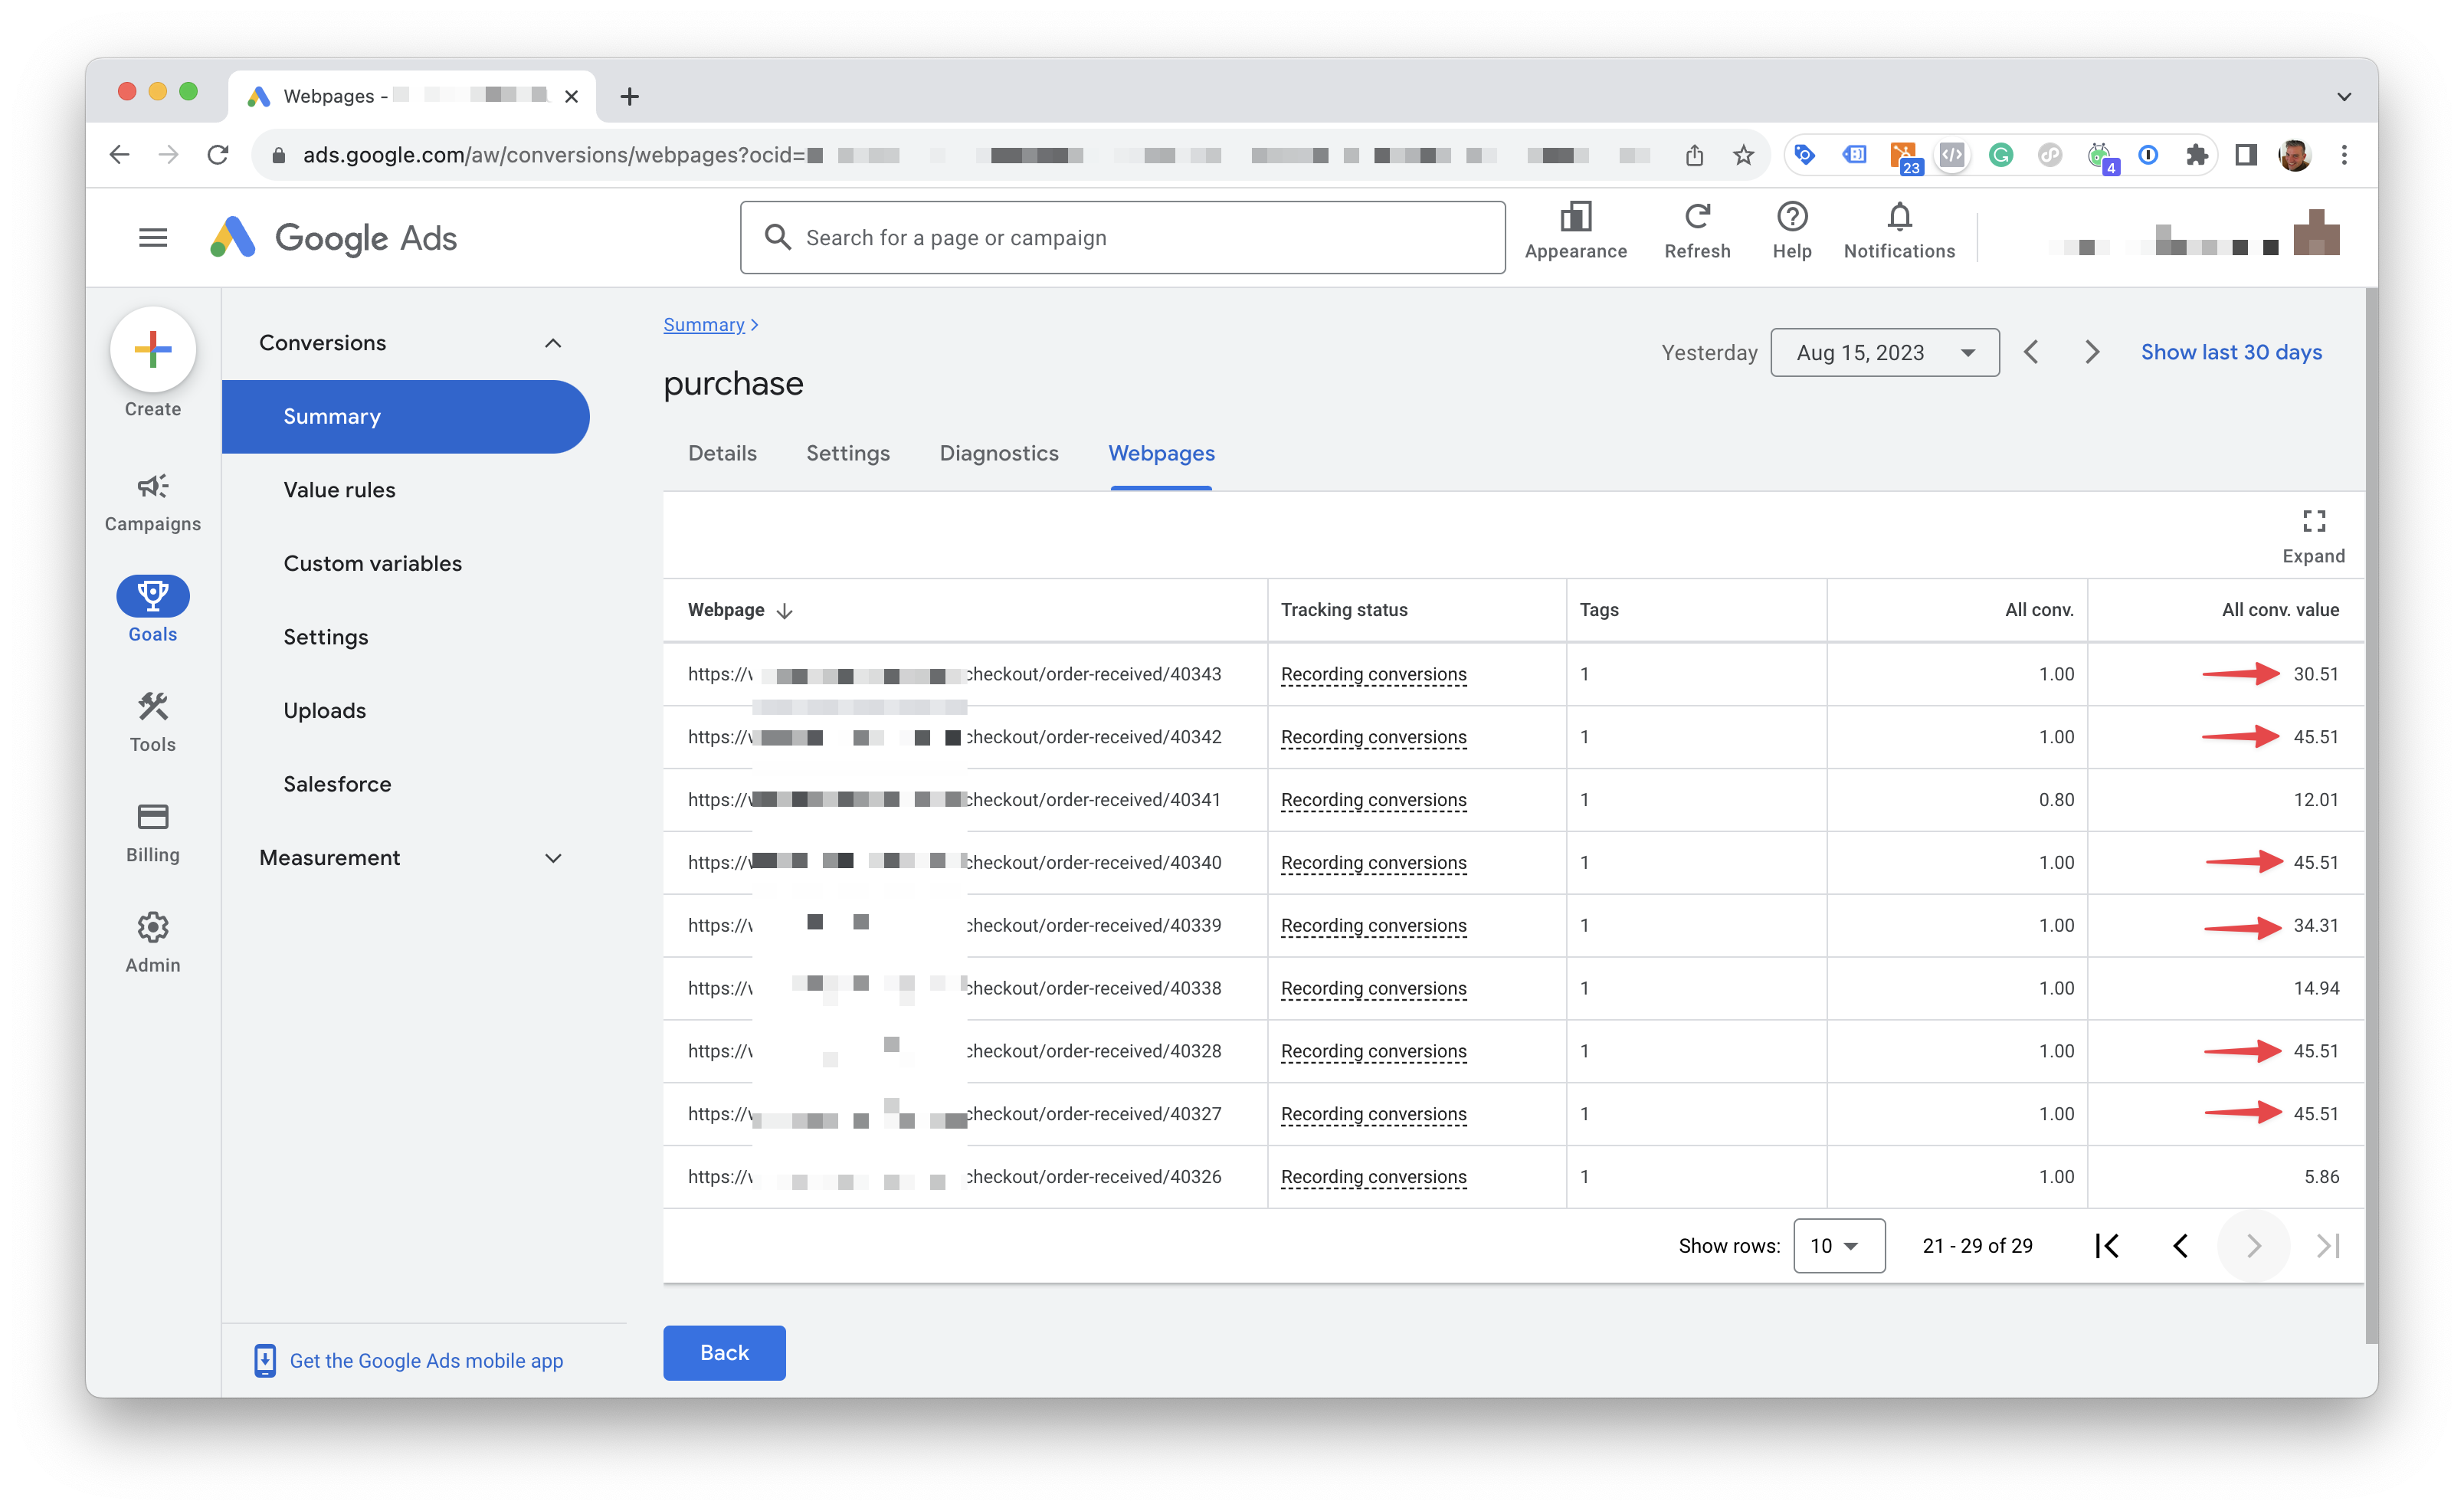
This can be explained by one or several of the following reasons:
-
You've enabled one or several campaigns to bid higher for new customers: In that case, Google Ads will increase the conversion value for new customers by the set value. This is a feature of Google Ads and not a bug.
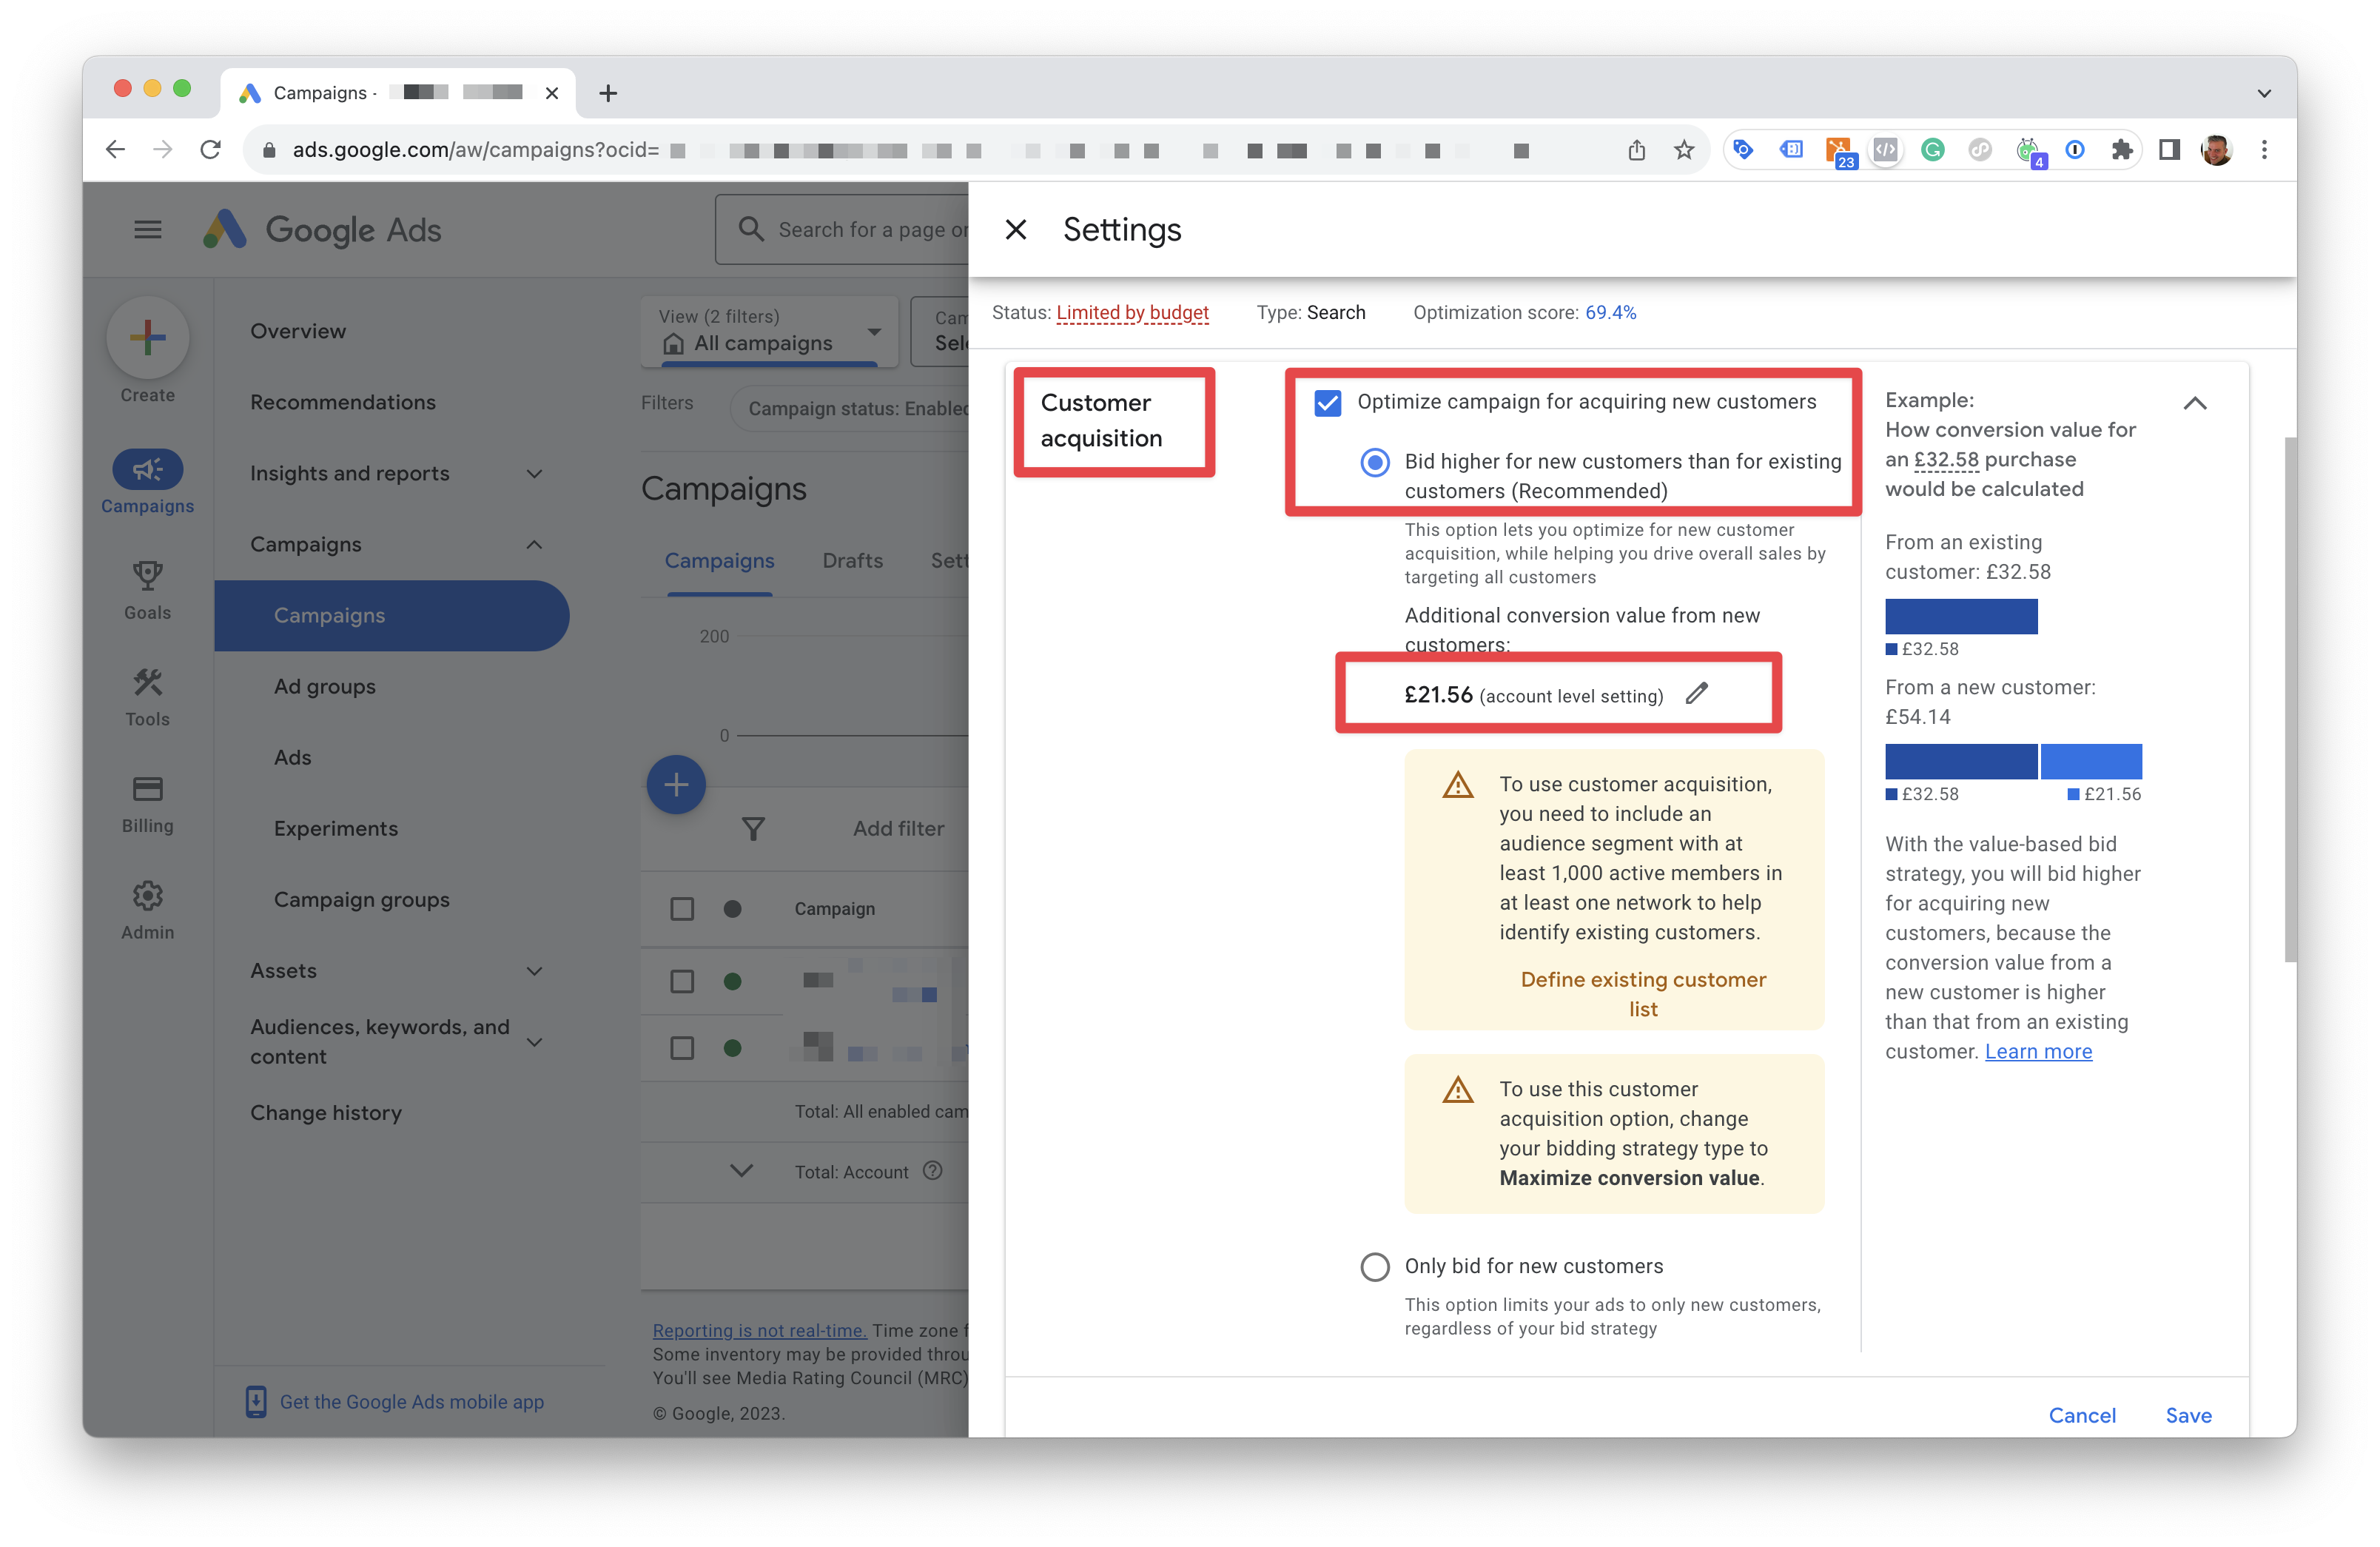
You might experience this only while using using the Pixel Manager. The reason is that the Pixel Manager is one of the few tracking code managers that is able to distinguish between new and existing customers and sends the
new_customerparameter to Google Ads as described in the Google Ads documentation. -
You are using the Pixel Manager conversion value filter to increase the conversion value: In that case, the conversion value will be increased by the conversion value determined by the filter. This is a feature of the Pixel Manager and not a bug. Read more about the conversion value filter here.
Tag not placed correctly warning
Google Ads, under certain circumstances, throws a warning that the tag is not placed correctly. Here are the most common reasons for this warning:
-
Pixel Manager Lazy Loading: The Pixel Manager pro version offers lazy loading of the tracking scripts. This is great to speed up the website. The tracking scripts get immediately loaded upon interaction with the website (mouse movement, scrolling, keyboard input, etc.). However, that also means that the tracking scripts are not loaded immediately when the Google bot crawls the website. This can cause the warning. If you see this warning, you can safely ignore it, or you can disable the lazy loading feature in the Pixel Manager under General → General via the Lazy-load the Pixel Manager toggle.
-
Third-party plugins: Some JavaScript optimization plugins can change the loading order of the Pixel Manager und thus cause the warning.
We haven't seen any measurable impact on the tracking quality when using the Pixel Manager lazy loading feature. We can't speak for third-party plugins. In general we would say, if you see the warning, but everything else is working fine, you can safely ignore it.
If you however feel better without the warning, you can disable the lazy loading feature in the Pixel Manager under General → General via the Lazy-load the Pixel Manager toggle, or disable the third-party plugin that causes the warning.
GA4
Unassigned traffic in GA4
GA4 may show transactions coming from unassigned traffic. The most common reason for this is when you're using the GA4 Measurement Protocol.
Using the GA4 Measurement Protocol has one main advantage. It tracks all transactions with the correct revenue value. You should see the revenue match the revenue in WooCommerce very closely.
However, using the GA4 Measurement Protocol also allows to track transactions from browsers that block third-party cookies and tracking. These transactions are then shown as unassigned traffic in GA4.
If you want to avoid unassigned traffic in GA4, you can disable the GA4 Measurement Protocol in the Pixel Manager under Tracking Pixels → Google (Ads & GA4) by clearing the API Secret (for Measurement Protocol) field. But, keep in mind that this will also disable the correct transactions and revenue tracking.
It is worth mentioning that there are other limitations using the GA4 Measurement Protocol. Some of the limitations are listed in the following support article: GA4 Measurement Protocol limitations