Shop Settings
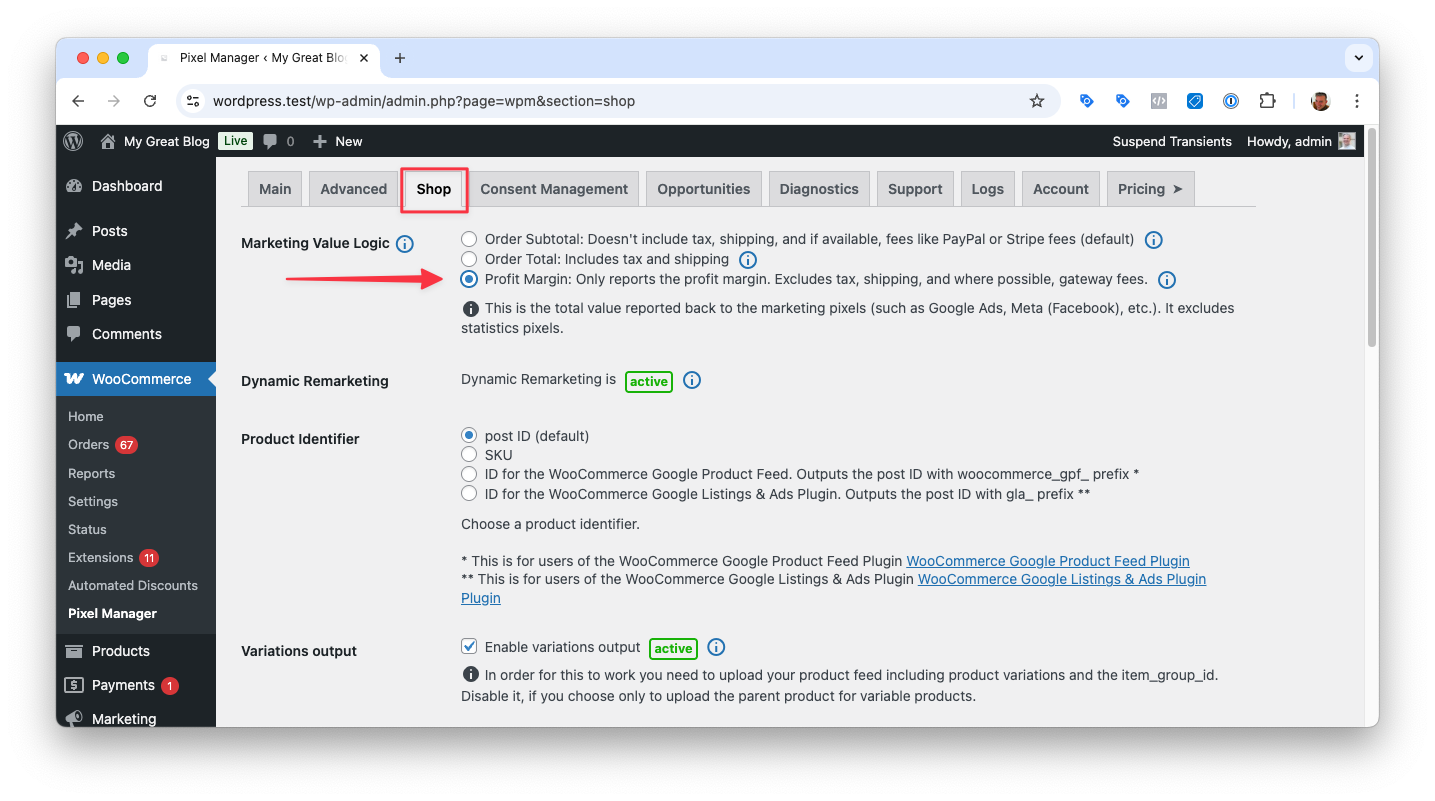
Marketing Value Logic
The marketing value logic controls the output of the marketing total value, which is sent to the marketing pixels (Google Ads, Facebook Ads, etc.). This setting excludes statistics pixels, such as Google Analytics, that will always receive the full total cart value, including taxes and shipping.
Order Subtotal (default)
The order subtotal represents the total minus the shipping costs, taxes, discounts, and if available, fees like PayPal or Stripe fees.
It is the default setting in the plugin.
Order Total
The order total is what the customer paid and includes the shipping costs and taxes.
Profit Margin
This setting requires one of the following Cost of Goods Sold sources to be active:
- WooCommerce built-in COGS — Enable in WooCommerce → Settings → Advanced → Features → Cost of Goods Sold (available since WooCommerce 9.5, no additional plugin required)
- WooCommerce Cost of Goods (SkyVerge)
- Cost of Goods for WooCommerce (WPFactory)
You may also use a custom postmeta field for the COGS. Read further down below on how to enable it.
The Pixel Manager will calculate the profit margin on the order and send that to the marketing pixels. It is the order total paid by the customer, minus shipping fees, taxes, discounts, and cost of goods for each product.
If cost of goods has not been set on a particular product, the Pixel Manager will use a value of zero for that product.
Use a custom postmeta field for the COGS
Using the following filter you can instruct the Pixel Manager to retrieve the Cost Of Goods Sold from a custom product postmeta field. Once the filter is active you'll also be able to choose and enable the Profit Margin logic in the settings. The Pixel Manager will then use the custom product postmeta field to calculate the profit margin on each order.
add_filter('pmw_custom_cogs_meta_key', function () {
	return 'NAME_OF_THE_CUSTOM_PRODUCT_POSTMETA_KEY';
});
The Pixel Manager will try to subtract payment gateway fees as well. However, not all payment gateway plugins store the fees in the dedicated place within the WooCommerce order. Therefore, we had to build an additional method to retrieve the payment gateway fees for those payment gateway plugins that store the fees in the postmeta table.
For now, the Pixel Manager can only subtract payment gateway fees for the following plugins:
If you use a different payment gateway plugin and want us to implement the subtraction for that plugin too, please reach out to us, and we will try to implement that as soon as possible.
Dynamic Remarketing
General Information
In order for the dynamic remarketing to work, you need to either upload your products into the platform catalog (Google Merchant Center for Google Ads, Meta (Facebook) Catalog for Facebook, etc.) Google Merchant Center, or upload a custom business feed into your Google Ads account.
We strongly recommend uploading the products with post ID as identifier. Using the SKU can lead to much more issues and more difficult situations to debug.
-
Check your Product Identifier setting and adjust if necessary.
The product identifier must match the product identifiers that have been uploaded to the catalog.
-
The output for variations is enabled by default. This requires that you upload the product variations with your product feed as well, including the
item_group_id. Depending on the feed plugin you use, this might be enabled or disabled by default. So make sure to double-check. We recommend including the variations into the upload.
Variations Output
The Variations Output setting controls whether the Pixel Manager sends variation-level product information or parent product information for variable products. This setting is enabled by default and is the recommended configuration for most shops.
How It Works
When a customer interacts with a variable product (e.g., a t-shirt with different sizes and colors), the Pixel Manager needs to decide which product ID to send with tracking events:
- Variations Output Enabled (Recommended): Sends the specific variation ID (e.g., "Blue T-Shirt, Size M") with all tracking events.
- Variations Output Disabled: Sends the parent product ID (e.g., "T-Shirt") regardless of which variation the customer selected.
Affected Events
This setting affects all product-related tracking events across all advertising platforms:
view_item– When viewing a product page (including variation selection)add_to_cart– When adding a product to the cartremove_from_cart– When removing a product from the cartview_item_list– When viewing category or search result pagessearch– When viewing search resultspurchase– When completing an order
Affected Platforms
This setting affects all marketing pixels supported by the Pixel Manager equally.
When to Enable (Recommended)
Enable Variations Output when your product catalog/feed includes all product variations as separate items. This is the recommended approach because it:
- Enables more precise retargeting (showing customers the exact variation they viewed)
- Allows better audience segmentation at the variation level
- Provides more accurate conversion tracking for specific product variants
When uploading variations to your product feed, ensure your feed plugin includes the grouping field that links all variations to the same parent product. For Google Merchant Center, this is the item_group_id field. Other platforms may use different field names for the same purpose.
When to Disable
Disable Variations Output only if your product catalog/feed contains only parent products for variable products. This might be the case if:
- Your feed plugin doesn't support exporting variations
- You have a very large catalog and want to reduce feed complexity
- The advertising platform you're using has limitations with variation-level tracking
Disabling this setting when your feed contains variations (or enabling it when your feed only contains parent products) will cause a mismatch between the product IDs sent by the Pixel Manager and the IDs in your product catalog. This breaks dynamic remarketing and can result in "product not found" errors in your advertising platforms.
Google Ads
There are several ways to upload your products to the Google Merchant Center. The easiest one is to use a feed plugin. So far, we can recommend the following two:
Google Merchant Center Feed
- Google Product Feed by WooCommerce.com
- Relatively easy to use
- Has difficulties handling large feeds
- Only good for Google Ads and Microsoft Ads
- WooCommerce Product Feed Manager by WPMarketingRobot
- Many options, but comparably difficult to set up
- Handles large feeds very well
- Supports many marketing channels
Custom Business Feed
For countries where the Google Merchant Center is not available, you can upload your product using a custom business feed. Create a feed
You will also need to set the Google Business Vertical to 'custom'. This is available in the Pro version of the Pixel Manager.
Setting Up Dynamic Remarketing Audiences in Google Ads
Within Google Ads browse to > Shared Library > Audience Manager > Audience Sources.
- Click on Setup Tag
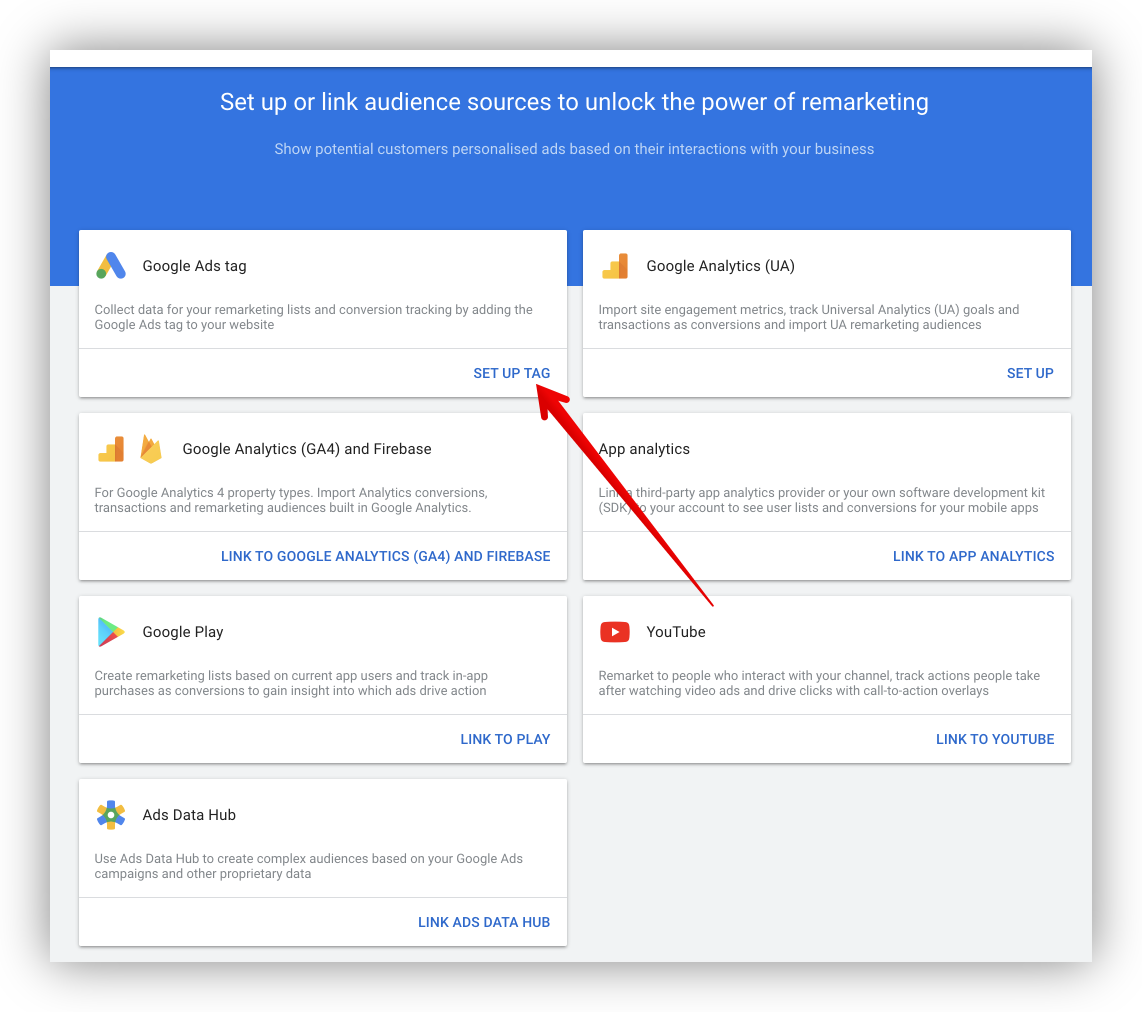
- Configure basic settings
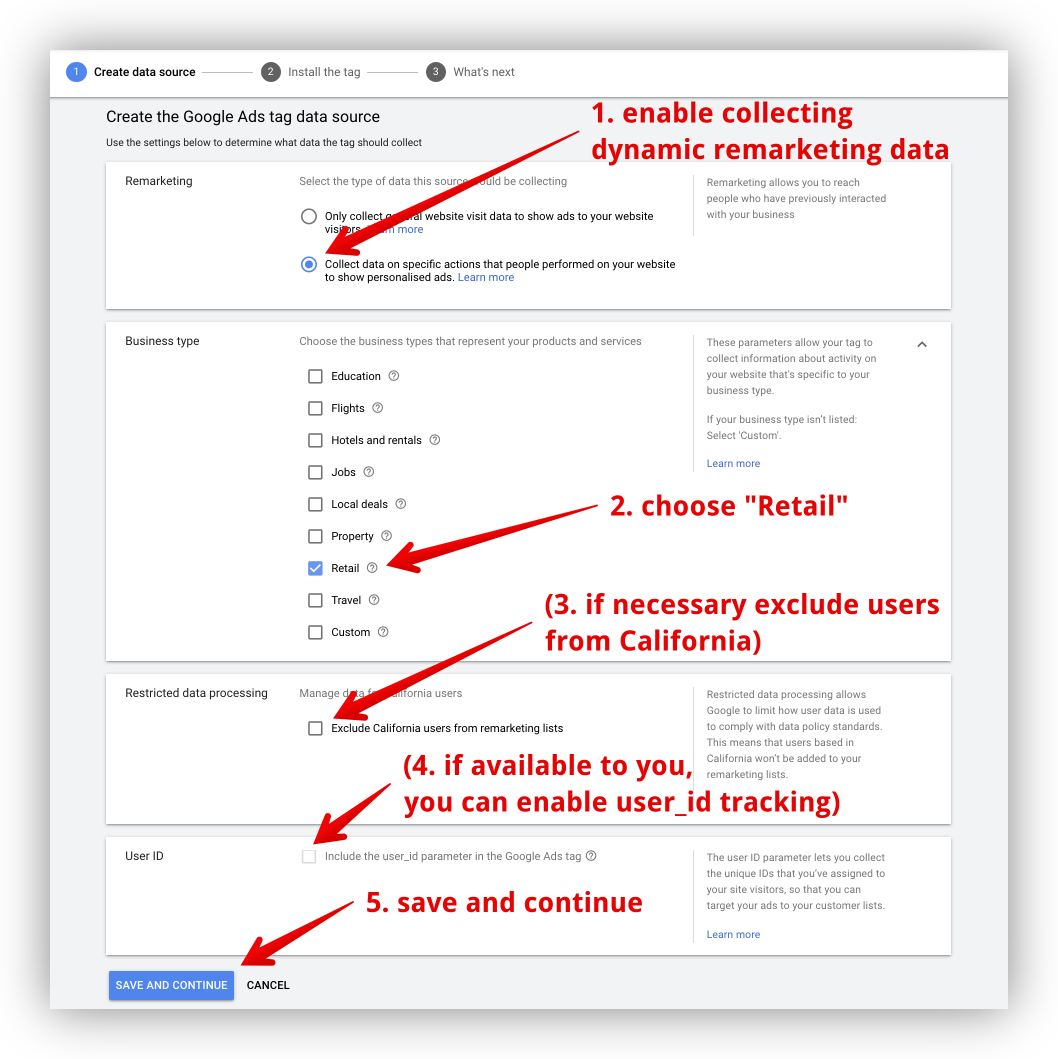
- Finish setup
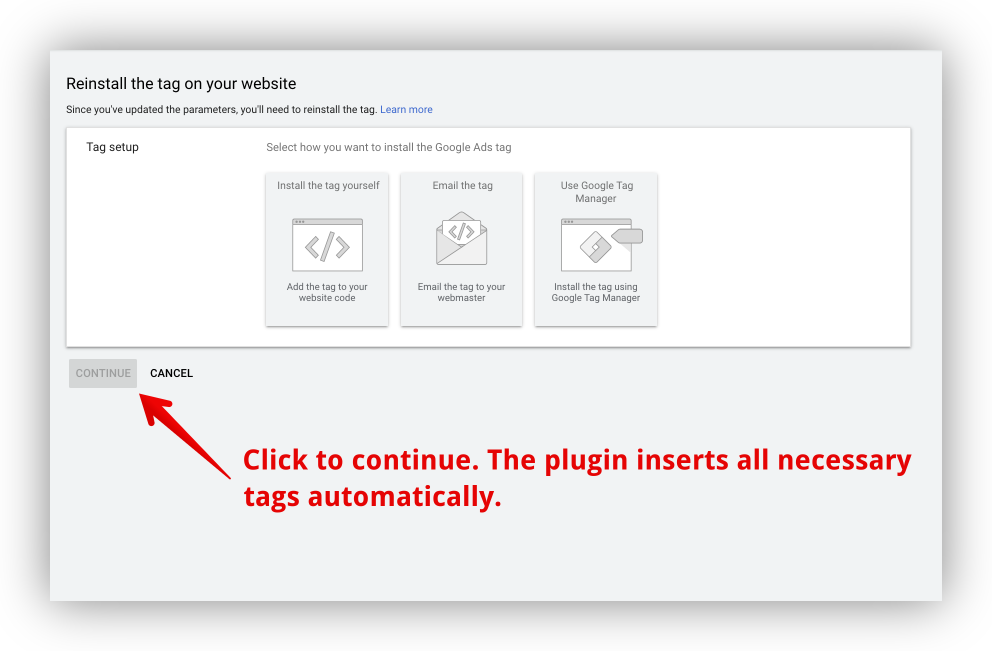
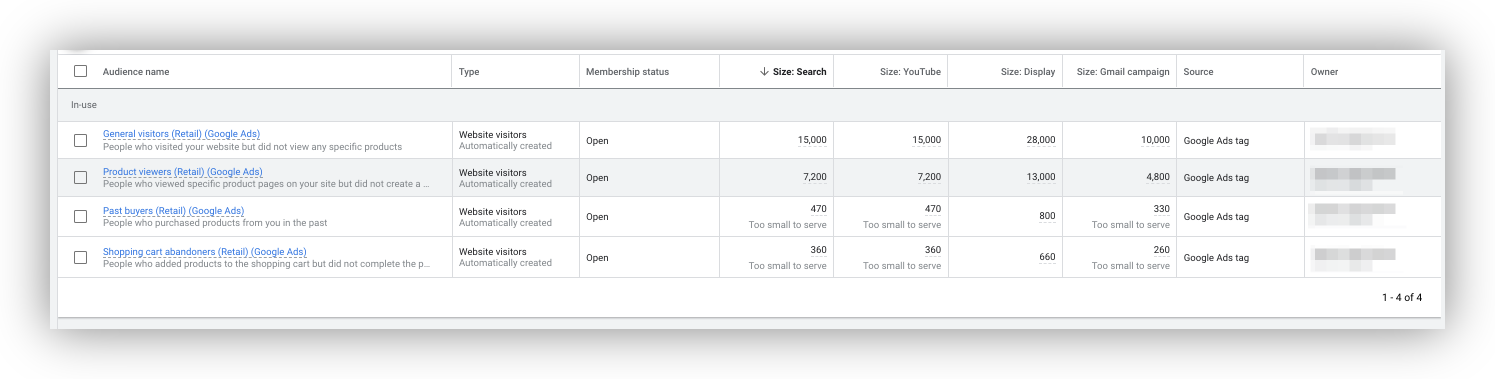
After finishing the setup, Google Ads will automatically create four new dynamic remarketing audiences.
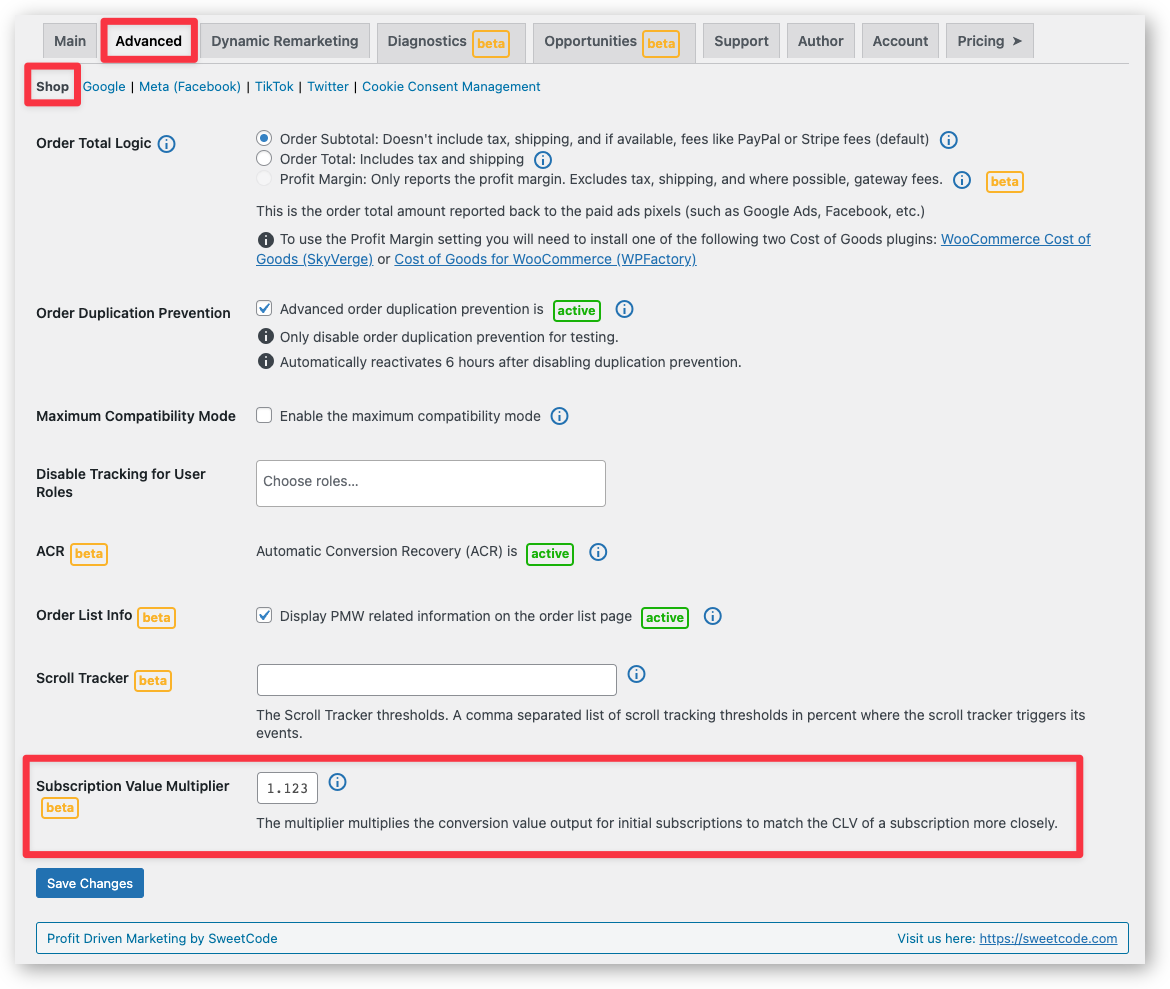
Subscription Value Multiplier
This is a pro feature. Get the pro version here
By default, the conversion value for subscriptions transmitted to the paid ads conversion pixels only contains the value of the first subscription. But, a subscription may yield a much higher effective conversion value or customer lifetime value (CLV) because a subscription usually creates more than one automatic order in the future. Unfortunately, all those future conversion values can't be captured by the paid ads conversion pixels because they don't require checkout by the visitor using the browser.
Therefore, we implemented the subscription value multiplier into the Pixel Manager. It multiplies the subscription value to closely match the effective conversion value or customer lifetime value generated by a subscription.
The default value of the setting is 1.00. You can set any multiplier larger than 1.00.
How to determine an appropriate multiplier
There is no general multiplier that can be used for all shops. The multiplier entirely depends on how long a subscription lasts on average for a specific shop.
A good approach is to average how often a subscription renews before the customer cancels it.
To calculate this, take the total count of subscription orders (initial and renewal orders) and divide it by initial subscriptions. This will give you an average number of times a subscription is renewed. And that is the number that you can use as a multiplier. Feel free to use a slightly lower number to stay on the more conservative side to account for fluctuations in the effective renewal multiplier over time.
Lifetime Value Calculation
The Pixel Manager can calculate the lifetime value (LTV) of a customer based on the total order value and the marketing value of all orders. The value is then available on the order details page and can be used by marketing pixels to optimize ad campaigns.
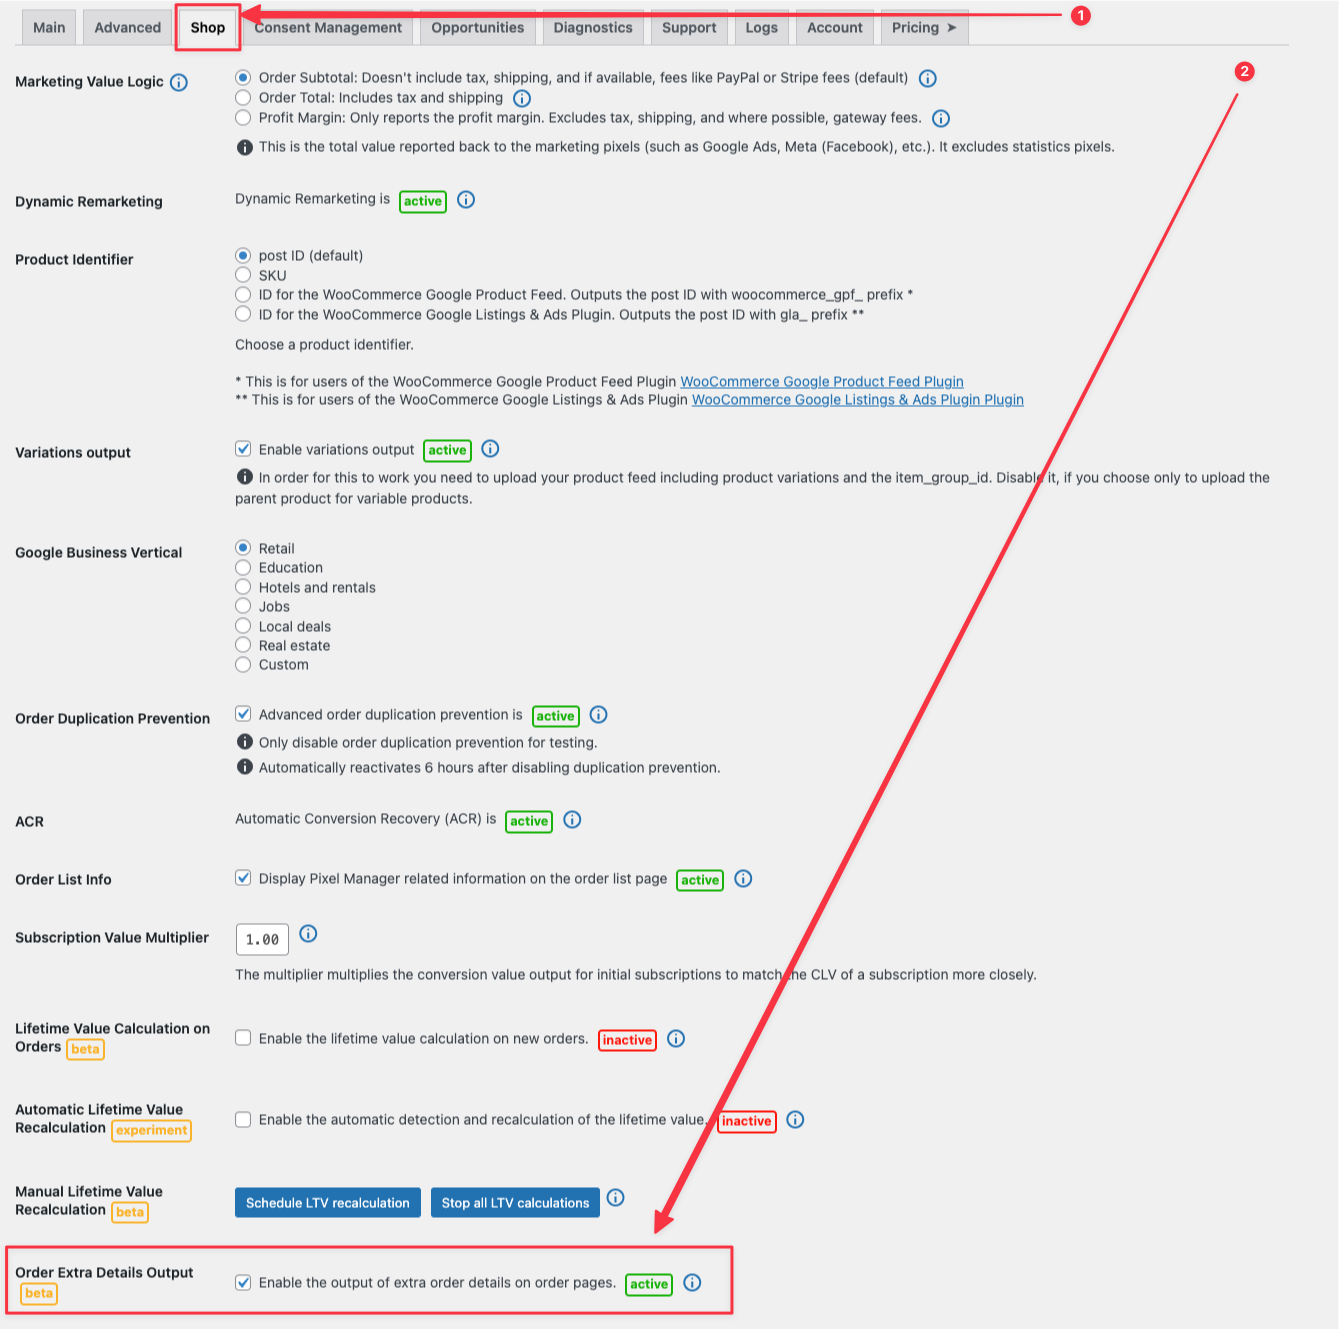
Active Lifetime Value Calculation
- Go to the Pixel Manager's Settings page.
- Go to Advanced > Shop.
- Enable the Lifetime Value Calculation on Orders setting.
- Click on the Save Changes button.
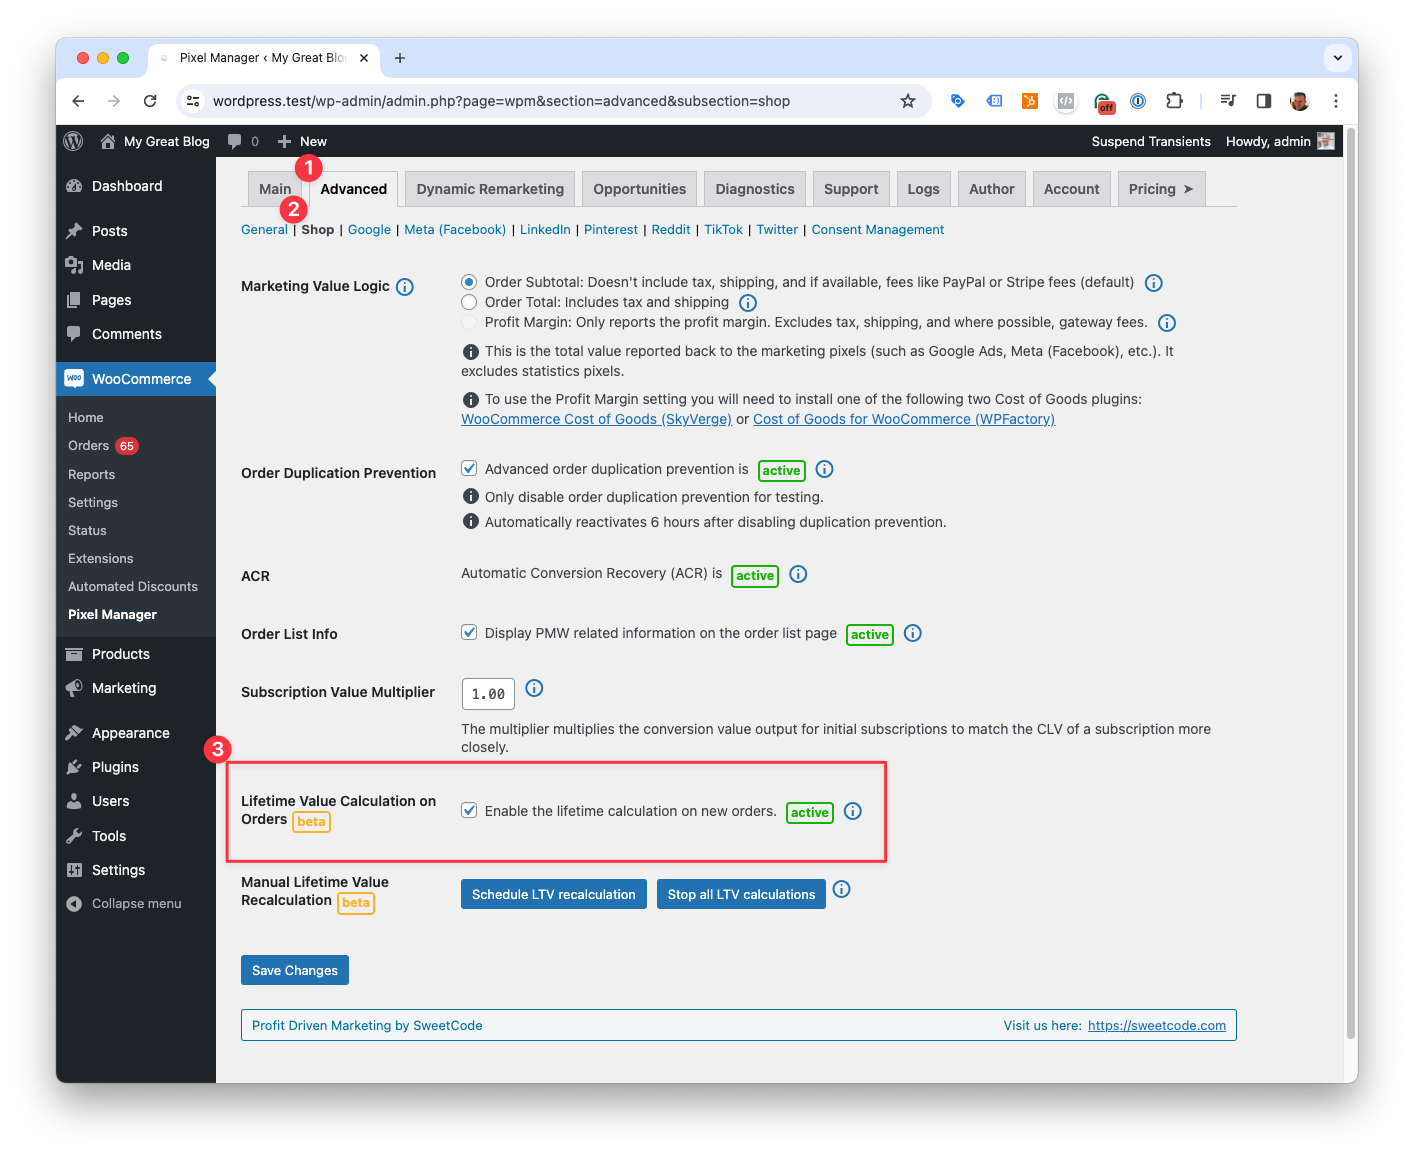
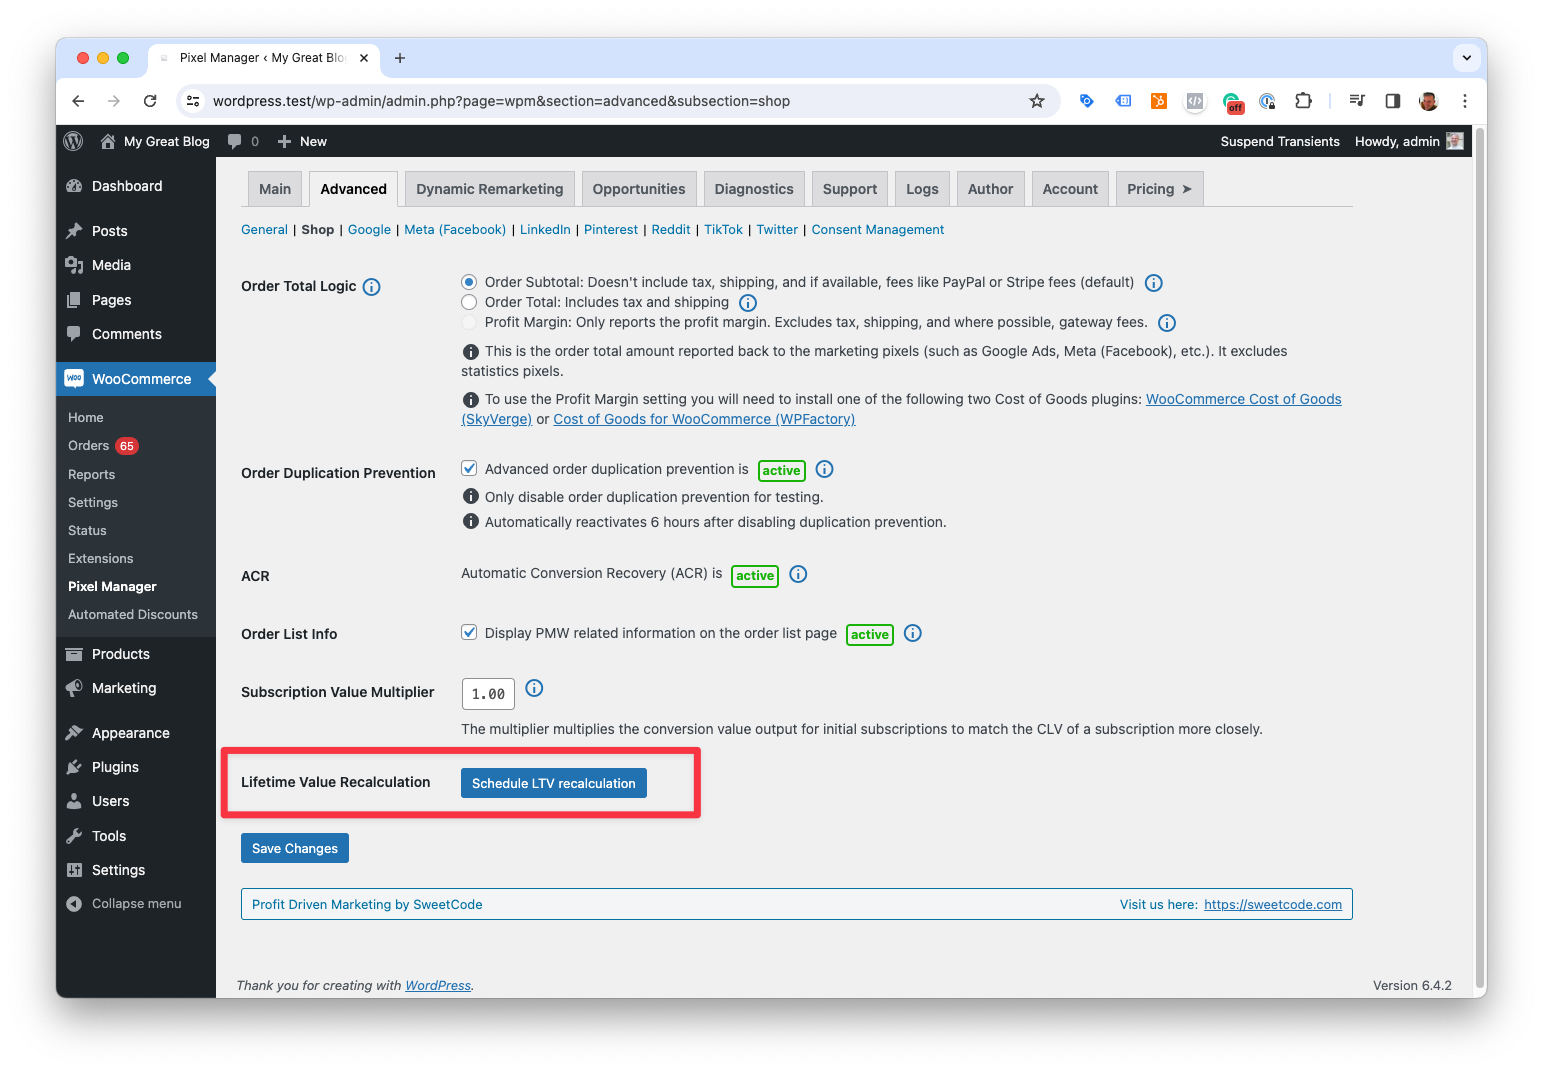
Lifetime Value Calculation Recalculation
The lifetime value (LTV) of a customer is calculated automatically each time a customer places an order. Under certain conditions, you may want to trigger a recalculation of the LTVs for all customers manually.
To trigger the recalculation manually, go to the Pixel Manager's Settings page and click on the Schedule LTV recalculation button.
The Pixel Manager calculates different types of lifetime values:
- Total order value LTV: This LTV is the sum of all total order values of a customer.
- Marketing value (LTV): The marketing value LTV is the sum of all order marketing values. The marketing values are based on your order total logic setting. It will take the value calculated by the order total logic for each order and sum them up. If you use a custom marketing conversion value filter, then the marketing value LTV will be based on that value.
The Pixel Manager tries to autodetect if the order total logic or if the marketing conversion value filter have changed. If that is the case, the LTVs will be recalculated for all customers over night.
There are two reasons why you would want to trigger the recalculation manually:
- You want to recalculate the LTVs immediately after changing the order total logic setting or the marketing conversion value filter.
- If you are using a custom marketing conversion value filter, that only changes the value on a subset of orders, then the automatic detection might not pick up the change. In that case, you should trigger the recalculation manually.
If you click once, it will schedule the recalculation for the next night. If you click twice, it will run the recalculation immediately.
Bear in mind, a recalculation of the LTVs for all customers can take a long time and take up a lot of server resources. Therefore, it is recommended to only trigger the recalculation manually if necessary and let the Pixel Manager schedule it for the next night.
The Pixel Manager uses the Action Scheduler to run the recalculation in the background. It may trigger timeout messages in the log files. Those can be ignored. The Pixel Manager handles them internally and ensures that the recalculation is completed.
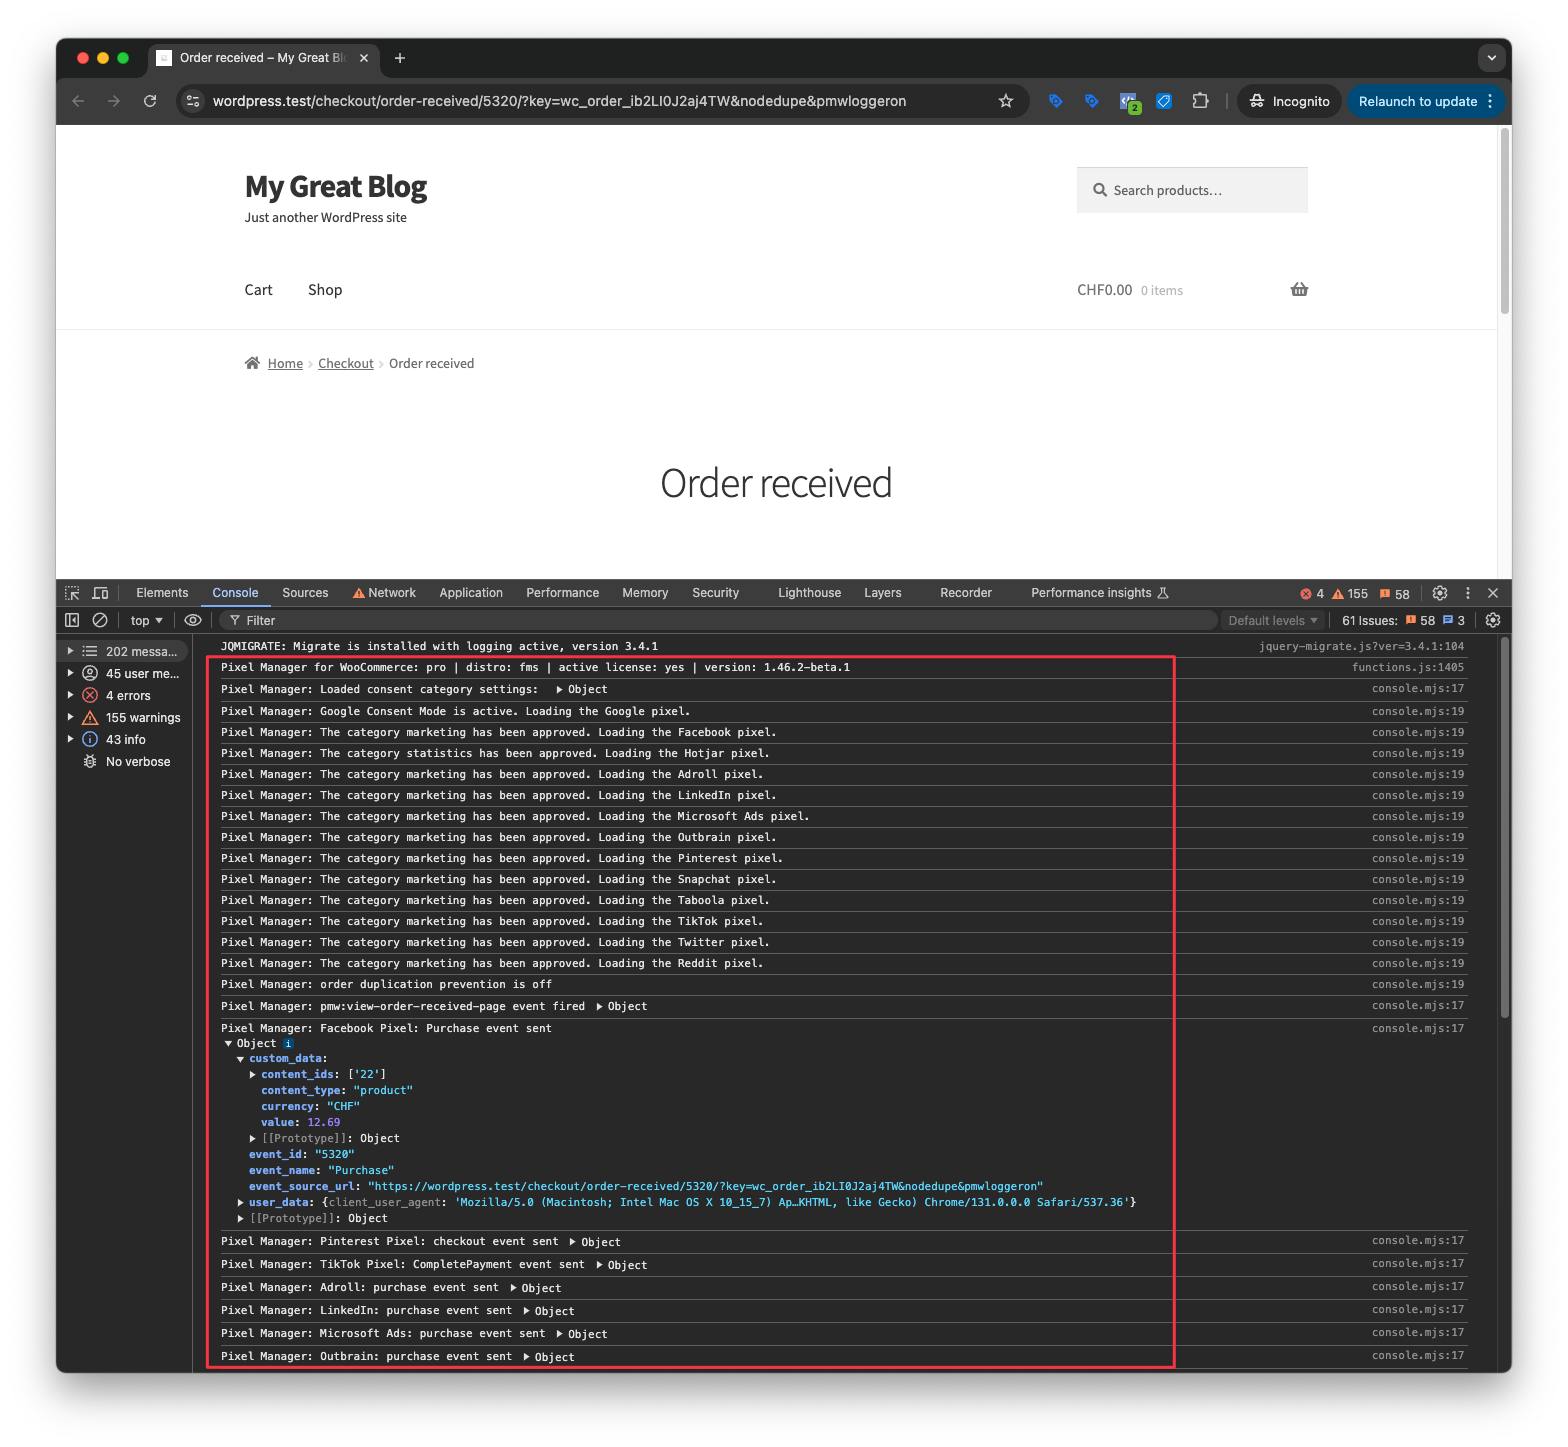
Extra Order Data Output
The Pixel Manager can output extra order data that helps you to debug and understand that data that is sent to the marketing pixels.
Enable the setting Extra Order Data Output in the Pixel Manager's settings.
Now you will see the extra order data on each order details page.
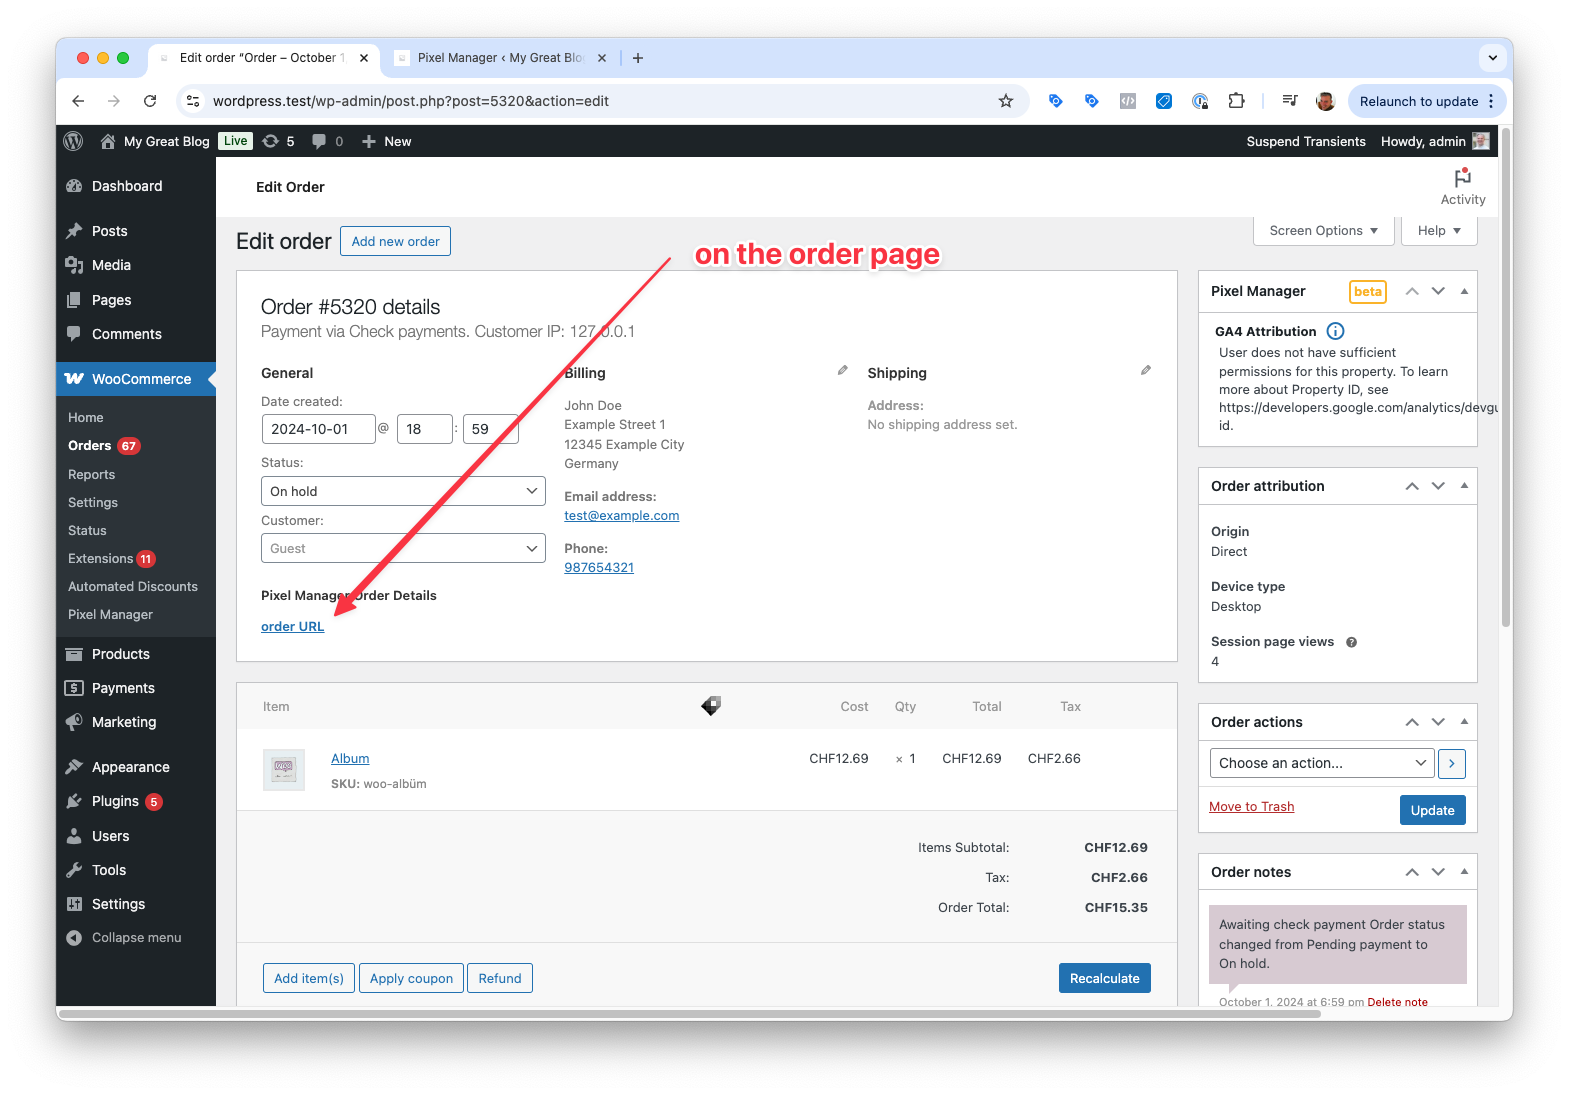
Order URL: When opening this special link the Pixel Manager will be instructed to output all the data that is sent to the marketing pixels in a human-readable format in the dev console.
The recommended way is to right-click on the order URL and open it in an incognito window. Then in that window open the dev console. You will see the data that is sent to the marketing pixels in a human-readable format.