How to Set Up Ecommerce Conversion Tracking for Google Ads on Your WooCommerce Store

TLDR
- Tracking your conversion rate is vital to creating better Google Ads campaigns but can be tough to do manually.
- A plugin can give you more features and functionality, save you time, and reduce your development costs.
- This tutorial will show you how to set up WooCommerce ecommerce tracking using Pixel Manager for WooCommerce.
If you want to know whether your Google Ads are generating conversions on your ecommerce store, you'll need to track them. Setting up WooCommerce ecommerce tracking is straightforward if you have the right tools at your disposal.
Google Ads is one of the most popular advertising platforms on the planet. Lots of online stores use it to target potential customers based on their interests. You can also use Google Ads to increase brand awareness and visibility of your products and services. For instance, you can target platforms such as YouTube, and leverage Google search pages to showcase your WooCommerce items. Using these Ad strategies you can grow your audience, target the right demographic for your business, and increase the chance that people will visit your store.
If you run (or plan to run) Google Ads for your WooCommerce store, you'll want to set up conversion tracking. It's important to know how your Ads perform, so you can make adjustments to improve them. In contrast, it's also vital to know which Ads perform well, so you can invest more in those campaigns.
For this tutorial, we'll explore how to set up WooCommerce ecommerce tracking for your Google Ads conversions using the Pixel Manager for WooCommerce plugin. First, let's discuss why you should track your Google Ads conversions.
Why you should track your Google Ads conversions
A Google Ads campaign can include many different types of advertising formats. For example, text ads, image ads, and video ads are common. This makes Google Ads campaigns suitable for almost every type of business.
Conversion tracking is a key way to figure out the efficacy of your Google Ads campaigns. In general, it helps you analyze how well your online marketing campaigns perform, and whether you need to optimize your Ads in any way.
In practical terms, this means you'll discover more about the shopping behavior of your site's visitors once they hit your site through a Google Ads click. For example, you can find out which product pages garner interest and lead to a conversion, or discover whether your customers are interested in your product upsells. You're also able to understand how many customers complete the checkout process, their Average Order Value (AOV), Customer Lifetime Value (CLV), and much more.
Using conversion tracking means you can begin to understand whether your target audience is responding to your Google Ads. From there, you can decide whether you should expand your scope to different customer groups, or double down on the group you're currently trying to reach.
The best way to set up ecommerce tracking for a WooCommerce store
As with many other facets of WordPress functionality, there are two main ways to set up WooCommerce ecommerce tracking:
-
The manual approach: You can set up conversion tracking using code snippets in the WordPress dashboard, and some extra setup and management within Google Ads. If you have coding knowledge and experience, this advanced method could be a viable option. Regardless, you still might find it a time-consuming and cumbersome experience, as you'll need to input and manage each code snippet for each Google Ad you want to track.
-
Using a plugin: For most WordPress users, the ideal option is to use a dedicated plugin to set up WooCommerce ecommerce tracking. Plugins can save you time, reduce your development costs, and often provide a non-technical and simple setup process.
A plugin can also give you more features and functionality than you can implement yourself. Such features include order duplication prevention, compatibility with all browsers, and data privacy features (GDPR).
What a pixel tracking WordPress plugin can do for you
A pixel tracking WordPress plugin implements a single pixel on your site from another platform – Google Ads in this case – that lets you collect and track ecommerce data. This lets you obtain information on the users who hit your site through specific Google Ads.
Keep in mind that if you're running Google Ads as a store owner, you'll want a plugin that lets you add tracking pixels directly from a Google Ads account. In your case, you'll want to avoid installing a plugin that only integrates with Google Analytics. Bear in mind that there are a lot of plugins that can connect to Google Analytics, but don't offer the same functionality for Google Ads.
You do have the possibility to set up Google Ads (and your WooCommerce store) as a "property" within your Google Analytics account. However, you'll get more limited data compared to having a Google Ads pixel directly in your WooCommerce store.
You may think it's best to have separate plugins for Google Analytics and Google Ads. However, this is not the case. Single-purpose plugins usually don't set the scope correctly and can cause tracking accuracy issues, which can compromise your data sets across one or both platforms.
The ideal solution is to use a conversion tracking plugin that lets you set up both pixels for both Google Analytics and Google Ads. While your main aim is collecting data about how users interact with your Google Ads, it's also very important to collect conversion data about your organic users, such as the top traffic sources resulting in conversions.
Choosing the best plugin for WooCommerce ecommerce tracking
While there are lots of WordPress plugins that let you add tracking pixels to your WooCommerce store, not all have compatibility and integration with Google Ads. They might not also provide the best tracking accuracy.
Pixel Manager for WooCommerce is developed specifically for WooCommerce and makes it as easy as possible to track Google Ads conversions using a dedicated tracking pixel.
There are a number of key benefits to the plugin that warrant a mention:
- First, you can add a tracking pixel to your WooCommerce store directly from your Google Ads account.
- The plugin provides horizontal integration across many other platforms too. You're able to set up tracking pixels for Facebook Ads, Twitter Ads, Microsoft Ads, Google Analytics, and many more platforms.
- You won't need any prior coding knowledge to use Pixel Manager for WooCommerce. The plugin was designed for performance marketers who want a straightforward solution to set up event tracking.
- For the tech savvy, Pixel Manager for WooCommerce also offers plenty of documentation on the plugin's official site and hooks that you can use to finetune the output. However, this isn't necessary if you simply want to set up conversion tracking quickly!
On the whole, Pixel Manager for WooCommerce offers superb functionality and unrivaled tracking accuracy. The plugin is available in five different plans ranging from 1 site to 25 sites, each offering the full set of features.
How to set up Google Ads conversion tracking with Pixel Manager for WooCommerce (in 3 steps)
Over the rest of the article, we're going to show you how to set up WooCommerce ecommerce tracking with Pixel Manager for WooCommerce. The first step in the process is to install and activate the plugin, so let's look at this now.
1. Install and activate the Pixel Manager for WooCommerce plugin
Your initial task is to choose the right plan for your needs. Once you do this, you can either choose to pay the cost upfront or select a 14-day free trial. You'll receive a license key and a ZIP file that contains the plugin in your email inbox.
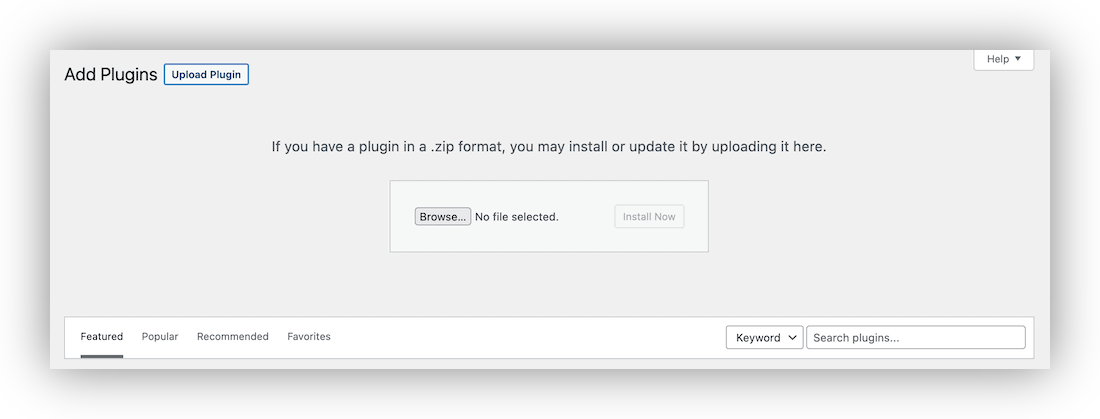
Once you have this ZIP file, log into WordPress and head to the _Plugins > Add New _screen:

This will bring you to a list of plugins to download: the WordPress Plugin Repository. Look to the top of the screen and select Upload Plugin. This will open a dialog that will let you search for your ZIP file. Once you find it, click the Install Now button:
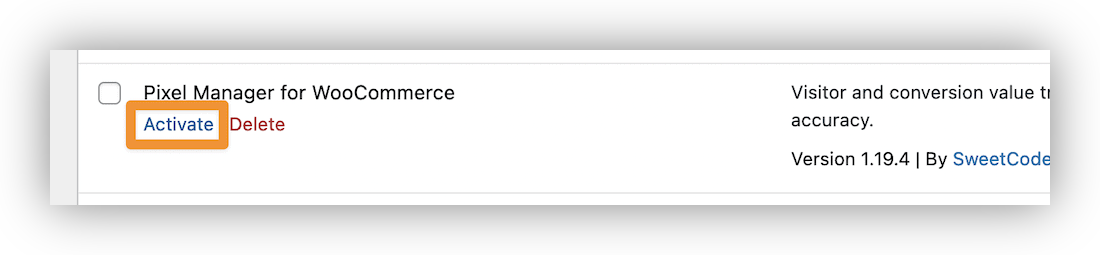
If you don't see a screen here to activate the plugin, head to the main Plugins page, scroll to find the plugin in the list, and click on the Activate link:
2. Add a Conversion ID and Conversion Label from Google Ads
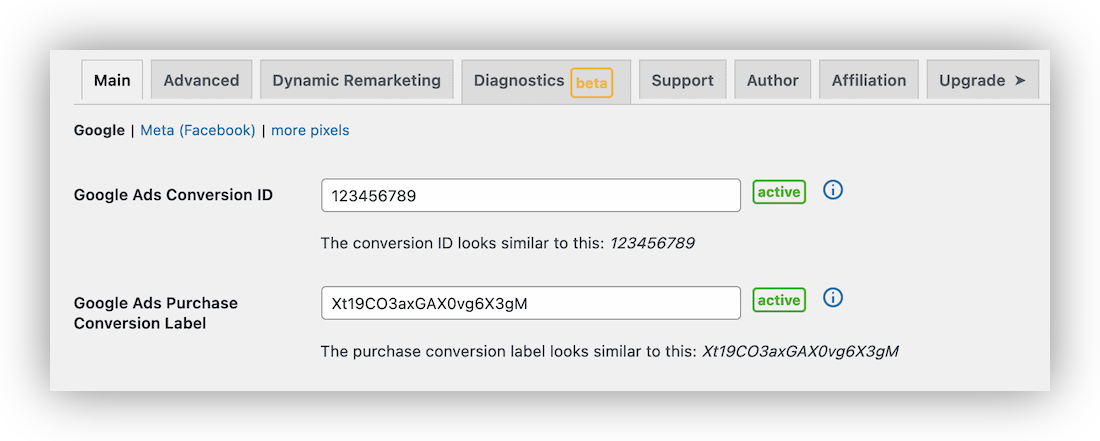
The activation process will automatically bring you to the WooCommerce > Pixel Manager plugin settings screen. You'll see the Main tab first, which contains lots of entry fields.
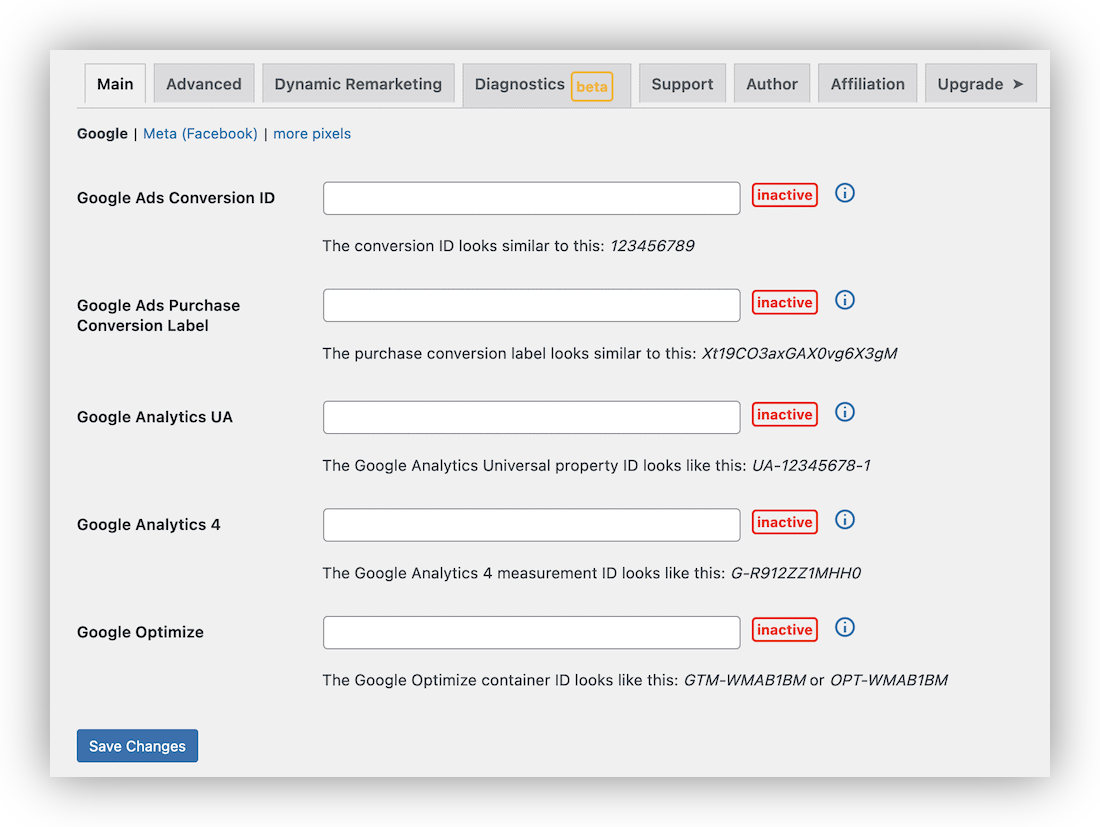
To set up tracking for Google Ads, you'll want to find the Conversion ID and Conversion Label within your Google Ads account:
- First head to Google Ads, and log into your account.
- Head to Tools and Settings > Measurement > Conversions.
- This will display the Conversion ID and Conversion Label values.
Once you have these, head back to WordPress, and enter the values into the appropriate fields on the WooCommerce > Pixel Manager > Main screen. You can then save your changes.
If you haven't created the conversion yet, you will need to do this first:
- Open the Tools & Settings > Conversions screen within Google Ads.
- Click the Plus icon on the Conversion Actions page.
- Next, choose the Website conversion action.
- Enter your site's domain, and click the Scan button.
- Once this process finishes, click the Add a conversion action manually link.
From here, you'll want to configure your conversion action details. We recommend the following default settings:
- Goal and action optimization: Purchase.
- Conversion name: Purchase.
- Value: Use different values for each conversion (and set the default value to Zero.)
- Count: Every.
- Attribution: Data-driven.
Once you do this, click the Done button. You'll now have a new purchase conversion set up for your site, and you'll now be able to retrieve your Conversion ID and Purchase Conversion Label.
3.a. Conversion cart data
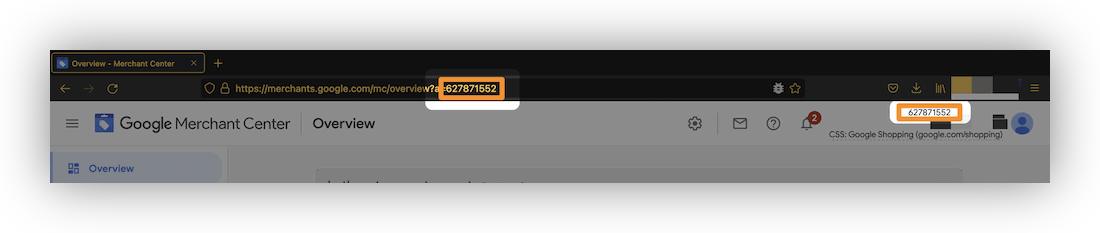
Google lets you add greater detail to your purchase conversion using the Conversions with Cart Data (CwCD) metric. This adds further information about the items you're selling. To set this up, you'll need to add your Google Merchant Center ID to Pixel Manager for WooCommerce.
You'll need a Google Merchant Center account, and you can find the ID either in the top right-hand corner of the screen or within the URL once you log in:
From here, head back to the WooCommerce > Pixel Manager screen in WordPress, and navigate to the Advanced > Google screen. Here, add the ID to the Conversion Cart Data field:
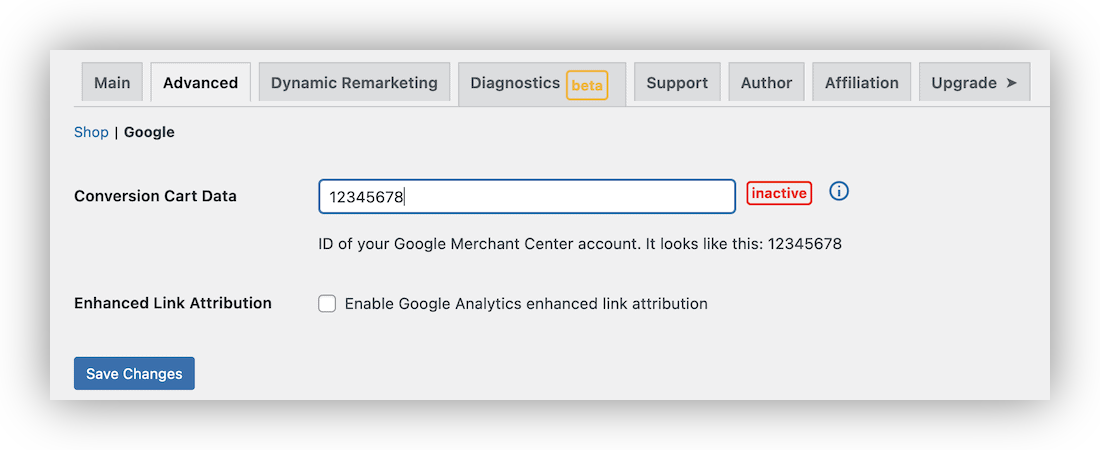
Once you save your changes, you'll be able to leverage CwCD for your purchase conversions.
3.b. Phone Conversion number
Pixel Manager for WooCommerce can also track phone conversions. This is where you'll be able to record the conversion data on any phone number link on your site. Google offers a comprehensive guide to set this up. The process involves Google swapping out your phone number for one of its own under the hood.
To find out whether you have this activated, you can append an anchor to the URL of a page on your site that contains a phone number: #google-wcc-debug. If this is active, you'll spot the phone numbers on your site change to Google-approved ones.
3.c. Enhanced conversions
Enhanced conversion lets Google send first-party conversion data with greater security. This will lead to even better accuracy in how you measure conversions. Pixel Manager for WooCommerce supports enhanced conversion tracking.
Before you enable enhanced ecommerce tracking, you'll want to make sure your site complies with Google's customer data policies. To confirm this, head to the Tools & Settings > Measurement > Conversions > Settings screen within your Google Ads account. From here, read the customer data terms and click to accept them.
Next, head back to the Tools & Settings > Measurement > Conversions screen, and find the Edit your purchase conversion option. From here, open the Enhanced Conversions section, and set the following options:
- Check the box to turn on Enhanced Conversions.
- Select a Tag type as “Global site tag.”
- Use Edit code when asked to confirm how you want to set up enhanced conversions.
- Check the Use event snippet radio button.
Once you save your changes, you'll need to wait around 72 hours for diagnostic ecommerce reporting to appear in the conversion action. Please note that once diagnostics come in, Google Ads will often still show warnings about data quality, which usually go away after one or two weeks. There's no need to be alarmed by these warnings.
Set up ecommerce tracking for your WooCommerce store today
Conversion tracking for your Google Ads is one of the most important tasks you can carry out as a store owner. It gives you invaluable data that you can use to improve your Google Ads marketing campaigns and increase your conversions over the long term.
The Pixel Manager for WooCommerce plugin is the best way to implement WooCommerce ecommerce tracking on your site. You add a tracking pixel from one of many platforms (including Google Ads) that will give you the most accurate data about how potential customers find you and use your site after they click on a dedicated link.
It's also valuable to set up WooCommerce ecommerce tracking for Google Analytics too, along with platforms such as Facebook Ads, and Twitter Ads, which you can integrate into your marketing strategy.
Pixel Manager for WooCommerce gives you a straightforward way to manage pixels from your WordPress website and comes with a 30-day money-back guarantee. Choose your plan and get started with ecommerce tracking for your WooCommerce store today.