How to Set Up Conversion Tracking with Google Analytics 4: Step-by-Step Guide (2022)

TLDR
- It's important to track conversions on your WooCommerce site. This is the best way to measure whether your visitors are taking the actions that you want them to.
- When it comes to tracking your organic users, it's time to make the switch to Google Analytics 4. This platform is much more powerful and flexible than Universal Analytics. It tracks events rather than goals, making it a better fit for conversion tracking.
- To make conversion tracking more accurate, you should add a GA4 tracking pixel to your site via the Pixel Manager for WooCommerce plugin.
E-commerce businesses expect their customers to take certain actions when they visit their websites. These are known as conversion actions and can be any action that you've defined as being valuable to your business. If you run a WooCommerce site, the expected action is purchase conversion.
Conversion tracking is important because better conversion data collection means better-informed marketing strategies for your business. To start tracking conversions, you can use Google Analytics 4 (GA4). This tool provides a more powerful way to get customer data than previous versions of Google Analytics. Universal Analytics is set to be totally phased out by Google in July 2023; therefore, it's important to start using GA4 in your business for conversion tracking.
In this article, you'll learn how to set up conversion tracking for your WooCommerce site with GA4 and Pixel Manager for WooCommerce, a plugin that lets you add conversion tracking codes to your site and ensures the accuracy of your data.
The GA4 measurement model is based on parameters and events, while the Universal Analytics model is based on page views and sessions. This makes the GA4 platform more flexible and superior to its Universal Analytics counterpart. The GA4 platform supports website and mobile apps, allowing users to consolidate their data for websites and mobile applications in a single property.
Additionally, GA4 roll-up reporting is much more accurate. That's because it uses the same schema for tracking users' activities for both websites and mobile apps.
The GA4 platform also provides automatic tracking for specific types of events without the need for changing codes. What's more, GA4 has a built-in enhanced measurement feature, allowing automatic conversion tracking.
What Conversion Events Can I Track in Google Analytics 4?
In Universal Analytics and other outdated versions of Google Analytics (GA), conversions are categorized as “goals.” So for conversion tracking, businesses would define goals related to visitor conversions based on factors such as:
- The number of pages viewed
- The duration a visitor spends on your website
- Events (such as a visitor playing video)
- A customer's destination (a customer landing page on a particular page would trigger the completion of a specific goal)
However, GA4 is different. It no longer treats key interactions as “goals” but as “events.” GA4 automatically tracks purchase events as conversions for websites. You can even mark up to 30 app and web events as conversions per analytics property, allowing greater flexibility and refinement in measuring your key user actions.
In GA4, you can track conversion events based on four categories:
- Automatically collected events
- Enhanced measurement events (automatically tracks events such as file download, scroll, outbound link click, video engagement, etc.)
- Recommended events
- Custom events
In GA4, you have much more flexibility to set up and track new conversion events, view conversion reports, and define event parameters to ensure your conversion data is specific to your needs.
The platform lets you get even more granular with your tracking and helps track micro and macro conversions along your sales funnel. The new Google Analytics interface drills down on conversion metrics – to help you understand where customers are coming from and the path they're likely to follow on your website.
There are many events that Google recommends setting up tracking for. But the downside to manually setting up conversion events is that it can get tedious and time-consuming, especially if you're less experienced.
For this reason, we recommend using a conversion tracking pixel plugin to help you track the most important events for your WooCommerce store.
How to integrate Google Analytics 4 with WooCommerce
Now that we've discussed why you should track conversion events in Google Analytics 4, let's talk about what you need to get started. The reality is that you won't get the most accurate or comprehensive data if you just add your site as a property in GA4.
The best way to optimize conversion tracking on your WooCommerce store is to use a tracking plugin. In essence, having a conversion tracking plugin helps you analyze the performance and measure the growth of your WooCommerce site more effectively. It's also a great way of retargeting your lost visitors and identifying the scope for improvement.
Here are the top three reasons you need a conversion tracking plugin for your online store:
- You don't need to set up conversion events manually. You'll just need to add your property ID to the conversion tracking plugin's backend, which will track specific events for you. Online marketers less experienced with GA4 will find this handy.
- Tracking pixels helps keep the data complete and accurate. Although GA4 won't be able to track every event in your WooCommerce store, it has different ways to fill in data gaps, such as using modeling to attribute conversions to specific sources. If you have a tracking pixel plugin, you can record as many conversion events as you like.
- A plugin connects your WooCommerce store's data to your GA4 conversion reports. This means the data you access in GA4 is much more complete and accurate.
Introducing the Pixel Manager for WooCommerce Plugin
The Pixel Manager for WooCommerce plugin was built to integrate with WooCommerce and helps you track the behavior and conversions of your shop visitors.
Pixel Manager for WooCommerce is a horizontal integration plugin. Therefore, you can set up conversion tracking for various different platforms, including Google Ads, GA4 and Universal Analytics, Meta Ads, Twitter Ads, Snapchat Ads, TikTok Ads, Microsoft Ads, Pinterest Ads, and Hotjar.
You have many options to integrate conversion tracking with other platforms to get specific data from their platforms. For example, you may want to run Google Ads, and by integrating Pixel Manager for WooCommerce with your Google Ads account, you can learn how users behave on your site after they interact with your Ads.
Here's why Pixel Manager for WooCommerce is the best conversion tracking plugin available for WooCommerce:
-
Easy to set up. Install and add the relevant property IDs in the backend. The plugin provides lots of hooks to finetune the output giving you more customizability. That said, the plugin mainly focuses on important conversion-tracking events in WooCommerce, which is ideal for most users.
-
Most accurate pixel-tracking plugin on the market. With the use of additional cookies, your conversion tracking can be as precise as 96%. The Pixel Manager plugin closes the data gaps, making it easier for your business.
Data gaps happen when you fail to track all conversions. For instance, your online store is missing up to 20% of the conversions or the conversions are inflated by up to 20%, which provides inaccurate data. To avoid such scenarios, it's important to use an accurate tracking plugin like Pixel Manager for WooCommerce.
-
You can track major conversion events. The plugin tracks all e-commerce events and implements advanced pixel features, especially those recorded in GA4, such as purchase events and customers' total shopping cart values. With this information, you can determine areas that need improvement.
-
Tracks the success rate of different payment methods in your online store. If you accept different types of payments in your store, you need to know the performance of each. For instance, you may discover that 80% of PayPal payments are successful in your store, which will give you some context about why some purchase conversion actions are failing.
Using the Pixel Manager plugin and Google Analytics 4, you can optimize conversion tracking in several ways, including (but not limited to):
-
Setting up an Enhanced E-Commerce Funnel. Setting up enhanced e-commerce funnels for Google Analytics helps you track each step of the funnel accurately, including all four stages of the customer journey: Awareness (checkout started), Consideration (billing email added), Decision (payment provider chosen), and Loyalty (order placed).
-
Setting up a GA4 API Secret to track server-to-server conversion events that don't happen immediately, such as refunds and subscription events. Setting up the API Secret makes conversion tracking practically 100% accurate.
How to Set Up GA4 Conversion Tracking With Pixel Manager for WooCommerce
With the Pixel Manager for WooCommerce plugin, WooCommerce store owners can quickly start conversion tracking using GA4. This step-by-step guide walks you through how to set up GA4 conversion tracking using the Pixel Manager plugin.
Step 1: Connect your site to Google Analytics 4
For this step, let's look at the difference between creating a new GA property and adding a site to GA4 if it's already a Universal Analytics property.
Create a new Google Analytics 4 property
To create a new Google Analytics account, follow these steps:
-
Sign in to Google Analytics.
-
At the bottom left of the page, click “Admin.” Then click the blue “Create Account” button in the Account column.

-
Click “Next” to add the first property to your GA account.
-
Next step is to create a GA property. In the Property column, click “Create Property”.
-
Enter the name of your property (for example, “my business website”).
-
Click “Next” and choose a category for your industry and business size.
-
Click “Create” and accept GA's Terms of Service.
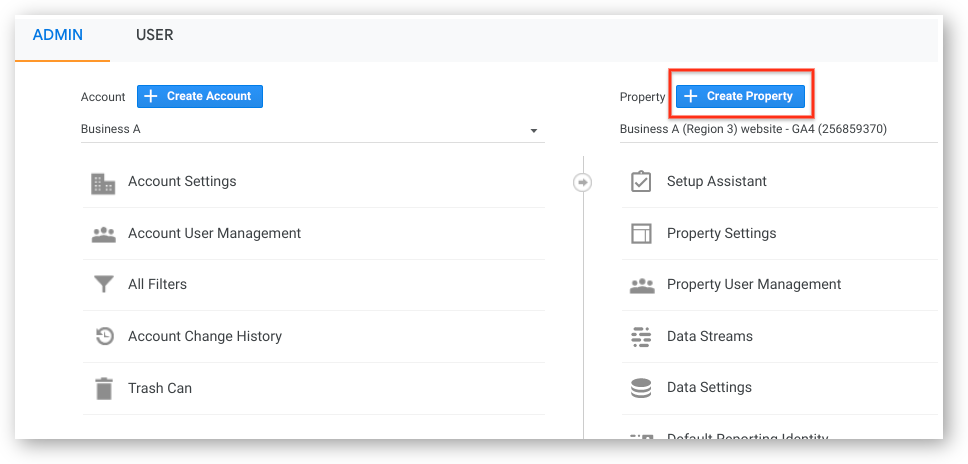
Add a site to GA4 if it is already a Universal Analytics property
If your site is already connected to Universal Analytics and you want to set it up as a Google Analytics 4 property, these are the steps you need to follow. Please note that if your site pages have a GA tag or a Google Tag Manager container, the following steps are the same.
-
In the Google Analytics page (lower left), click “Admin”.
-
Select your desired account in the Account column (but if you already have a Google Analytics account, it's already selected).
-
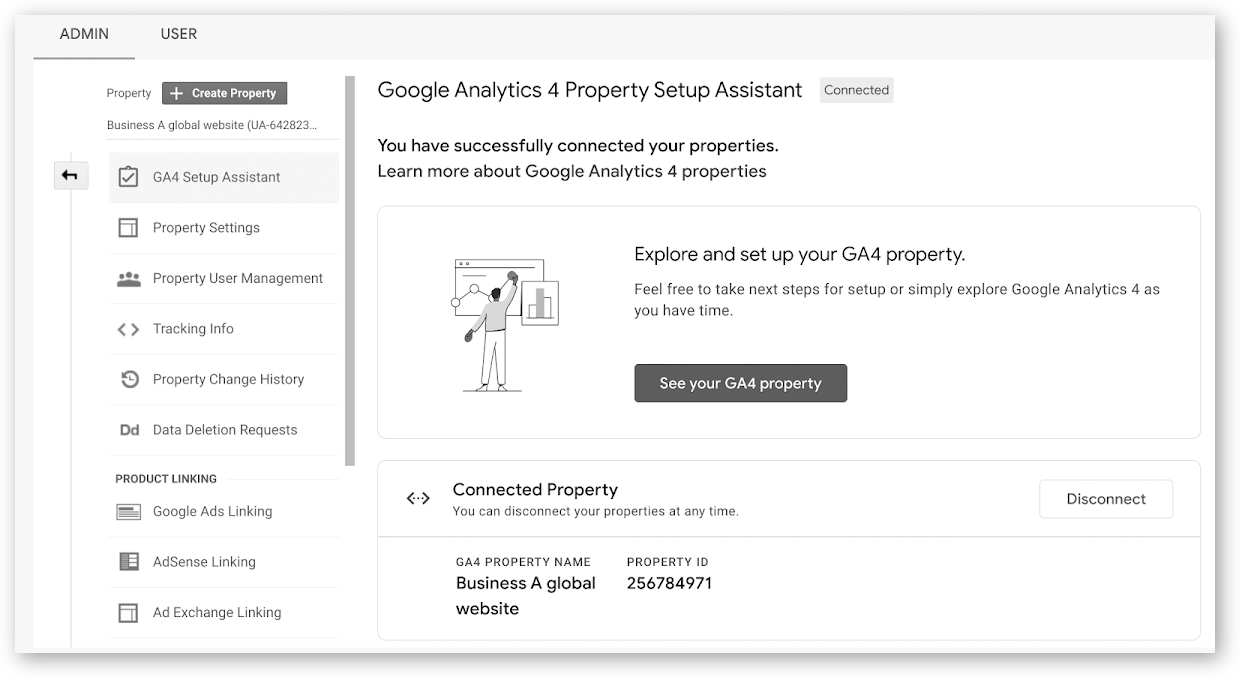
In the Property column, select the Universal Analytics property. Then click “GA4 Setup Assistant” (It's the first option in the Property column).
-
Then, under “I want to create a new Google Analytics 4 property,” click “Get started”.
-
Click “Create Property” to create your new GA4 property.
Step 2: Install and setup Pixel Manager for WooCommerce
Follow these steps to install the Pixel Manager plugin on your site:
-
Purchase the Pixel Manager for WooCommerce plugin. There are five plans to choose from, depending on how many sites you want to track conversions on.
-
Upload the Pixel Manager plugin into your plugins directory (/wp-content/plugins).
-
Go to WordPress's “Plugins” menu to activate the Pixel Manager plugin.
Step 3: Add the Google Analytics 4 measurement ID into the plugin
After you set up your website as a GA4 property and install Pixel Manager for WooCommerce, the next step is to retrieve your property measurement ID from Google Analytics 4. Here's how to find it:
- Go to your Admin dashboard in Google Analytics and select Data Streams. Click on your property when it appears in the tab.

- Your Measurement ID will be located in the top right corner of the page.
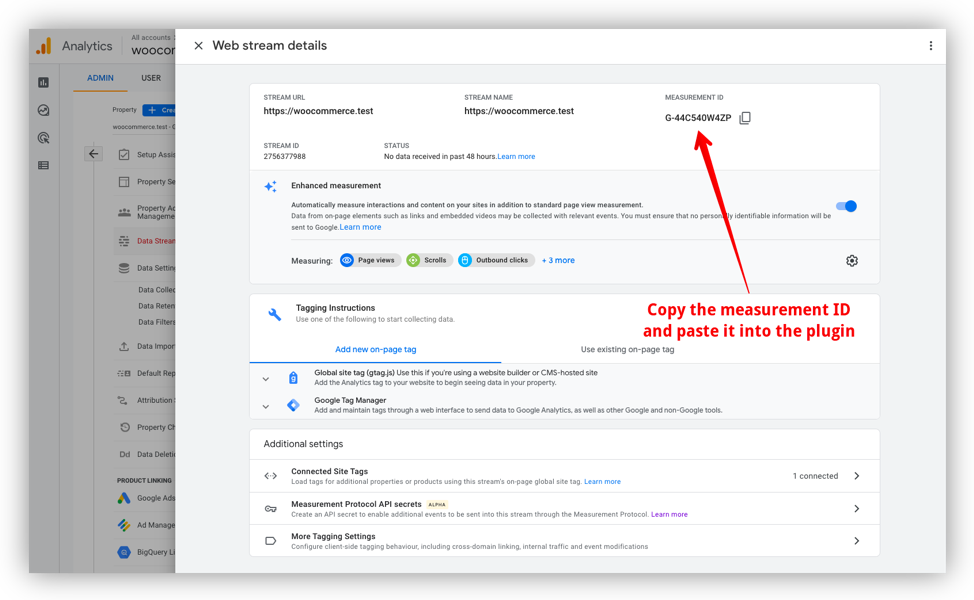
- Open your WP Dashboard and open the Pixel Manager. In the Main tab, you'll find the GA4 field. Enter the Measurement ID there and save your changes.
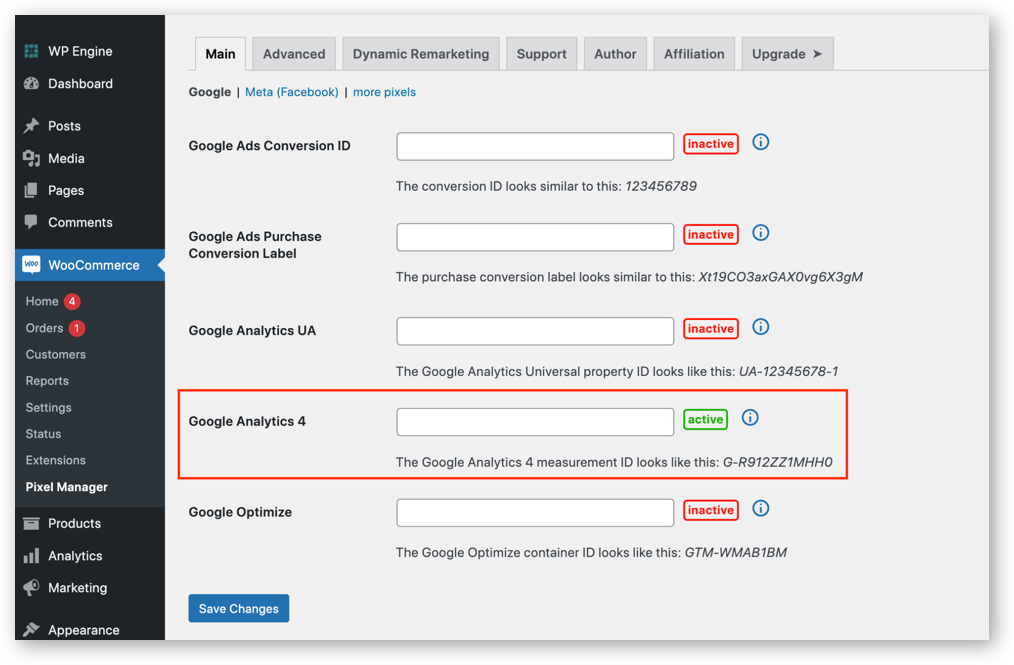
By completing this step, the GA4 pixel will be added to your WooCommerce site, and the plugin will start tracking your conversions.
Step 4: Set up the GA4 API Secret
Setting up the GA4 API secret will automatically enable the measurement protocol for GA4. Since the GA4 measurement protocol is still in beta, it works well but may have a few glitches.
Here's how to set up the GA4 API secret:
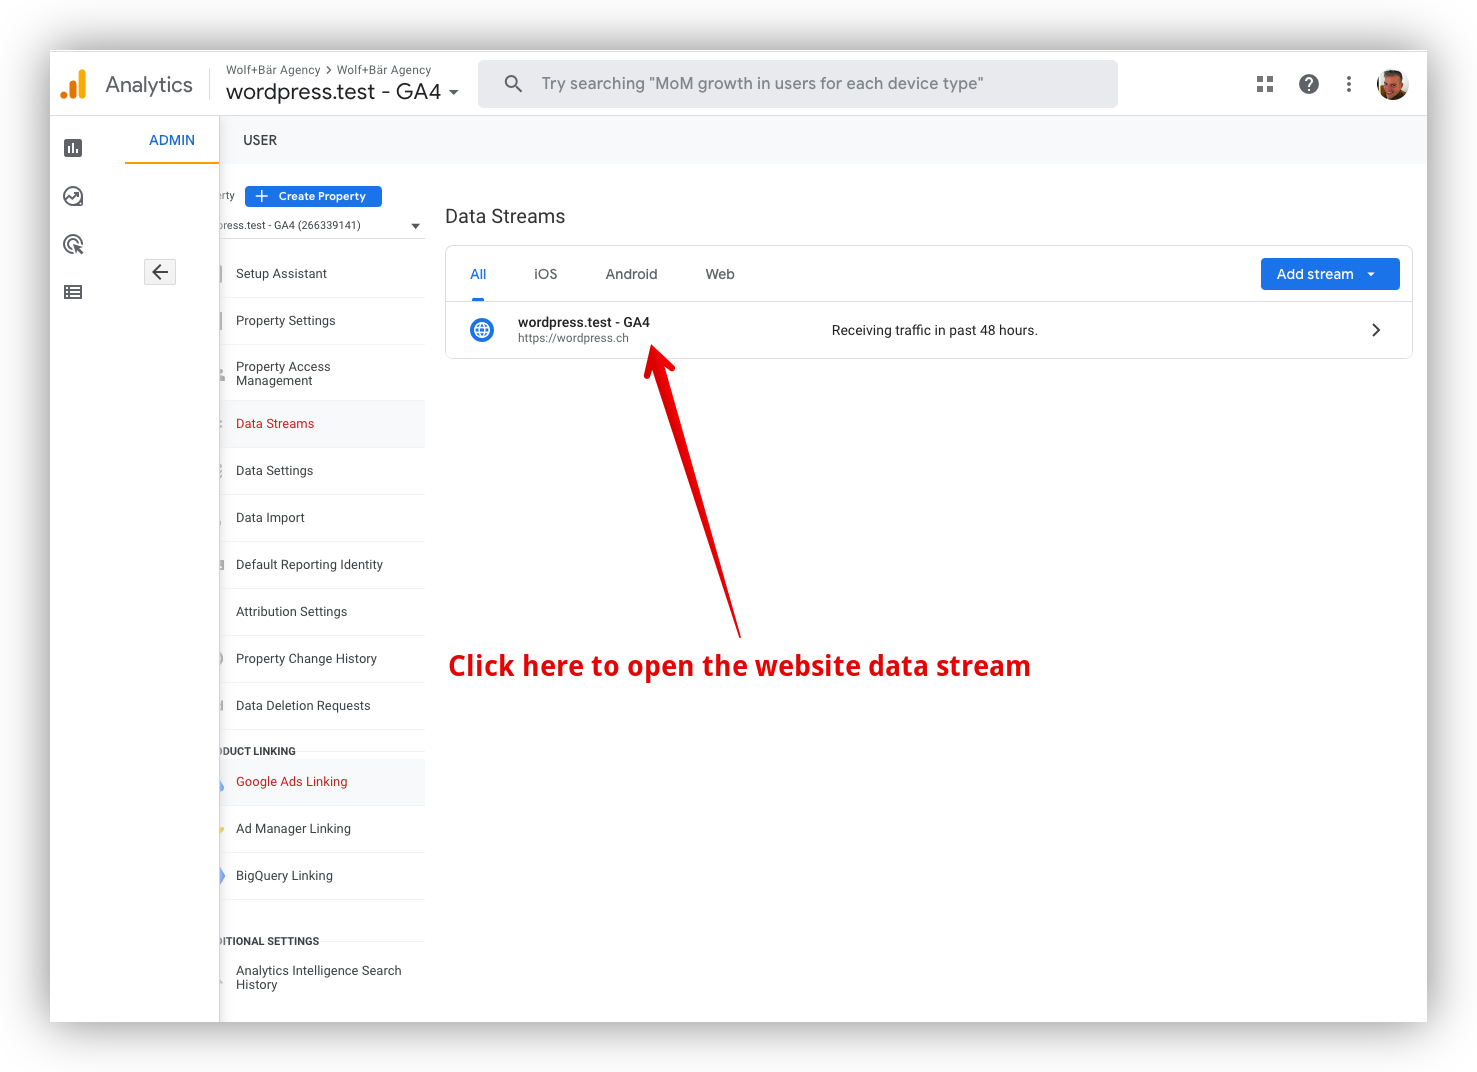
Step 1: Open the GA4 property admin interface.
Step 2: On the admin page, open the website data stream.
Step 3: Navigate to “Additional settings” to open the API secret setup menu.
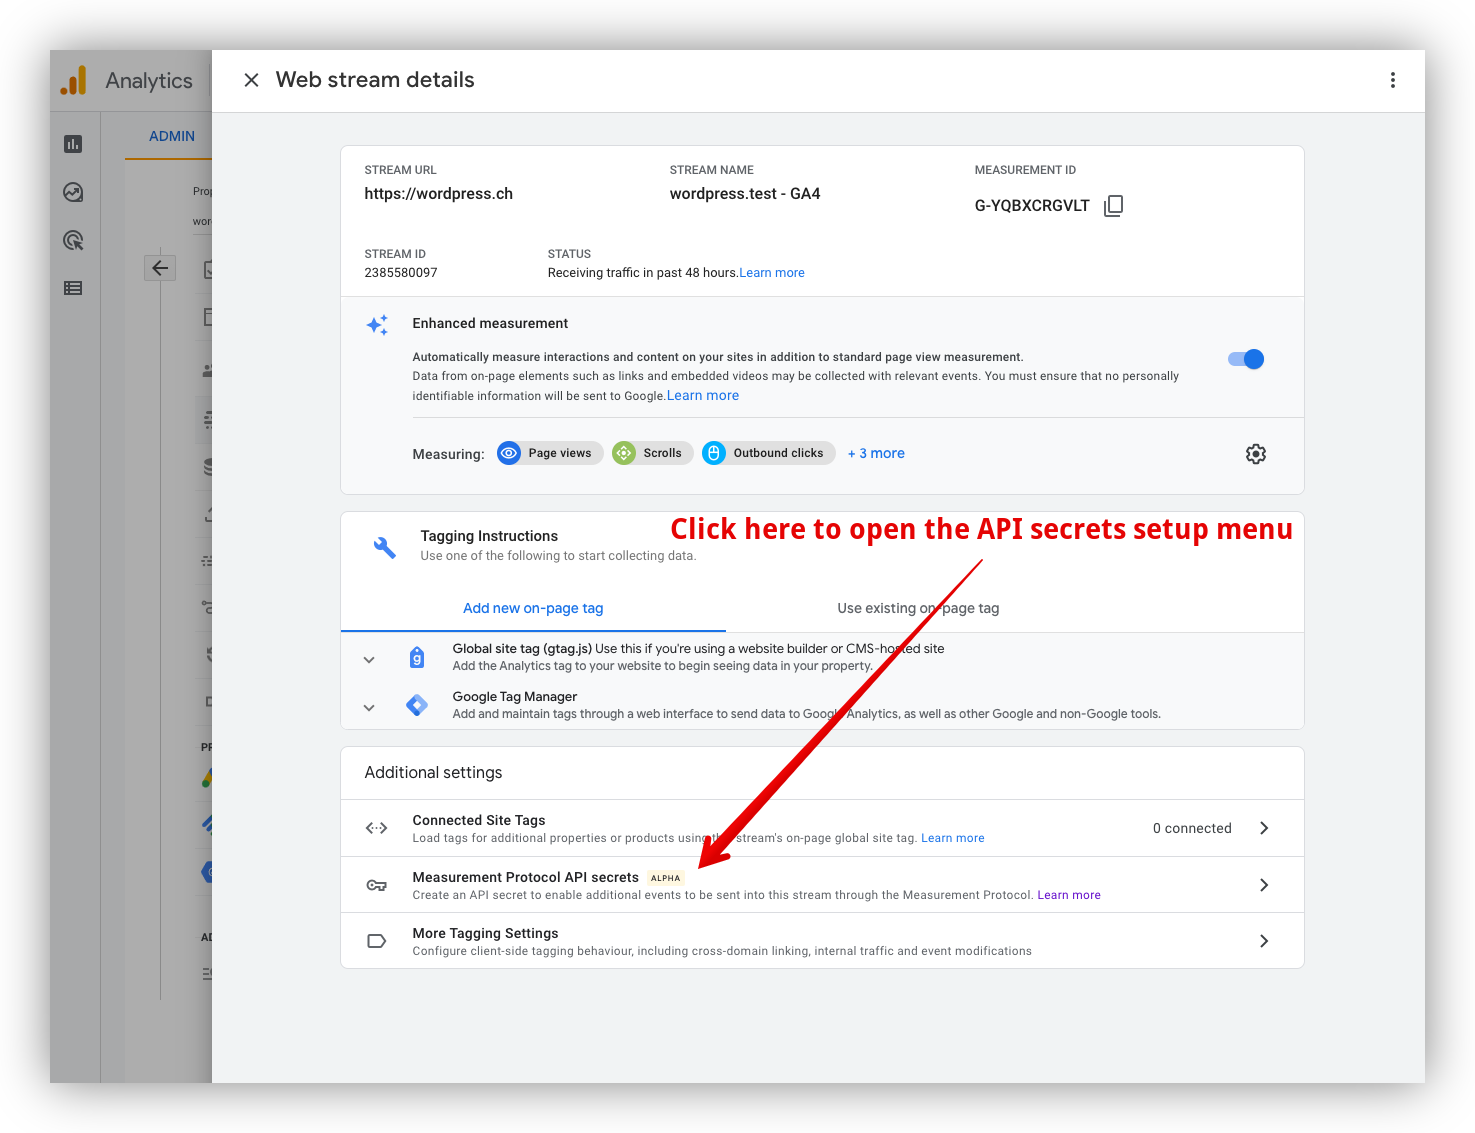
Alt text: Open the API secret setup menu
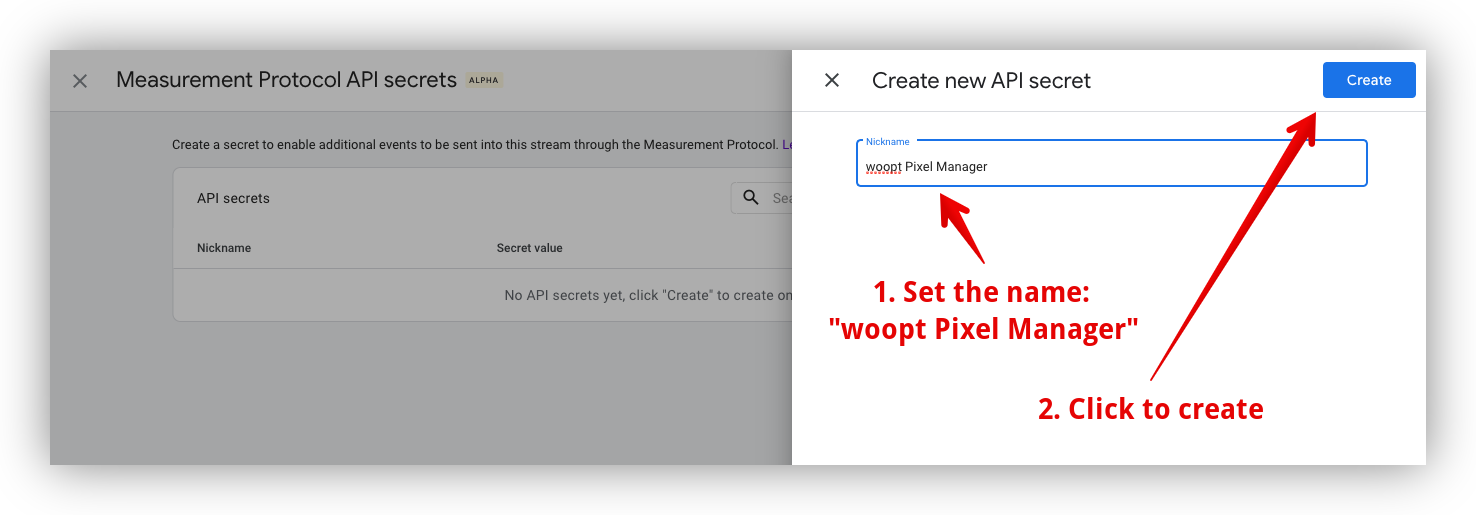
Step 4: Start creating a new API secret.
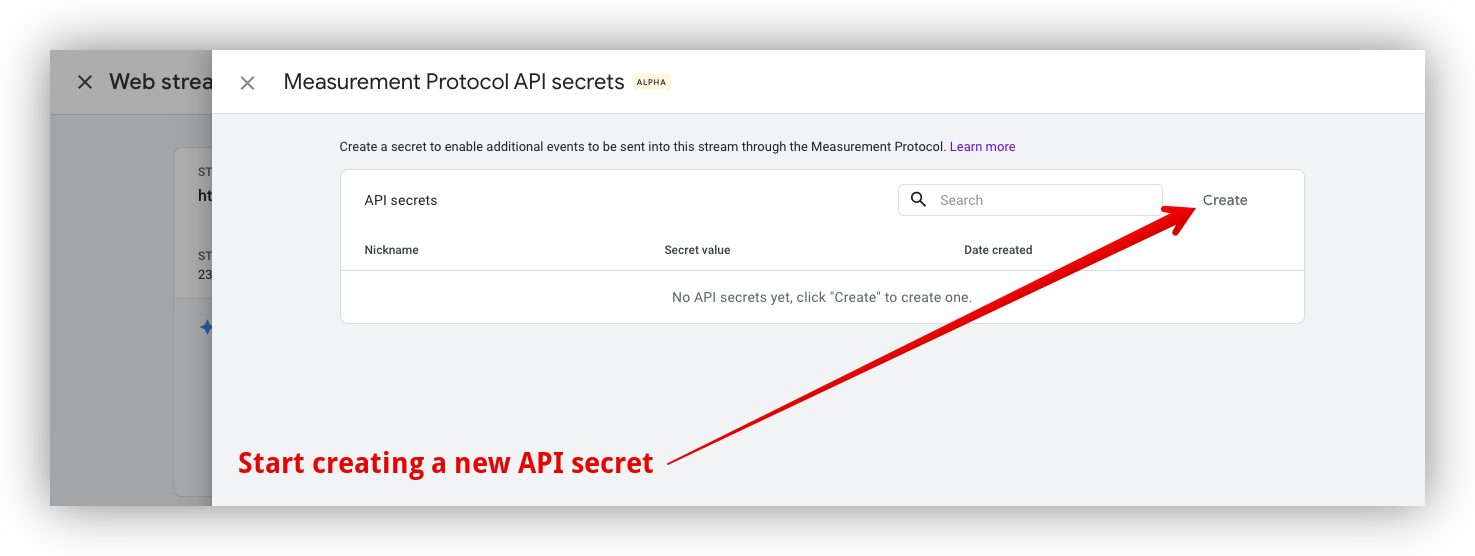
Step 5: Enter a new API secret name in the text field and click “Create”.
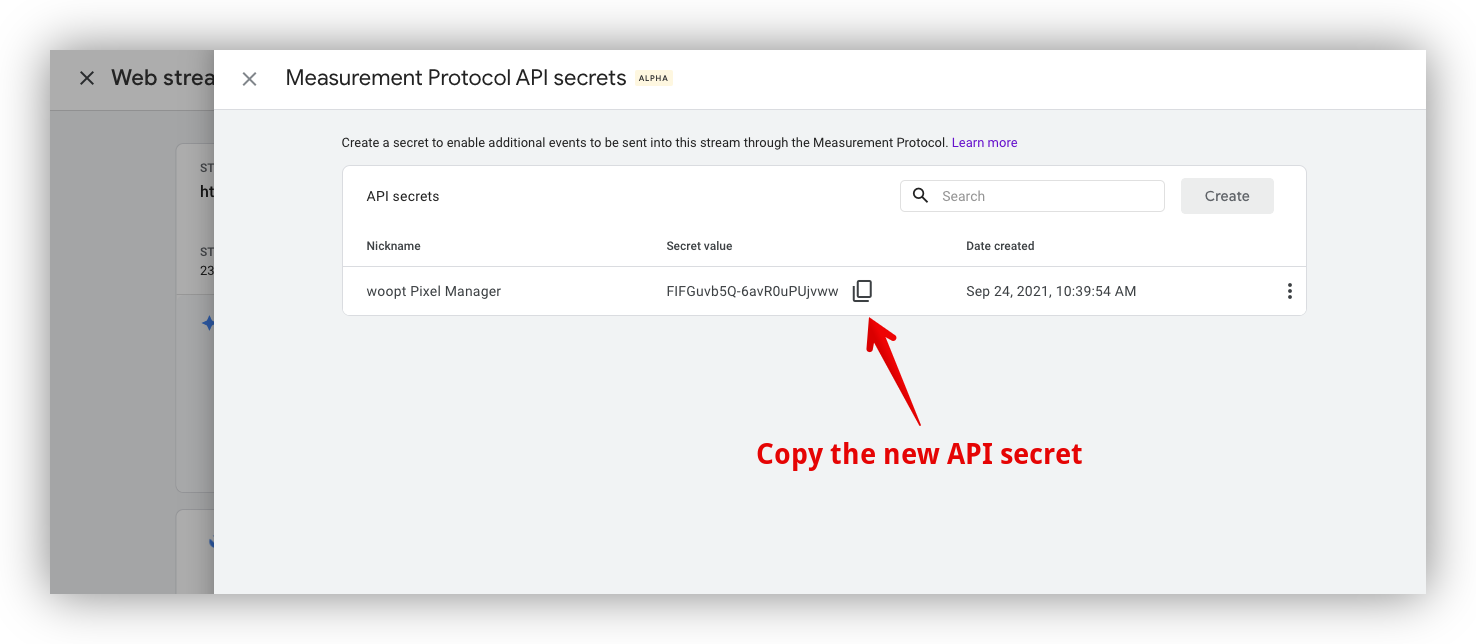
Step 6: Copy the new API secret
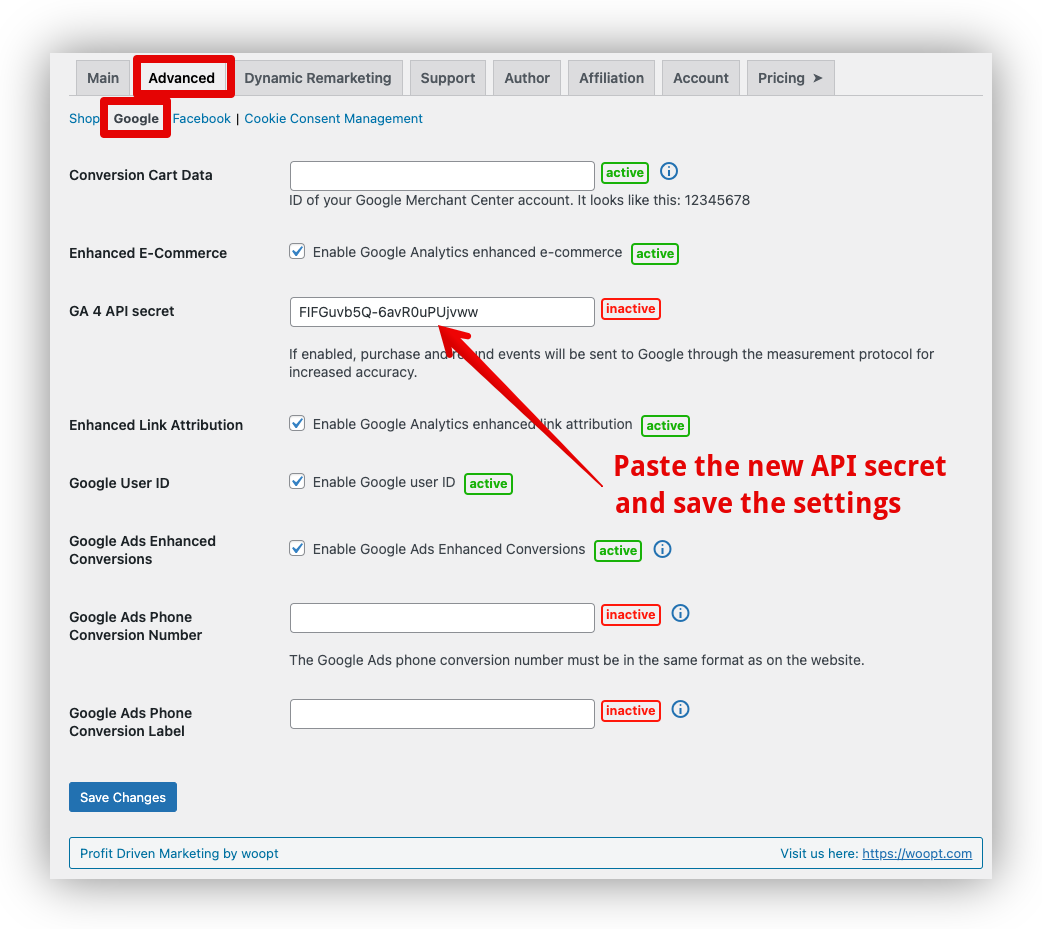
Step 7: Under the Advanced column, select “Google” to find the API secret setting. Then paste the new API secret into the plugin and save the changes.
Start Tracking Conversions for Your WooCommerce Store With Google Analytics 4
Every day, visitors engage with your WooCommerce website. To better understand where your visitors are coming from and how they behave, you need to track the conversions that occur on your site.
Google Analytics 4 is the obvious platform to use to analyze your website traffic as it gives you more flexibility to set up conversion events than Universal Analytics.
To get even more accurate and consistent data in your conversion reports, you should add a GA4 tracking pixel to your site with the Pixel Manager for WooCommerce plugin. Choose your plan today and benefit from a 14-day free trial.