How To Set up Conversion Tracking for Your WooCommerce Shop: A Complete Guide

TLDR
- Conversion tracking is the process of measuring how many visitors complete a desired action - like signing up for a newsletter or completing a purchase - while browsing your site.
- Conversion tracking is also essential to understand customer behavior, which parts of a WooCommerce website are working well, and which ones need improvement.
- The easiest way and most powerful way to track conversions is with a plugin - like Pixel Manager for WooCommerce - which is capable of capturing the data you need without the use of code and with extremely accurate results.
In the world of e-commerce, conversions are always a hot topic as they are the backbone of a successful business. You may have all the web traffic in the world, but if they aren't converting in any way, then there is no real benefit for your ecommerce store.
You'd maybe like to have more newsletter sign-ups or simply more completed checkouts and overall sales. Whatever the goal, you want to convert these store visitors into customers, now or in the future. But how do you know what these people are doing on your online store? Are they buying or merely opening your home page for a matter of seconds before moving on? The way to find out is simple: conversion tracking.
In this article, we walk you through step-by-step how to set up conversion tracking on your WooCommerce store.
What is conversion tracking?
Conversion tracking in WooCommerce must be harnessed to achieve e-commerce success. It is a powerful tool that allows businesses to better understand what parts of their store are leading to more conversions and what parts could be adjusted to achieve the conversions they're looking for. A healthy conversion rate is the end goal for most WooCommerce sites.
The analysis of conversion data is paramount in any ecommerce business. Without it, you simply can't see what your store visitors are doing. Being able to track a user's behavior allows you to better understand the thought processes customers go through when browsing your store, and see precisely what parts of the website are driving conversions.
As time goes on, more and more analytics are accumulated, further solidifying your understanding of what you are doing right and what elements could be improved or adjusted. This important information allows you to put your time and resources into what matters most for your online business.
How do you track conversions in WooCommerce?
You can track conversions in WooCommerce in various ways. For example, tech-savvy users or software developers can use code. This approach has many steps and requires some expertise. The easiest and most recommended way is to use a plugin specifically designed for conversion tracking.
WooCommerce conversion tracking plugins are easy to set up, highly effective, and very user-friendly. They have everything you need to help you monitor your conversions as well as other useful tools to assist you in your e-commerce journey. A plethora of plugins are available on the market, but one notable option is Pixel Manager for WooCommerce.
One of the reasons why this plugin is a great option is its seamless implementation of tracking pixels from many platforms: Google Ads and Google Analytics Universal Analytics, Google Analytics 4, Meta (Facebook) Pixel, Microsoft Ads, Twitter, HotJar, and Pinterest to name just a few.
In addition, Pixel Manager for WooCommerce has gained notoriety in the conversion tracking world because it also offers:
- ease-of-use, particularly for those new to conversion tracking or pixel management
- an in-depth, performance-focused design that enables users without prior coding skills to integrate their tracking pixels seamlessly
- support for all previously mentioned platforms, as well as other advanced features that allow for a custom experience depending on your needs (e.g. privacy features, language translation, or custom variables mapping)
- no slowing down of website loading speeds
- impeccable and reliable accuracy
- reasonable pricing to benefits ratios
How do I set up conversion tracking using Pixel Manager for WooCommerce?
Over the years, countless claims have been made that conversion tracking is difficult to set up, particularly with those using Meta Pixels or Google Analytics. Pixel Manager for WooCommerce is a refreshing change of pace when it comes to conversion tracking. This plugin is simple and easy to use to ensure you'll be able to track conversions sooner than later. Thanks to its user-friendliness and simple UI, you'll avoid common frustrations often associated with pixel management and setup.
Follow along with these guides and you'll be tracking your conversions with Pixel Manager for WooCommerce in no time.
Note: The most current version of WooCommerce is required to use the plugin.
Step 1:
-
Select the Pixel Manager for WooCommerce plan you wish to use. You can purchase your plan right away, or opt for a 14-day free trial. Once you've completed this process, check your email for your download link.
-
Follow the instructions in this email until you've completed the download and activated the plugin.
Step 2:
-
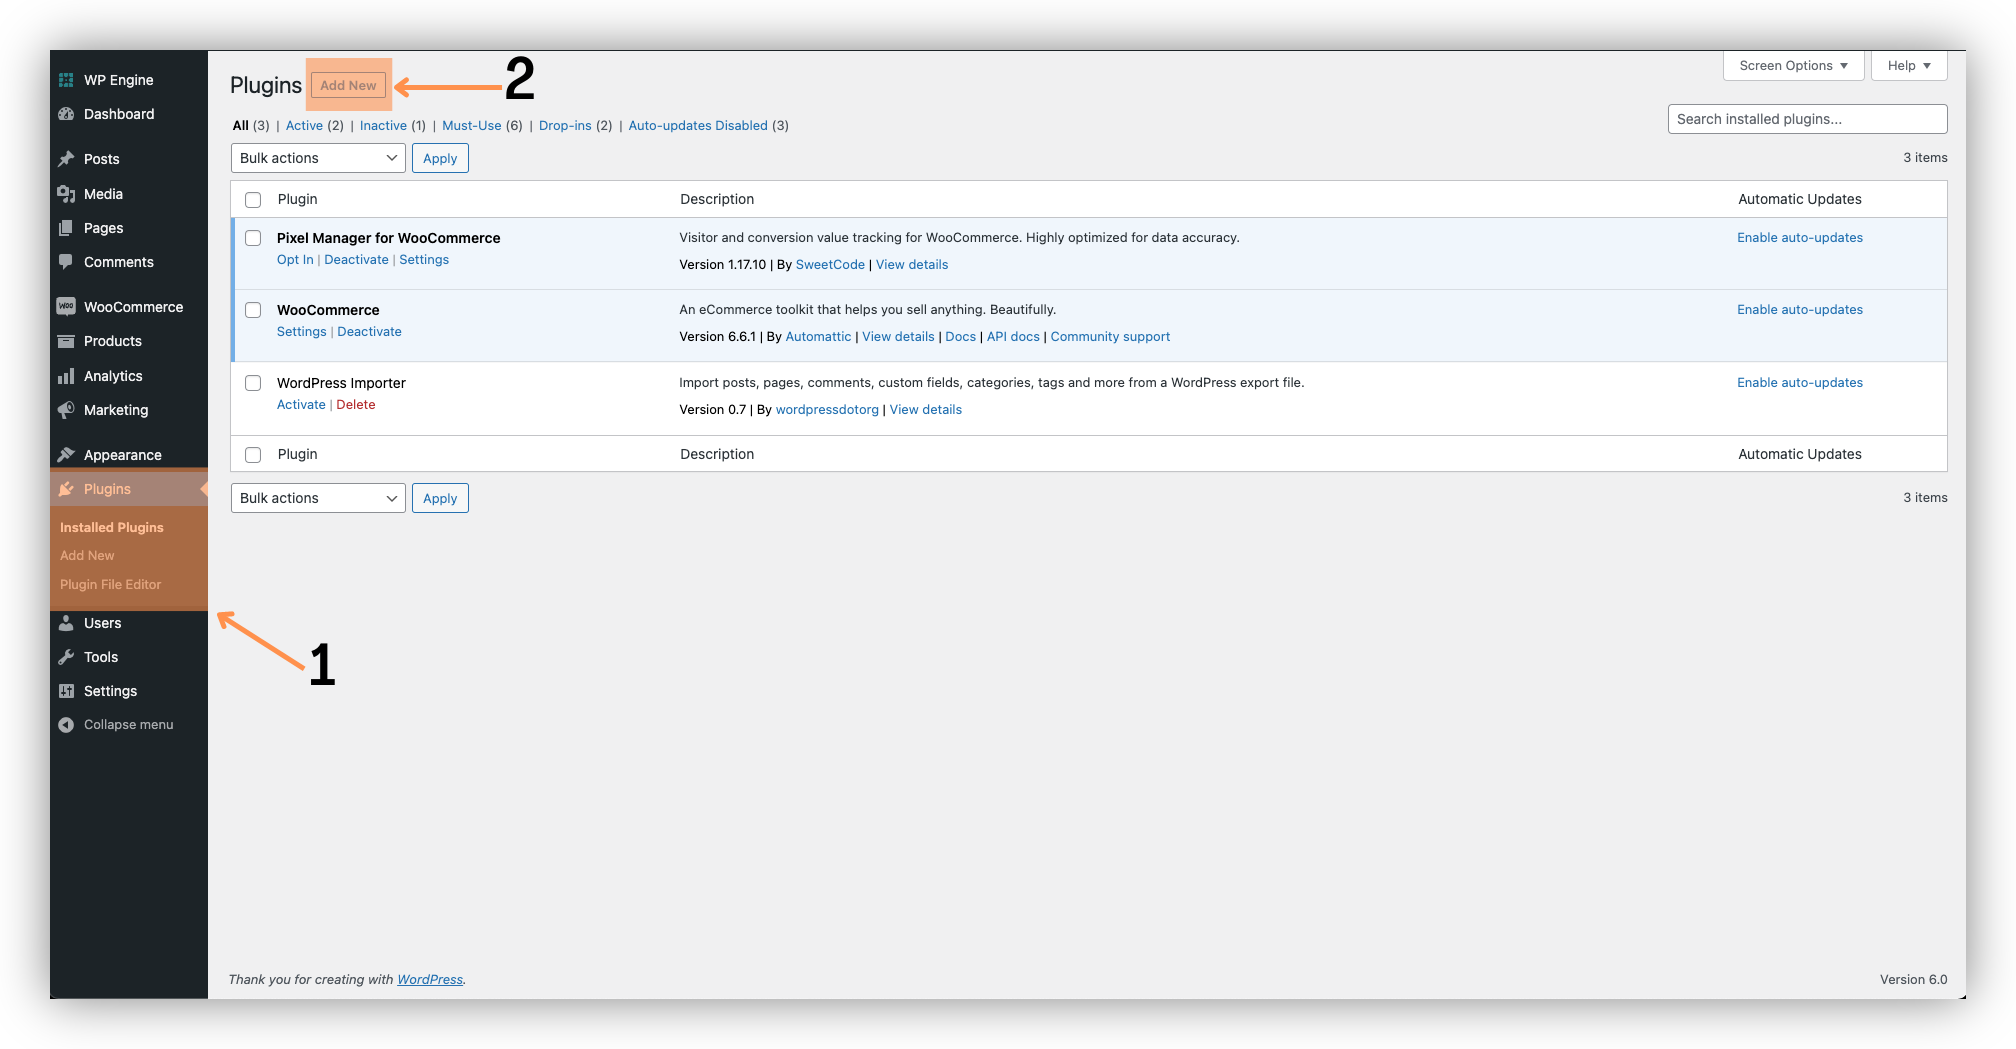
Head to your WordPress plugin directory.
-
Click Add New at the top of the page.
Step 3:
-
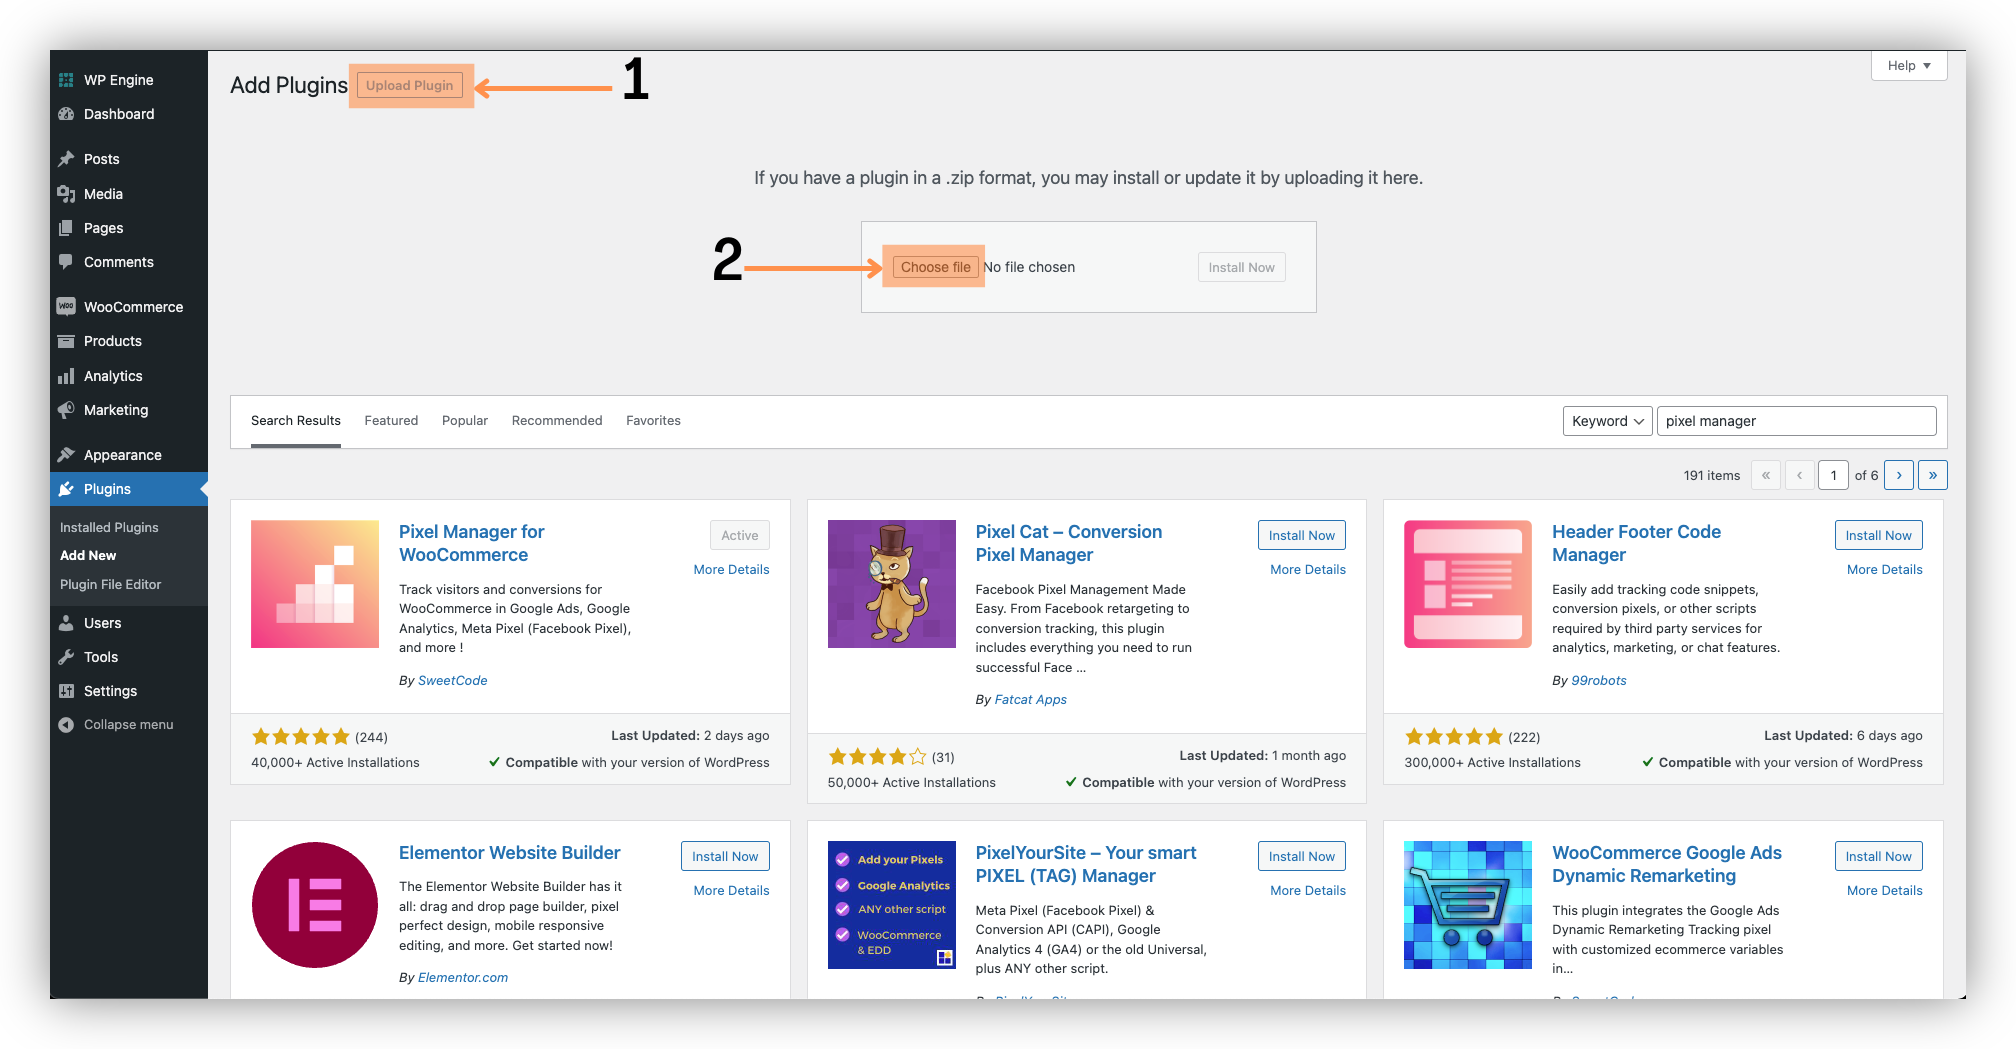
Click the Upload Plugin button at the top of the page.
-
Click Choose file. Find your recently downloaded Pixel Manager for WooCommerce plugin and select Install Now.
Step 4:
-
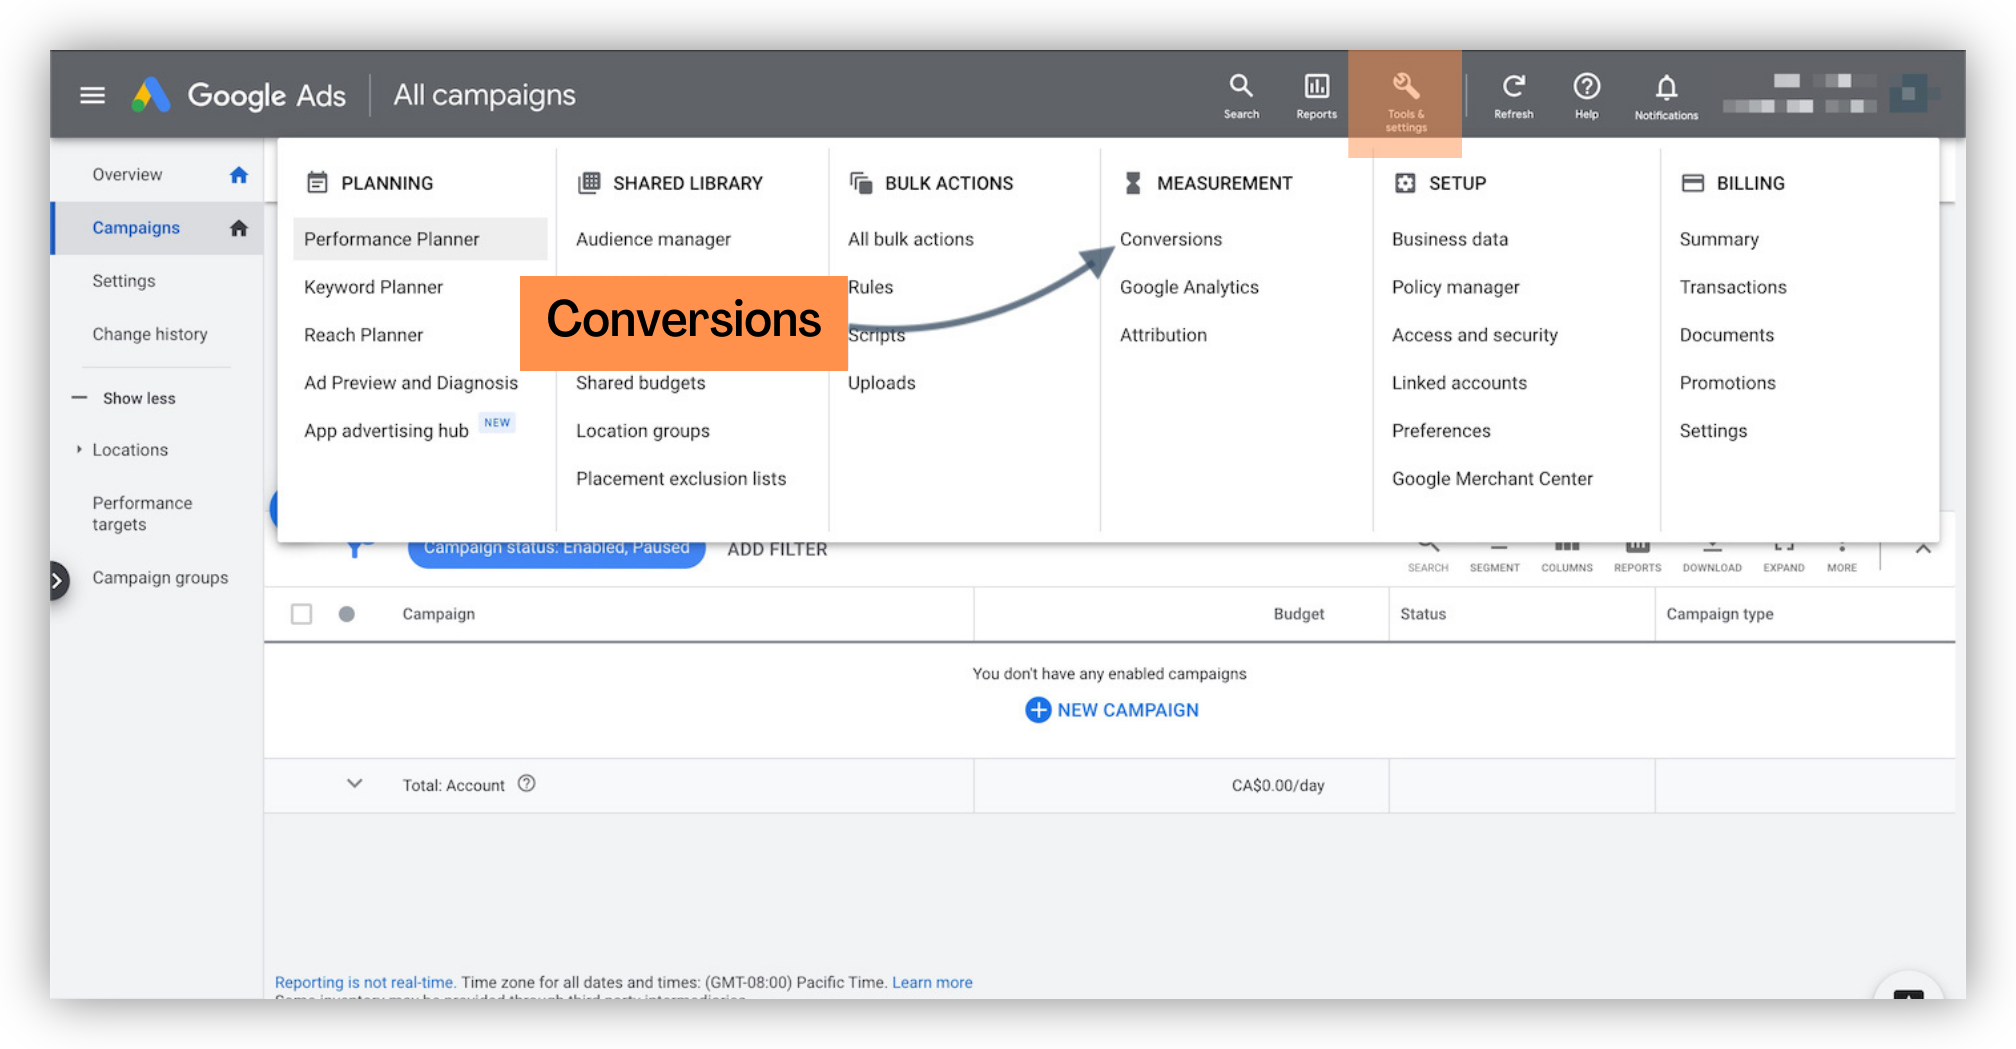
Now that the plugin has been installed and activated, you need to add your Google Ads conversion ID and conversion label. You'll find both values in the Google Ads conversion tracking code.
-
To find these, log in to your Google Ads account and navigate to Tools and Settings > Measurement > Conversions.
Step 5:
-
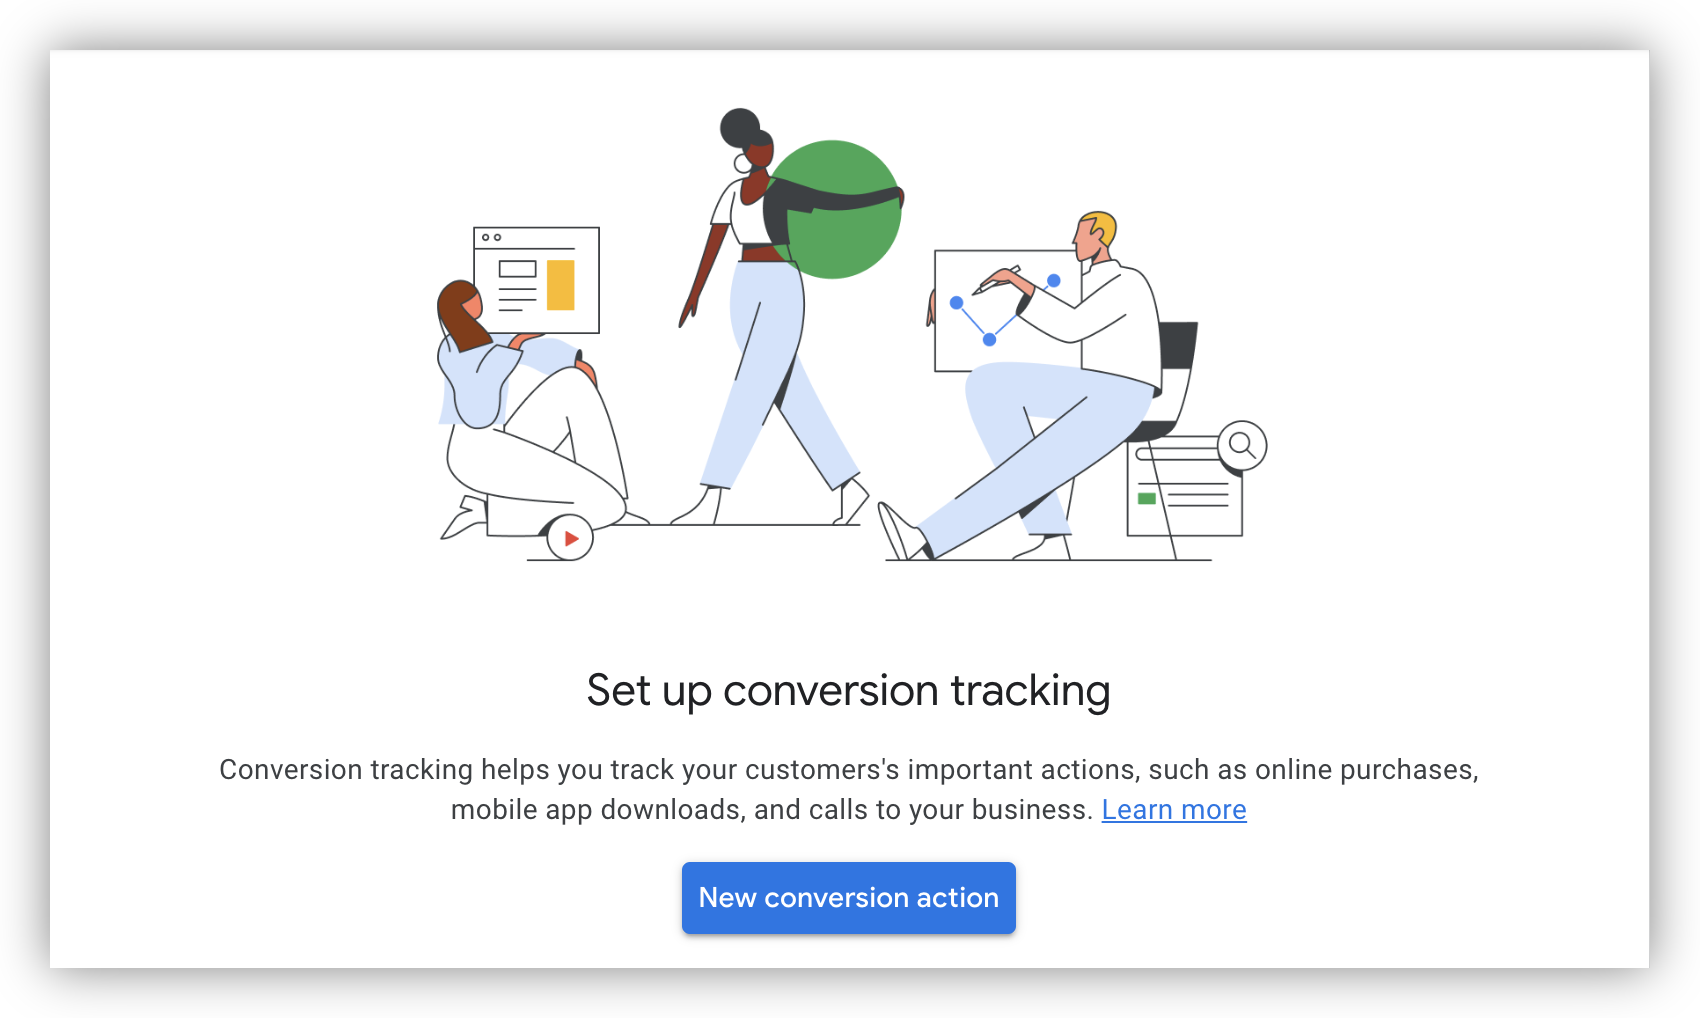
If you haven't created the conversion in Google Ads yet, initiate a new conversion action. When asked what kind of conversions you want to track, select 'Website'. Then, enter your domain when prompted and it will be scanned.
-
You will then have two options: 'Create conversion actions automatically from website events' or 'Create conversion actions manually using code'. Select the second option.
-
Configure the Google Ads conversion settings using these details. It is recommended that you don't change these settings unless you know exactly what you're doing:
- Category: Purchase
- Conversion name: Purchase
- Value: Use different values for each conversion
- Default value: zero
- Count: Every
- Attribution: Data-driven
Step 6:
- Once you have your Google Ads Conversion ID and Google Ads Purchase Conversion Label from the Google Tag Manager tab in the conversions section of your Google Ads account, you need to go back to your WordPress site admin panel and go to WooCommerce > Pixel Manager and then add your Conversion ID and Purchase Conversion Label into their respective fields.
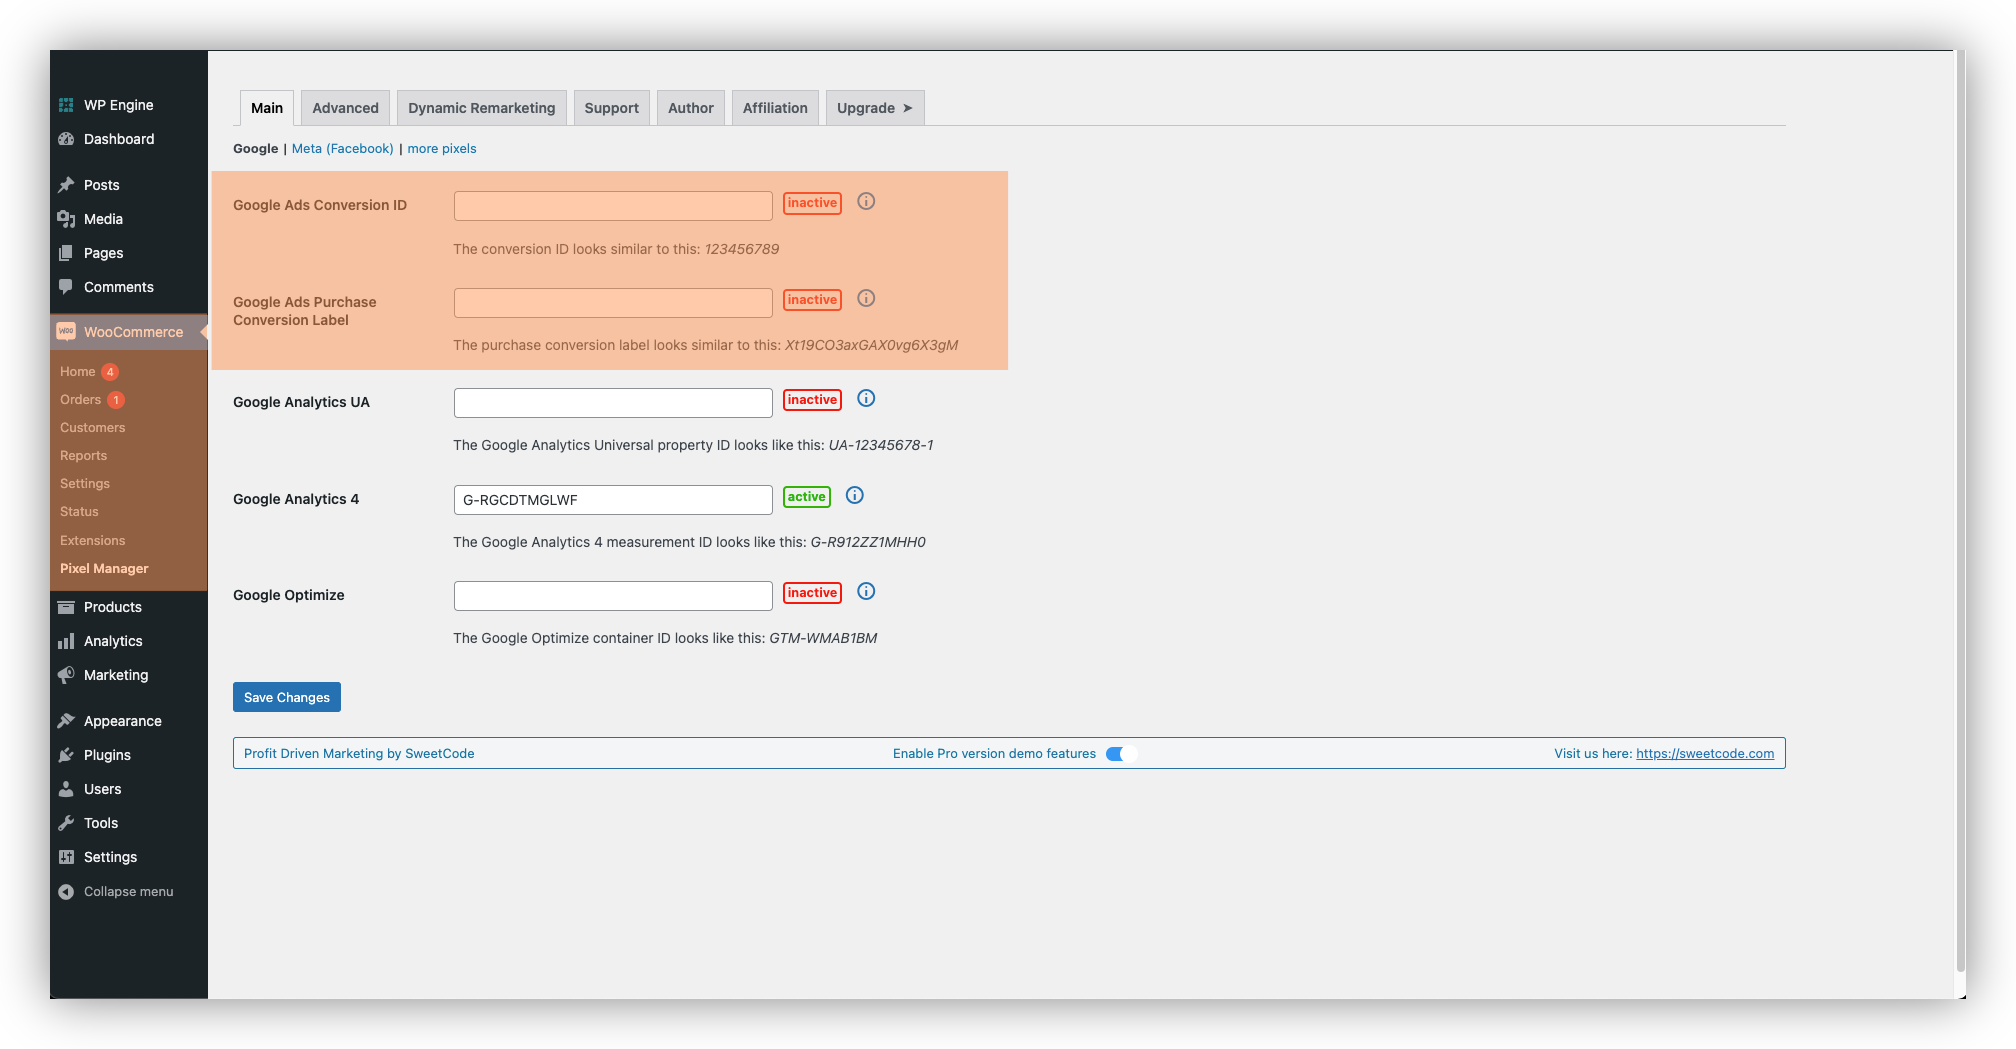
That's it for setting up your new Pixel Manager on your WooCommerce account. Now it's time to go through the simple integration of third-party analytics in your Pixel Manager for WooCommerce. We'll be using Google Analytics in this example.
Integrating your Google Analytics into your new Pixel Manager allows you to utilize the benefits of Google Analytics within your WooCommerce store. Being able to track your conversion metrics is a fundamental reason for using pixels in the first place. Monitoring key metrics like add-to-cart clicks, conversion rates, cart abandonment rate, traffic sources, completed checkouts, and average order value is something you'll want to keep an eye on when using your conversion tracking plugin.
This visual guide shows you how to create a new Google Analytics property and how to retrieve the relevant property IDs for your Pixel Manager for WooCommerce.
Head to your Google Analytics account to get started.
Step 1:
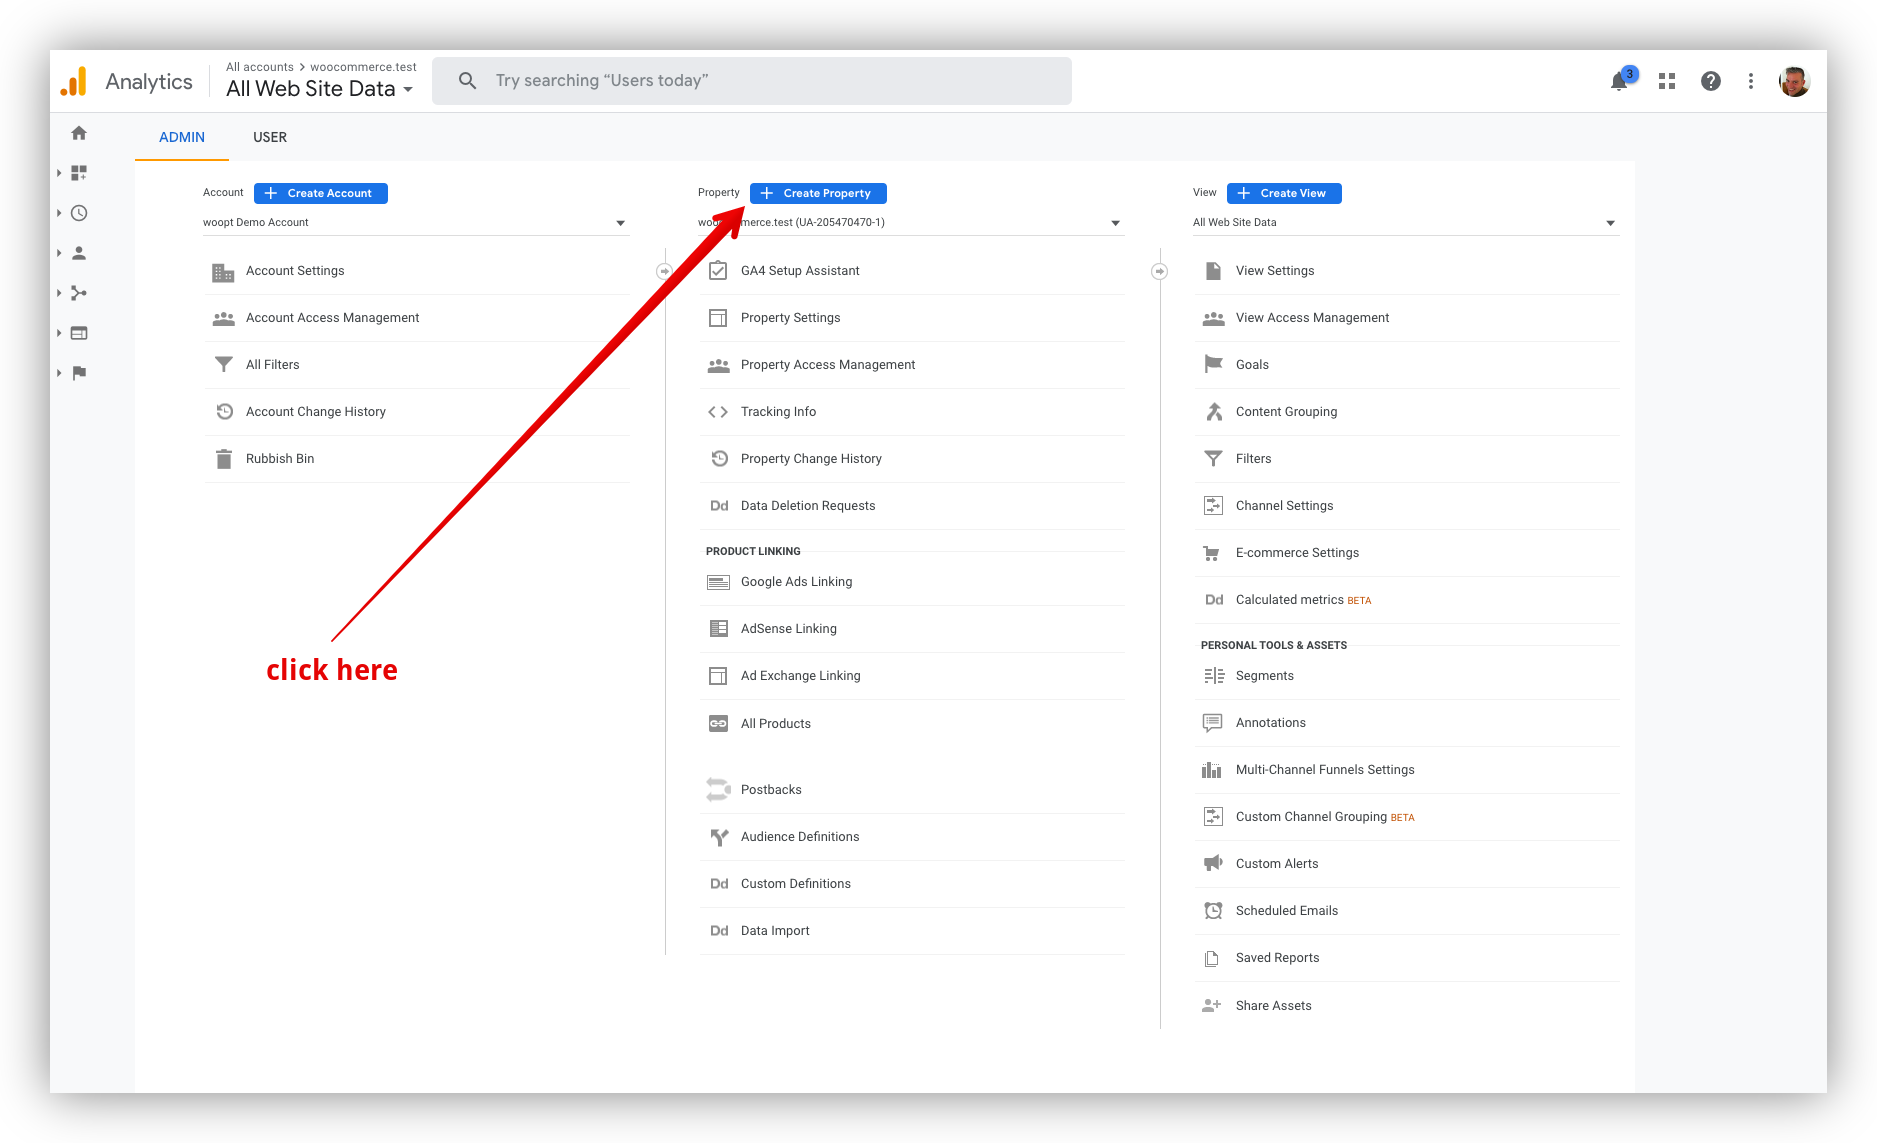
Navigate to your Google Analytics dashboard and head to the Admin section of the website. Find the Property section and click Create Property.
Step 2:
-
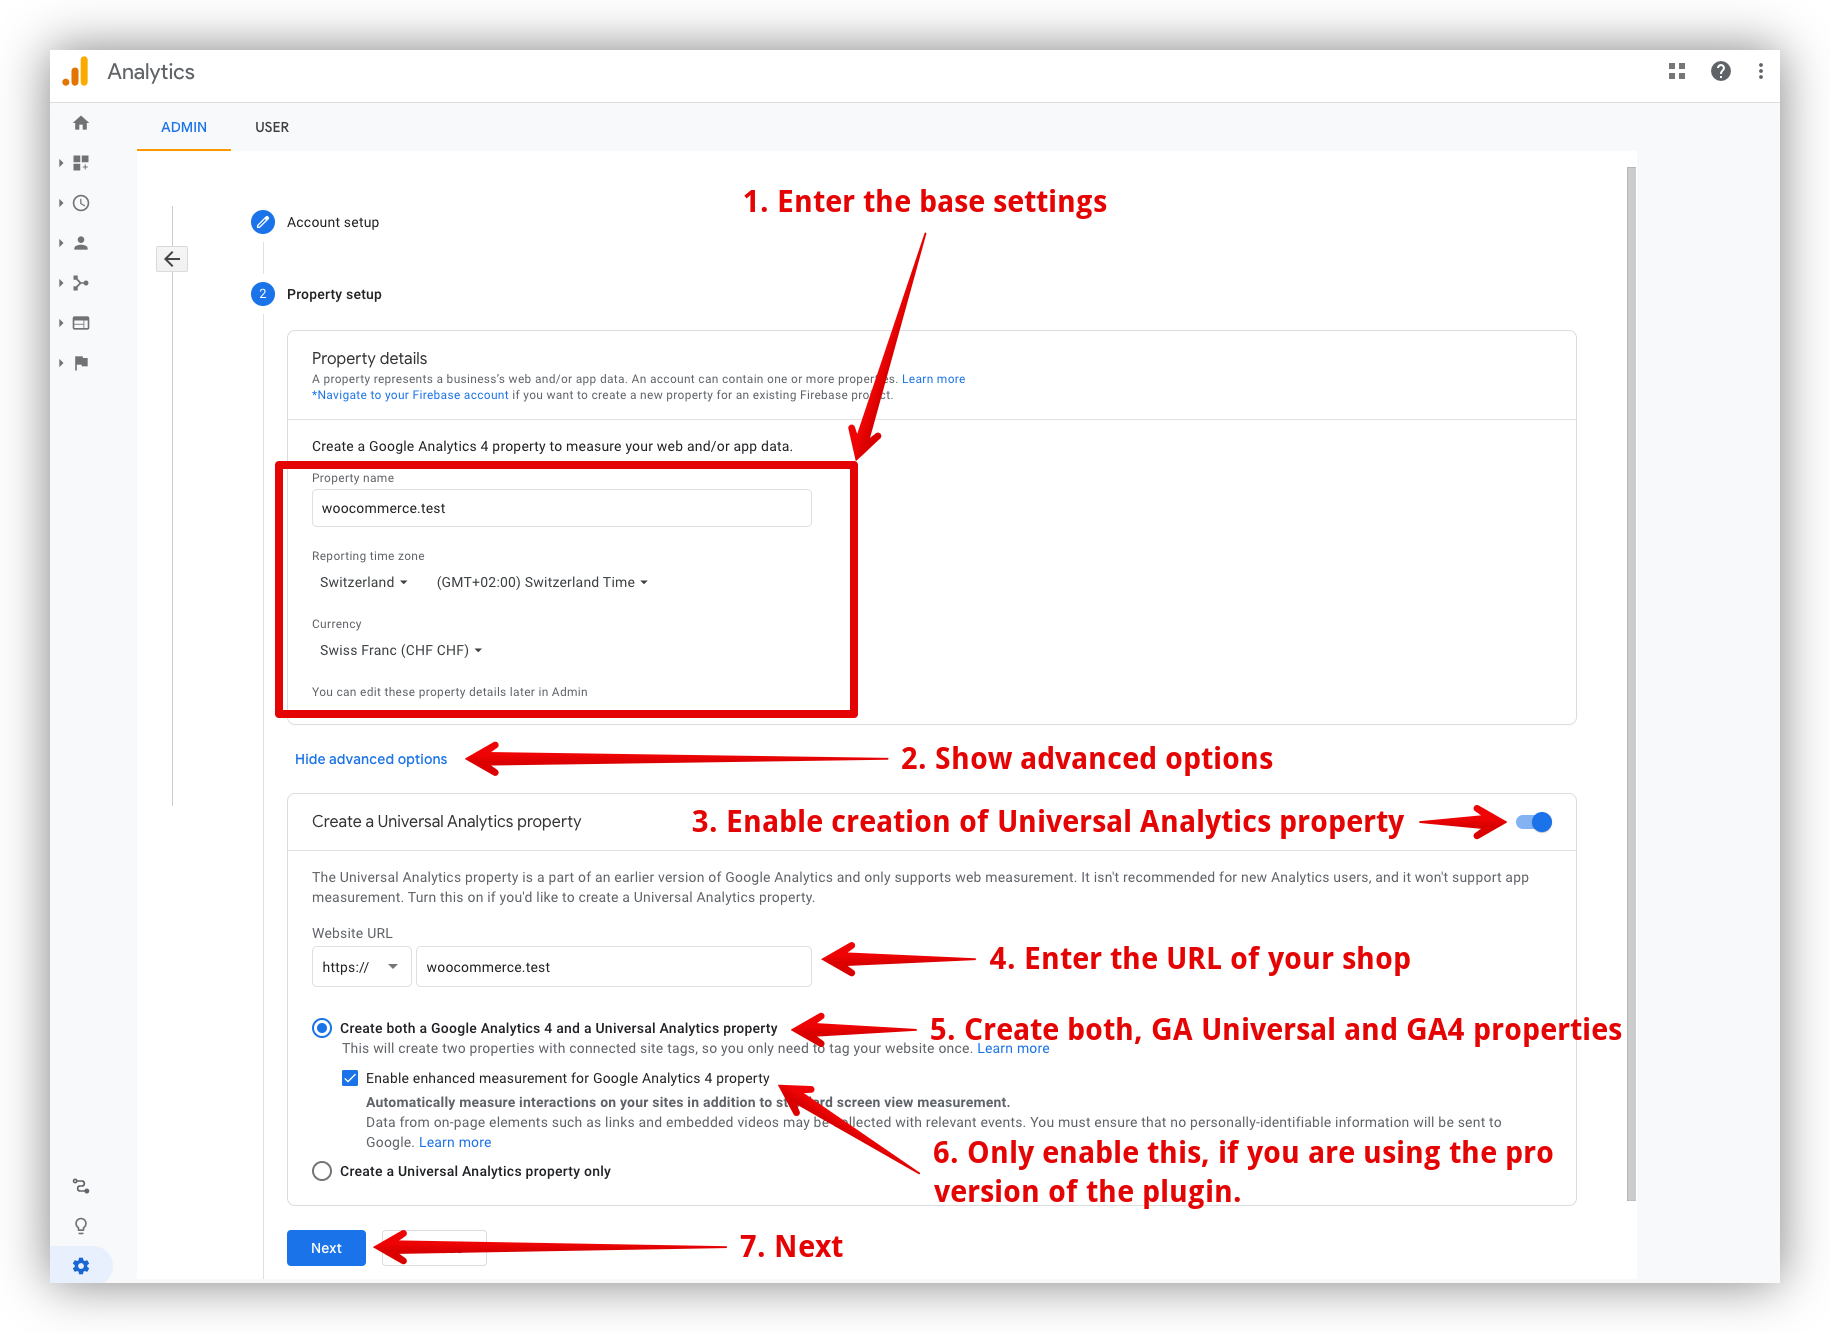
Once on the property creation page you will want to add your base settings: Property name, Reporting time zone, and Currency.
-
Click Show advanced options.
-
Enable Create a Universal Analytics property.
-
Enter the URL of your shop in the Website URL section.
-
Select Create both a Google Analytics 4 and a Universal Analytics property.
-
If using the pro version of the plugin, check Enable enhanced measurement for Google Analytics 4 property.
-
Click Next.
Step 3:
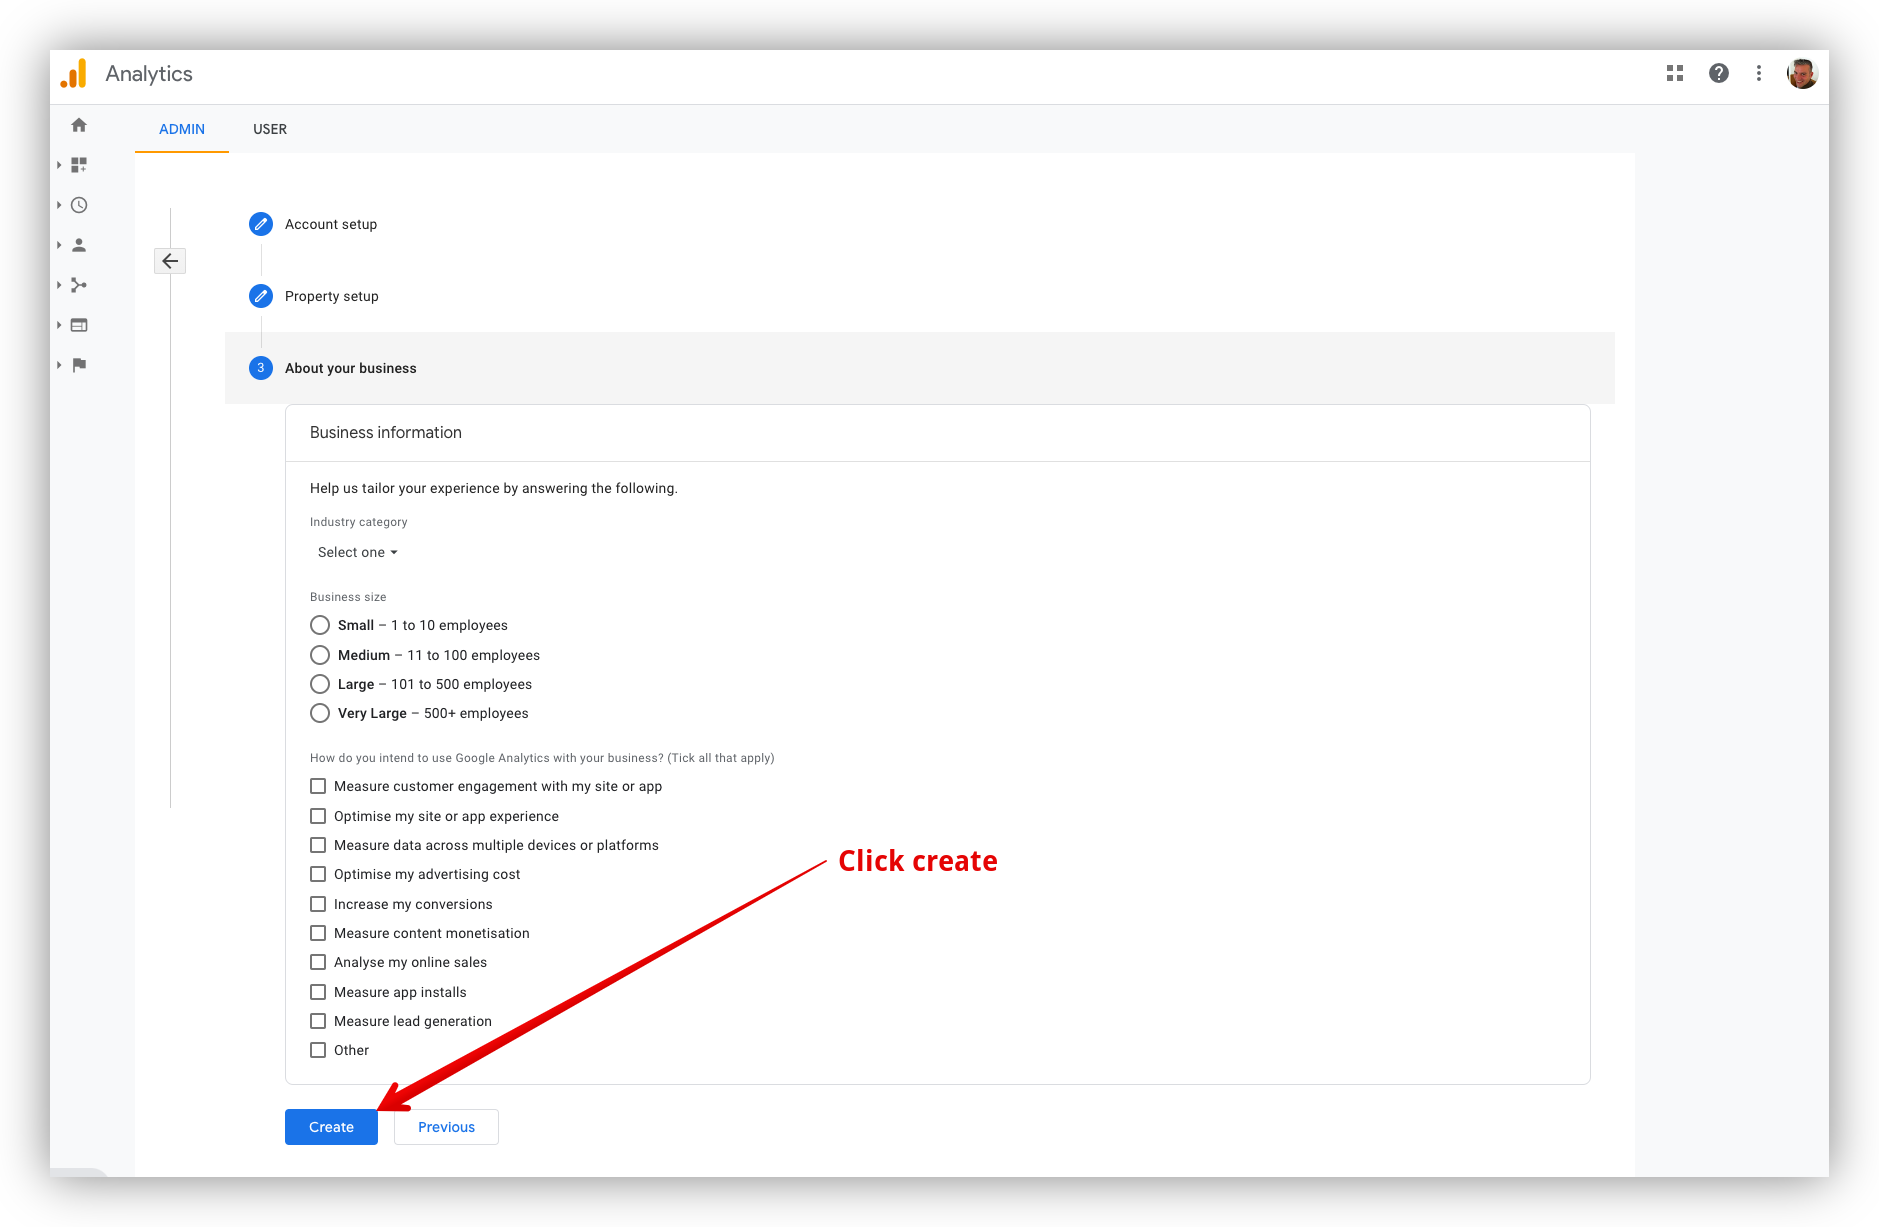
Click Create at the bottom of the page.
Step 4:
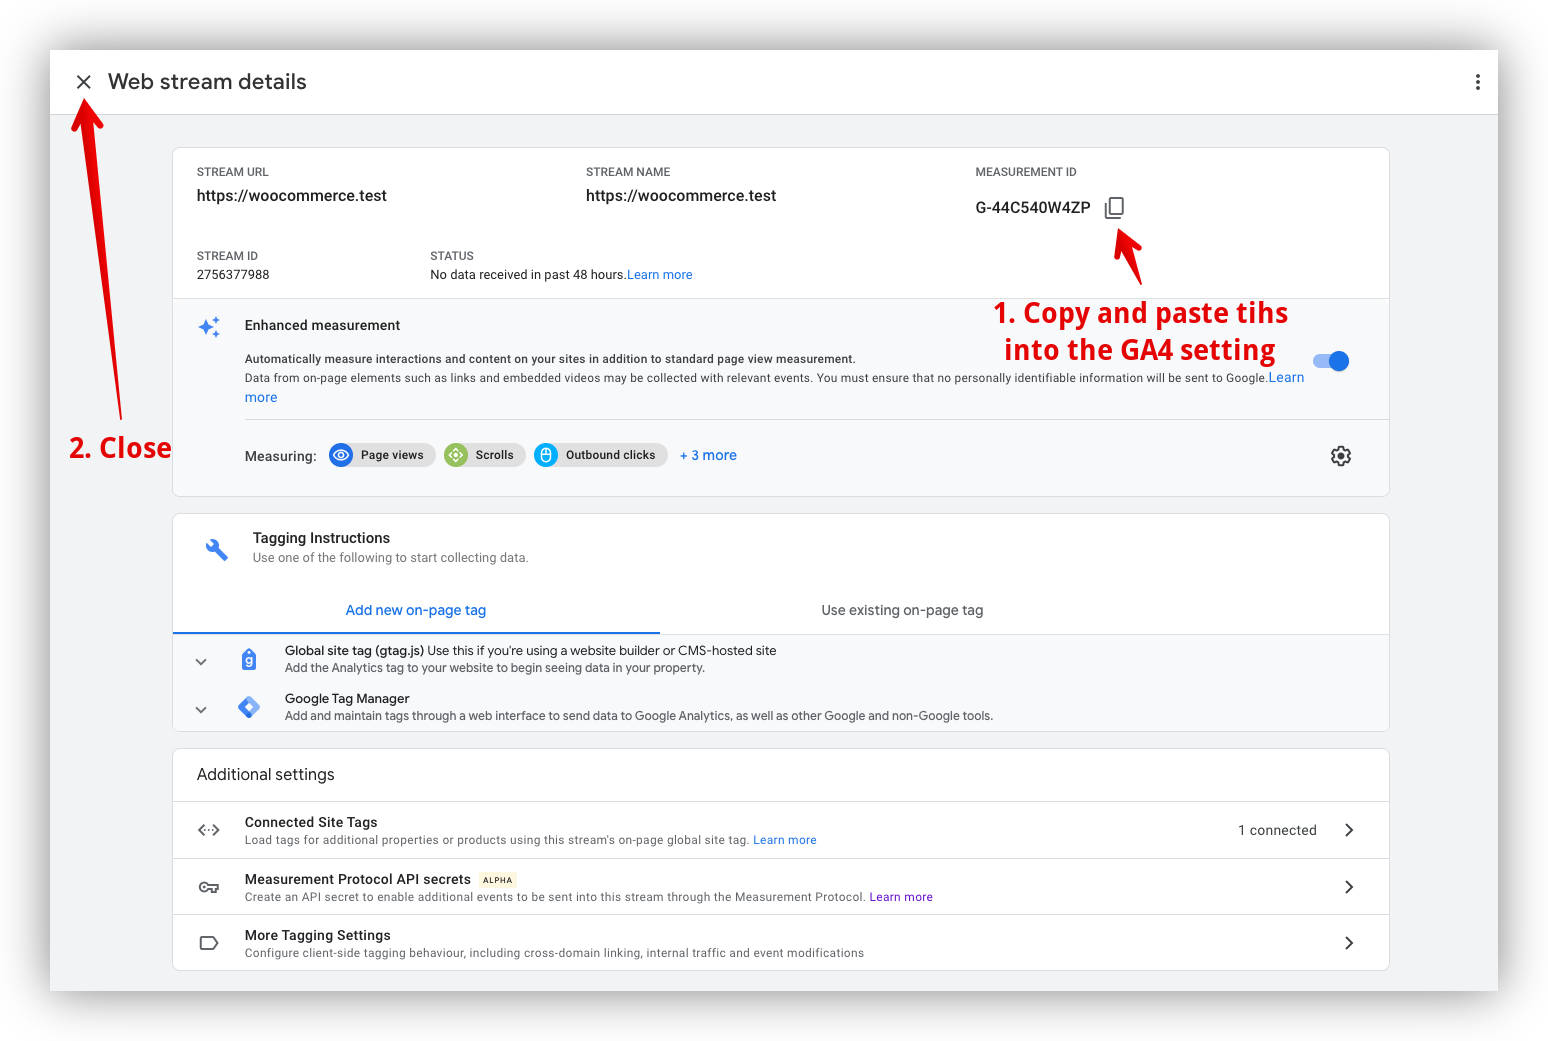
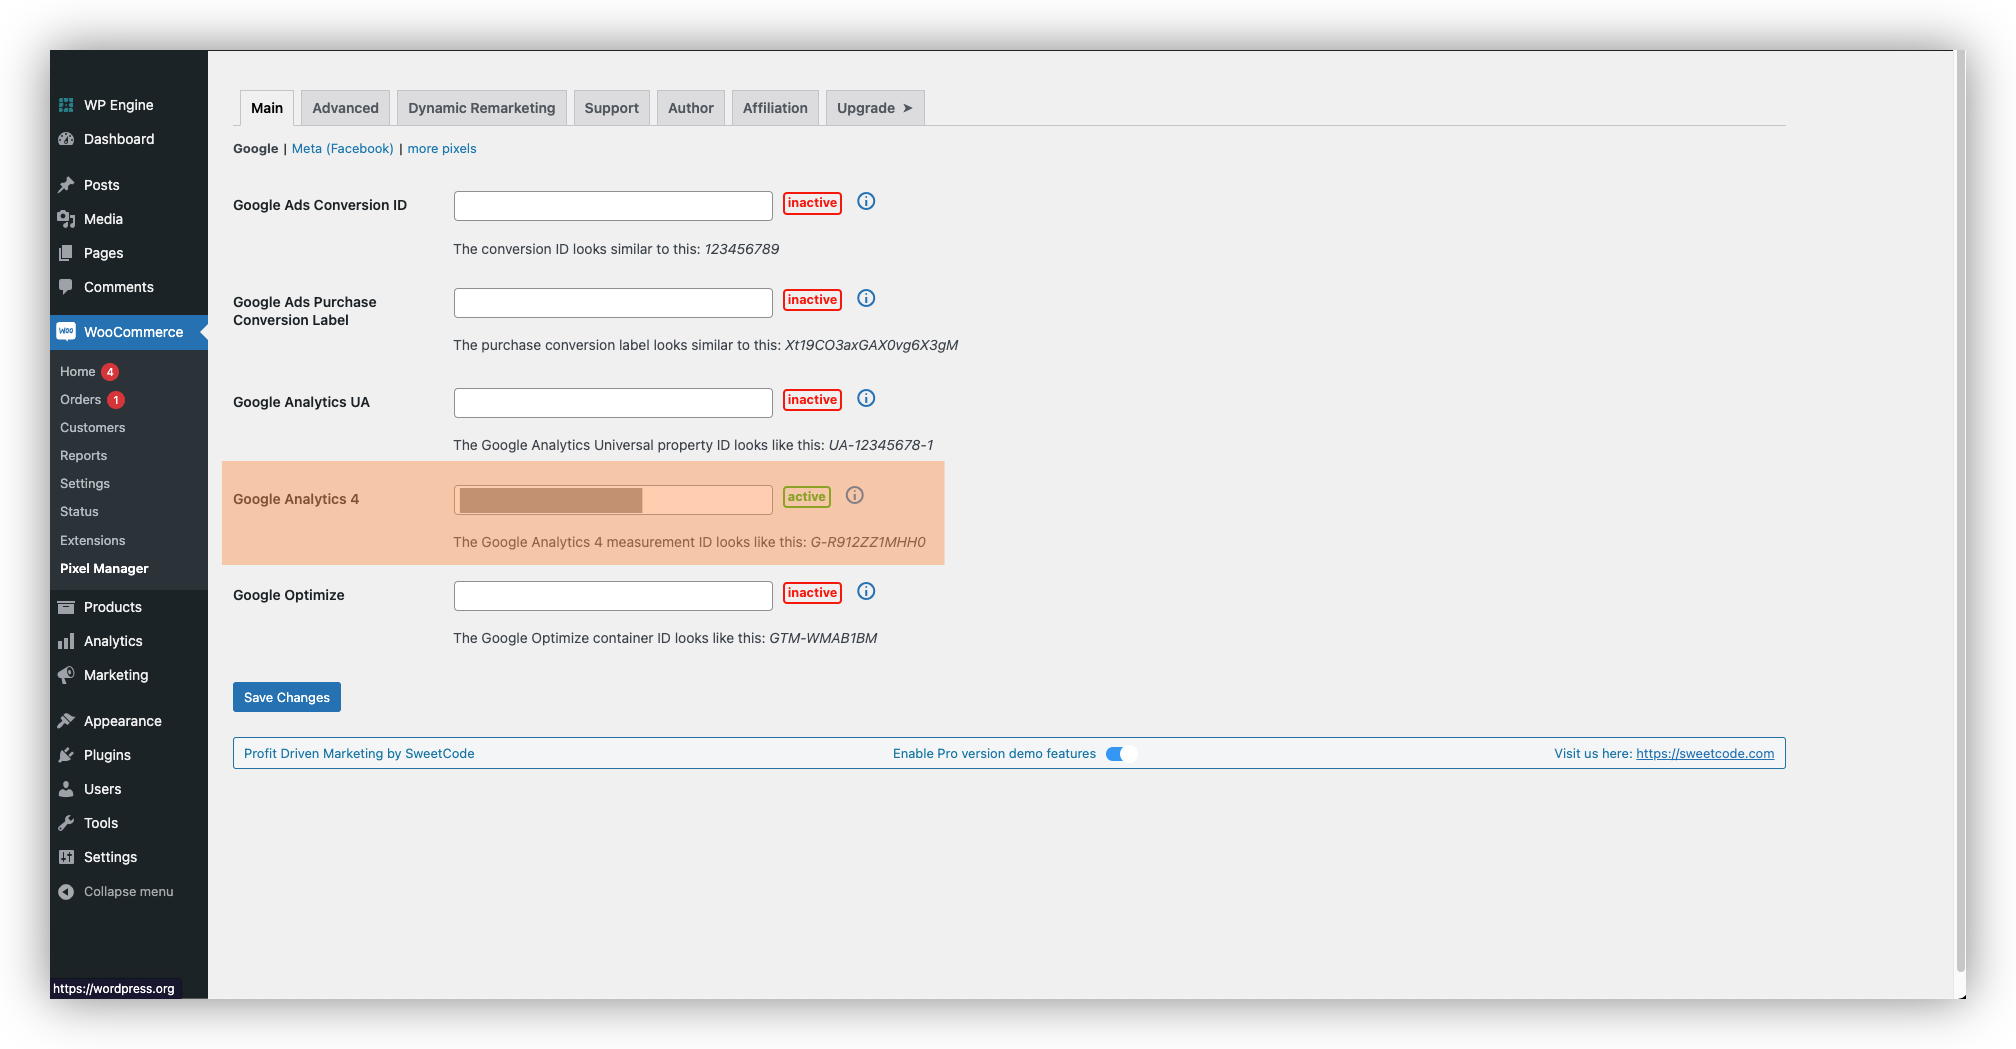
- Copy and paste the Measurement ID into the GA4 input in your Pixel Manager for WooCommerce.
The GA4 (Google Analytics 4) input field can be found in the Main tab of your Pixel Manager for WooCommerce.
Tips and best practices when it comes to conversion tracking
- Including relevant keywords for your business in your link URLs allows Google to better understand what your pages are about and helps it rank your pages accordingly.
- Utilizing event-based goals helps you track desired actions taken by your website's visitors like newsletter sign-ups, adding items to their cart, or completing checkout.
- Using goal funnels helps you track how many visitors reach the desired endpoint in a multi-step process, e.g. checkout or signup. (This is particularly useful if you use an affiliate program.)
- When using Google Ads, making sure you check your search terms report gives you an understanding of what search terms your website visitors were using before they saw your ad. This is a powerful tool as it reiterates what keywords you should be focusing on and trying to include in your content.
- When using Google Ads or other popular ad platforms, using split testing helps you gain further conversion tracking metrics. Split testing is the act of testing multiple ads for the same product or service (usually low ad spend budgets) to understand which ad is performing better. Checkouts, add-to-cart, and cost per click are some of the primary metrics you want to pay attention to when split testing.
Conclusion
Now that you've got your new Pixel Manager for WooCommerce plugin up and running, you're ready to start tracking conversions. This will open your business up to a world of new, important information which will allow you to really get the ball rolling with your business.
For example, you'll be able to harness the bad analytics and use that important information to improve your website where necessary. If you notice something going well with your conversions, use this learning to optimize your future campaigns. Conversion tracking gives you the ability to know precisely what's performing and start to better understand why these things are working for you.
Built by professional performance marketers, Pixel Manager for WooCommerce has been crafted with e-commerce businesses in mind, with the objective of simplifying pixel management and conversion tracking. It is a truly user-friendly tool and a highly accurate tracking solution.
As you've seen in our tutorial, the plugin is simple to set up and configure. In addition, it can seamlessly support all major pixel solutions so that, no matter what solution you're using or choose to use, you'll be able to easily integrate it into your new plugin without all the fuss that usually accompanies this task.
Pixel Manager for WooCommerce offers a 30-day money-back guarantee, so you can test it out risk-free. As far as enhanced ecommerce tracking is concerned, this is a plugin that should be on everyone's radar!