Implementation recipes
The subsequent documentation outlines proven strategies to fulfill all business requirements. We have included only those methods that we have verified to be effective. If you have discovered alternative or superior approaches to address these business requirements, we encourage you to share your insights by submitting feedback through our support form.
Essential steps
- Set up conversion cart data reporting.
- Save the
cost_of_goods_soldandauto_pricing_min_pricein a field for each product. - Upload the Google Merchant Center feed containing
cost_of_goods_soldandauto_pricing_min_price. - Apply for the Google Automated Discounts program at Google: Application Link
- Purchase and install the Google Automated Discounts for WooCommerce plugin.
- Double check that caching for Automated Discounts is disabled and caching for WooCommerce sessions when a visitor clicks on an Automated Discount link.
- Start running and optimizing the Google Automated Discounts program.
SweetCode Implementation Service
Enhance your business effortlessly with SweetCode's custom implementation services for Automated Discounts. While some steps are relatively simple, others — such as determining and setting the Cost of Goods Sold and Auto Pricing Min Price for each product — demand meticulous preparation. Businesses vary in their compatibility with the Automated Discounts program, and each one calls for a tailored approach to ensure accurate calculations.
To truly unlock the potential of Automated Discounts, a well-crafted and customized strategy is essential for seamless implementation, execution, and performance optimization.
Should you find any of these steps challenging, SweetCode is here to help. Our team of skilled developers and business economists will guide you throughout the setup process, actively implementing the necessary steps and fine-tuning the program for optimal results. To receive a personalized quote, simply contact us via our support form, and we'll be eager to help you elevate your business's efficiency and profitability.
Conversion Cart Data reporting
The Pixel Manager for WooCommerce is the sole verified plugin that seamlessly transfers conversion cart data out-of-the-box. You can obtain it from sweetcode.com and woocommerce.com.
Upon activation, simply enable Google Ads conversion tracking and input the Google Merchant Center ID. With these steps completed, conversion cart data will be automatically transmitted to Google.
If conversion cart data has never been sent before, the Automated Discounts program will take at least several days before recognizing that the data is being received.
Cart data with GTM4WP (Google Tag Manager for WordPress)
If your shop tags through Google Tag Manager with the GTM4WP plugin instead of the Pixel Manager, cart data can be sent from the Google Ads conversion tag in your GTM container.
- In WordPress, open Settings → Google Tag Manager → Integration → WooCommerce and turn on Track e-commerce.
- Make sure the product IDs in the data layer match the
idattribute in your Merchant Center feed. The Use SKU instead of ID and Product ID prefix options change them, so set them to whatever your feed uses. - Turn on Exclude tax from revenue in the Purchase tracking group. It is off by default. See below for why it matters.
- In Google Tag Manager, open the Google Ads Conversion Tracking tag that fires on the
purchaseevent, enable Provide product-level sales data, choose the data layer as the data source, enter your Merchant Center ID, set Feed country and Feed language to the country and language of your Merchant Center feed, and publish the container.
Leave the tag's Discount field empty. GTM4WP reports each item's price after your coupons, so an order-level discount on top would subtract the same coupon a second time and understate your margins (Google's definition: the item price excludes transaction-level discounts, the discount covers the whole order).
Why Exclude tax from revenue matters
The Business Requirements state that the product price in the cart data must not include VAT, because Google calculates the profit margin from that price and your cost_of_goods_sold. With the option off, GTM4WP reports item prices the way your shop displays them (WooCommerce → Settings → Tax → Display prices in the shop), which in most shops outside the USA and Canada means including VAT. The cart data then overstates every margin by the VAT rate.
The option also lowers the order value GTM4WP reports, so the Google Ads conversion value, and GA4 revenue if GA4 runs in the same container, drop by the VAT rate after you turn it on. Adjust your ROAS targets accordingly.
Treat this as a profit-margin accuracy requirement, not as a fix for a blocked step. If Merchant Center flags the cart data step, the message it shows names the cause. See Merchant Center Still Asks for Conversions with Cart Data for those.
Some older GTM4WP versions applied Exclude tax from revenue only to the order total while the item prices kept following the display setting. After enabling it, place a test order and check that the item prices in the purchase data layer event are net of VAT. If they are not, update GTM4WP.
Setting cost_of_goods_sold
For setting the cost_of_goods_sold we recommend the following plugin.
- WooCommerce Cost of Goods. The plugin doesn't only set the Cost of Goods Sold (COGS). It also provides valuable reports on profit margins over all products sold.
Uploading the feed
There are two feed plugins that officially support the auto_pricing_min_price field or have a direct integration with the Google Automated Discounts plugin.
WooCommerce Product Feed Manager (by WPMarketingRobot)
Here's how to set the cost_of_goods_sold in the WooCommerce Product Feed Manager.
(This example shows the use of the _wc_cog_cost field created by the WooCommerce Cost of Goods plugin.)

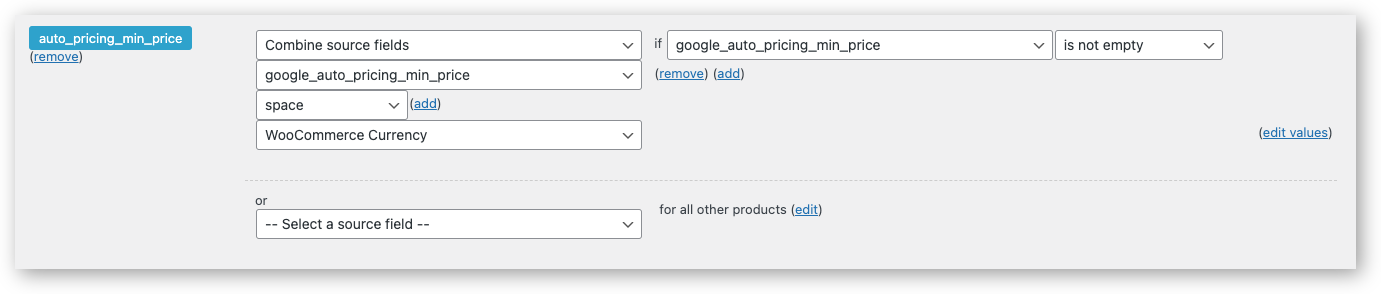
Here's how to set the auto_pricing_min_price in the WooCommerce Product Feed Manager.
Google Product Feed for WooCommerce (by Ademti Software)
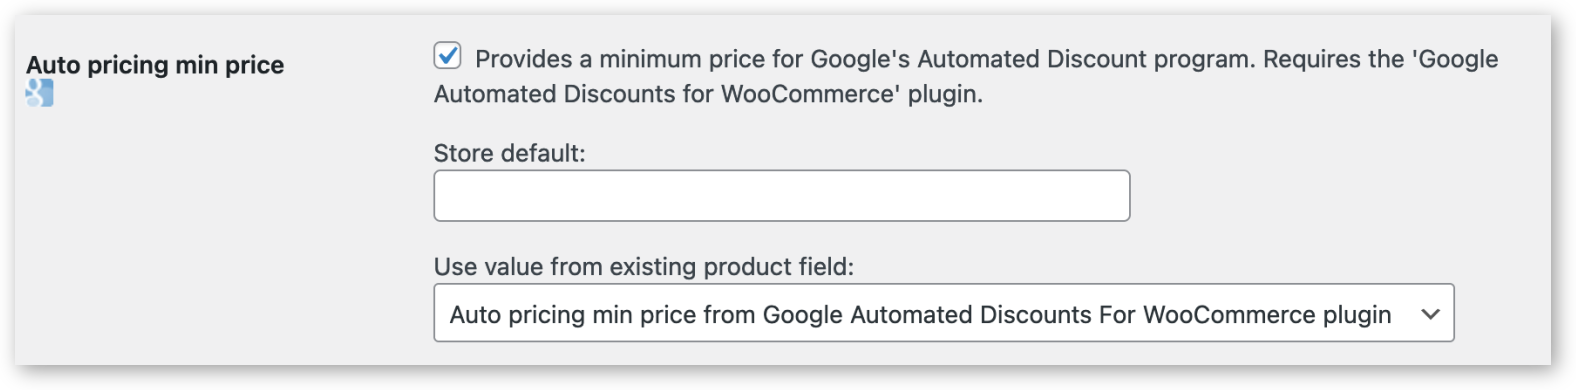
When both plugins are active (Google Automated Discounts and Google Product Feed) you’ll see the auto_pricing_min_price field in the Google Product Feed settings (WooCommerce » Settings » Product Feeds). When enabling the field you can choose to have the values come from the pricing fields provided by the Google Automated Discounts for WooCommerce plugin: