OpenAI Ads Tracking for WooCommerce: Measure Your ChatGPT Campaigns

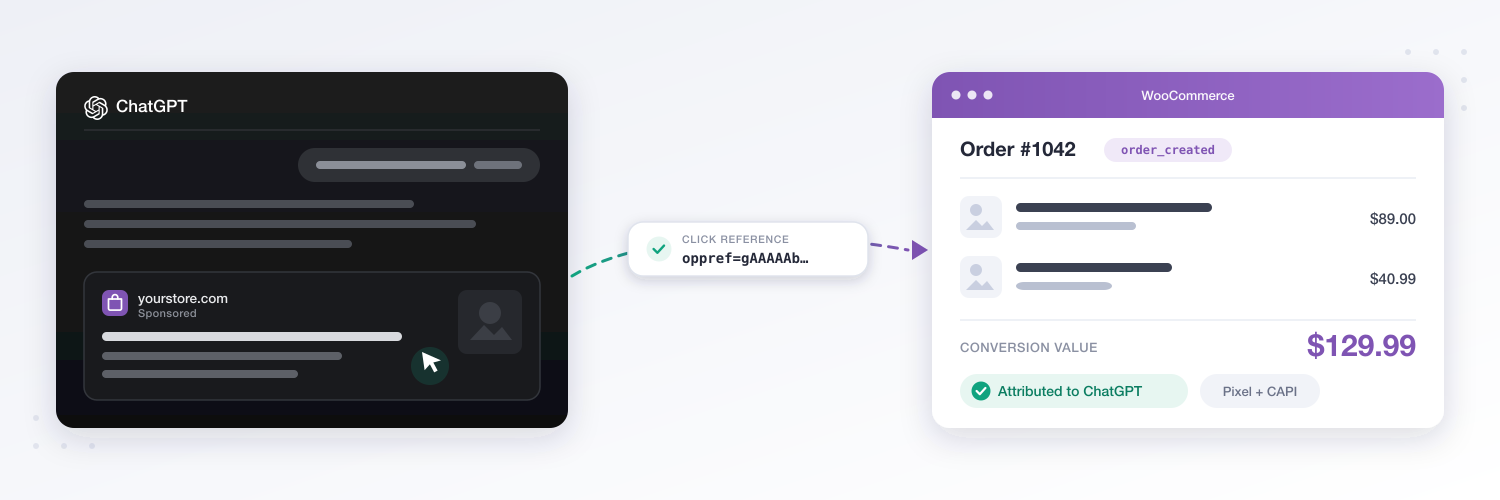
ChatGPT has become a place where people decide what to buy, and OpenAI now sells ads inside those conversations. Six months ago, joining that program meant a six-figure spending commitment. Today the minimum is gone, the sign-up is self-serve, and any WooCommerce store in a supported country can run a campaign.
The Pixel Manager tracks those campaigns end to end. Not just a page view, but the full shopping funnel, purchases sent server-side, and the ChatGPT click reference that connects a conversation in ChatGPT to the order it produced.
TL;DR
- The Pixel Manager supports the OpenAI (ChatGPT) measurement pixel and the OpenAI Conversions API, available from version 1.60.0 (Pro).
- There is no minimum spend to advertise in ChatGPT anymore. The gates today are a supported country, business verification, and a payment method.
- Conversion tracking is a hard prerequisite for OpenAI's conversion-optimized (oCPC) campaigns, and it has to be standard events, not custom ones.
- The Pixel Manager covers all five points on OpenAI's own "how to improve measurement quality" checklist, including the one almost everybody misses: preserving the click reference through redirects.
- Setup is two fields: your pixel ID and, optionally, a Conversions API token.
Who Can Advertise in ChatGPT Right Now
This changed fast, so it is worth getting the current state on the record.
The budget barrier is gone
When OpenAI first tested ads in ChatGPT in early 2026, it worked with a hand-picked group of advertisers. OpenAI never published a price of entry, but the trade press reported minimum commitments in the low hundreds of thousands of dollars: eMarketer put the figure at roughly $200,000, citing Adweek proposals in the $100,000 to $250,000 range for campaigns running February through March.
On May 5, 2026, OpenAI announced the beta self-serve Ads Manager, CPC bidding, and pixel plus Conversions API measurement. Digiday reported that the $50,000 minimum spend requirement was dropped at the same time, opening the platform to advertisers of all sizes.
Today, neither OpenAI's Ads Manager documentation nor its budget or FAQ pages mention a minimum spend or a minimum daily budget at all. You set an average daily budget and OpenAI paces against it.
What you actually need today
Per OpenAI's own account setup documentation, the real gates are administrative rather than financial:
- A business in a supported country. As of this writing the Ads Manager is available in Australia, Canada, Japan, Korea, New Zealand, the United Kingdom, and the United States. Outside those markets you can register interest through OpenAI's advertiser interest form.
- An OpenAI account plus business details: business name, website, logo, and industry.
- Identity and business verification through Persona, followed by an account review. OpenAI assesses whether your products or services are eligible under its Ads Policies. Reviews run in a rolling queue and take time, and OpenAI states it cannot expedite them.
- Billing set up before delivery: a billing profile and a credit card. Ads will not serve without them.
- Your account name and logo filled in. They appear in the ad unit, and ads do not serve until this step is complete.
- Ad review. Each ad has to be approved before it can serve.
One detail worth planning around: the country, billing currency, and time zone you pick at account creation cannot be changed later. Getting them wrong means creating a new advertiser account.
Who will see your ads
OpenAI does not show ads to users on Plus, Pro, or any Business plan, nor to users it believes are under 18. Ads appear below ChatGPT responses as a single sponsored unit with an advertiser name, favicon, headline, description, image, and landing page.
Buying is CPM (the Reach objective), CPC (the Clicks objective), or conversion-optimized CPC (the Conversions objective), settled in a relevance-weighted second-price auction. For CPC campaigns, OpenAI currently recommends starting with a maximum bid of $3 to $5 per click.
The one eligibility requirement that is about tracking
Here is the part that matters most for this article, and the reason we are writing it now.
Conversion tracking is not required to run a plain CPM or CPC campaign. But it is a hard prerequisite for OpenAI's conversion-optimized (oCPC) campaigns, the ones that actually optimize delivery toward purchases instead of clicks. OpenAI's requirements before you can create one:
- Conversion tracking set up for the ad account, via the Conversions API, the JavaScript pixel, or both.
- At least one supported standard conversion event available. Custom conversion events are not supported for oCPC.
- A decision on which event the campaign should optimize toward. It cannot be changed afterwards, and an existing CPM or CPC campaign cannot be converted to oCPC.
Read that second point twice, because it is where homegrown tracking setups fall down. Firing a custom event called woo_purchase does not qualify. OpenAI wants order_created, items_added, checkout_started and the rest of its standard taxonomy, with the right event type and the right value format. The Pixel Manager sends exactly those, which we will come to in a moment.
Practically speaking: get tracking healthy before you want to run conversion campaigns, not after. The event history you accumulate now is what those campaigns will optimize against.
OpenAI's Measurement Quality Checklist, Point by Point
OpenAI publishes a list of five things advertisers should do to improve measurement quality. It is a remarkably good specification, and it is the honest way to evaluate any tracking plugin, ours included. Here is the list, and what the Pixel Manager does about each item:
| OpenAI's recommendation | What the Pixel Manager does |
|---|---|
| Install the pixel across relevant pages and send conversion events when the action occurs | Loads the pixel shop-wide and fires the standard events from real WooCommerce hooks, with product data, values, and currency filled in |
Preserve the click reference (oppref) through redirects and landing-page navigation | Reads it from OpenAI's first-party cookie, with its own landing-page capture as a fallback, and stores it on the order |
| Include the click reference with server-side events when available | Attaches it as a top-level field to every Conversions API event, including purchases and subscription events |
| Provide eligible advanced matching data where permitted | Optional Advanced Matching sends normalized, SHA-256 hashed customer identifiers |
| Use the pixel and Conversions API together, with the same event ID for the same conversion | Browser and server events share one event ID, so OpenAI deduplicates them into a single conversion |
Five for five. The interesting one is the second.
The ChatGPT Click Reference (oppref)
When a visitor arrives from ChatGPT, the landing page URL carries an oppref parameter: OpenAI's privacy-preserving click reference. It is what lets OpenAI connect a purchase back to the specific ChatGPT interaction that started it. OpenAI's Conversions API documentation is explicit that the API will not find this value for you. You capture it and pass it along yourself.
Between the landing page and the purchase event, there is a lot of room for that value to get lost:
- The customer browses for a week before buying.
- They leave your site to pay at PayPal, Klarna, or a bank redirect, and come back on a fresh page load.
- They pay by bank transfer and the order is only marked paid three days later, long after the browser session ended.
The Pixel Manager reads the click reference from OpenAI's first-party cookie and, as a fallback, from the landing page URL it captured itself. That belt-and-braces approach is deliberate: the cookie does not persist on every site configuration and does not survive every cross-domain redirect, and our own capture covers those cases. The value is then stored with the order and attached to every Conversions API event, so delayed payments are covered too, because the reference lives on the order rather than in a browser session.
You do not configure any of this. It happens automatically. It shipped in version 1.64.0.
The Rest of the Integration
The measurement pixel
The Pixel Manager loads OpenAI's measurement SDK and fires the standard events across your shop. No template edits, no manual event snippets, no theme hooks. Here is how your WooCommerce funnel maps onto OpenAI's taxonomy:
| Shop event | OpenAI event | Event type |
|---|---|---|
| Page view | page_viewed | contents |
| Product view | contents_viewed | contents |
| Add to cart | items_added | contents |
| Checkout start | checkout_started | contents |
| Purchase | order_created | contents |
| Subscription trial start | trial_started | plan_enrollment |
| Subscription sign-up | subscription_created | plan_enrollment |
| Lead (via shortcode) | lead_created | customer_action |
Order values are converted into the integer minor units OpenAI expects, including the currencies people usually get wrong: Japanese Yen has no decimals, Bahraini Dinar has three. Send 129.99 where OpenAI expects 12999 and your reported revenue is off by two orders of magnitude.
The Conversions API
The browser pixel alone is the fragile half of any measurement setup. Ad blockers remove it, tracking protection restricts it, and a customer who closes the tab the moment their payment provider confirms the order never loads the thank-you page at all.
The Conversions API sends the same events from your server, and in the Pixel Manager purchase conversions always go server-side, whether or not you route them through SweetCode Cloud. If you do run SweetCode Cloud, events are delivered from the edge instead of your web server, which takes the outbound HTTP calls off your checkout path entirely.
One small convenience: OpenAI does not use a test event code the way Meta or Snapchat do, so there is no extra field to fill in and nothing to remember to remove before going live.
Consent is respected
The OpenAI pixel belongs to the marketing consent category. If a visitor declines marketing consent, no OpenAI events fire in the browser, and since version 1.62.0 the server-side purchase event is withheld as well. Every withheld event is written to the logger, so you can always see why something was not sent. OpenAI's own guidance asks advertisers to send conversion data only where permitted and with the necessary consents in place.
Setting It Up
Two fields, five minutes.
- In the OpenAI Ads Manager, open the Conversions tab and create a pixel, which is your data source. Copy its Pixel ID.
- In WordPress, go to WooCommerce → Pixel Manager → Tracking Pixels → OpenAI, paste the pixel ID, and save.
- For server-side tracking, create an API key for the pixel in the OpenAI Ads Manager, then paste it into the OpenAI Conversions API token field under Show advanced settings.
That is it. The events, the click reference, the deduplication, and the value conversion are all handled for you. The full walkthrough is in the OpenAI setup documentation.
What We Would Do First
If you are considering ChatGPT ads, the sequence that makes sense to us:
- Start the account verification now. OpenAI reviews applications in a rolling queue and will not expedite them, so this is the long pole, not your tracking setup.
- Install the measurement before the first campaign. Set up the pixel and the Conversions API while the numbers do not matter yet. A channel you start measuring after you start spending gives you a first month of data you cannot trust, and no event history for conversion campaigns to learn from.
- Turn on the Conversions API, not just the pixel. Browser-only tracking on a new channel with a small budget will under-report, and under-reporting on a small budget looks exactly like a channel that does not work.
- Enable Advanced Matching. It costs nothing and it is what makes cross-device purchases show up.
- Verify one real order end to end before you scale. The Pixel Manager's logger shows you exactly what was sent.
Availability
OpenAI ads tracking is a Pro feature of the Pixel Manager. The pixel, the Conversions API, and Advanced Matching are available from version 1.60.0. The ChatGPT click reference shipped in version 1.64.0, so be on that version or later before you start spending.
On OpenAI's side, ChatGPT Ads is still a beta that is expanding gradually. You can check your eligibility and sign up at ads.openai.com.
Not on Pro yet? Have a look at what Pro unlocks or go straight to the pricing.
Interested to get updates?
Sign up to our monthly newsletter today.Happy tracking! 🎯

