Integrating the Facebook Pixel for Accurate Tracking on Your Woocommerce Shop: A Complete Guide

TLDR
If you run a WooCommerce business and use Facebook Ads you need to know that:
- The performance of Facebook Ads needs to be measured, including on your WooCommerce site
- There are various ways of tracking the success of a Facebook Ad campaign
Read on to learn how to do this easily and seamlessly with Pixel Manager for WooCommerce.
Are you a WooCommerce store owner looking for ways to improve your Facebook advertising? If so, you may be wondering how to track conversions and sales accurately. One of the best ways to do this is by using the Facebook Pixel, a small piece of code that you add to your website which helps Facebook track how people interact with your store.
Gaining insights about people's activity on your website is the first step toward conversion optimization. In this article, we'll show you how to set up the Facebook Pixel on your WooCommerce shop and how to use it to improve the efficacy of your advertising.
What is the Facebook Pixel, and what are the benefits of using it?
The Facebook Pixel is a piece of code that you add to your website in order to track conversions and measure the effectiveness of your Facebook advertising. When someone visits your website after clicking on one of your ads, the Facebook Pixel will automatically drop a cookie on their computer.
This will allow Facebook to track whether or not that person later converts on your website. If you're running a WooCommerce shop, adding the Facebook Pixel is a must-do if you want to accurately track your ecommerce's performance
How does it work?
The Facebook Pixel tracks the activity of people who have visited your website after clicking on one of your Facebook ads. It then reports how many of these website visitors completed an action on your ecommerce store, like a purchase or the completion of a form. This information can help you to understand the success of a Facebook advertising campaign and make adjustments to improve your results.
Adding the Facebook Pixel to your WooCommerce shop is very easy, no coding knowledge is required to install it. You will just need to copy and paste a snippet of code into your website's header. If you're not sure how to do this, then your web developer can help you out.
Benefits of using the Facebook Pixel
There are many benefits to using the Facebook Pixel on your WooCommerce shop. Some of the key benefits include:
Create custom audiences for better targeting.
Wouldn't it be wonderful to be able to target your adverts to those who have previously expressed interest in your business?
You can indeed achieve that with pixel-based custom audiences.
Retargeting previous customers and urging them to make more purchases will undoubtedly boost your conversion rate and your revenue.
Aside from that, audiences have varied product interests unless you sell a single product. Audience behavior in your business may vary even if you just sell one product.
You may also target different audience segments with customized audiences based on the Meta Pixel data and the items they are interested in.
For example, you may want to target those who have visited your website but never made a purchase. You can also target people based on the pages they have viewed on your website.
Measure the effectiveness of your Facebook campaigns
Just as importantly, you can use Pixel data to assess and optimize the effectiveness of your Facebook campaigns.
You can track how many people saw your ad, how many clicked on it, and how many made a purchase as a result.
This data will help you to better understand what is working and what isn't with your Facebook campaigns so that you can make necessary changes. The costs of ads can quickly mount, so making sure that your campaigns are as effective as possible is key. Imagine if you could cut down on wasteful spending by optimizing your campaigns.
Tracking ad attribution to conversions on your WooCommerce site is key to determining exactly which advertisements work and which don't in order to allocate your advertising money wisely and get better results. Using the metrics from past campaigns is also important to plan your upcoming promotions.
Additionally, you may examine your effectiveness with various audience subgroups based on their demographics, locations, and devices. You can improve your audience targeting by doing this.
For instance, if you launch a campaign with five distinct ad sets but only one of them generates sales for your WooCommerce store, you may pause the others and scale the top-performing one. You may also focus just on your effective advertising by going down to the level of the ad.
You should make use of the vital information that Meta Pixel gives you about the effectiveness of your ads to enhance your current and upcoming campaigns.
Dynamic product ads
Facebook dynamic product ads are a type of ad that allow you to target people who have visited your website with ads for products they viewed on your website. This is an incredibly powerful way to market to customers as it allows you to create a custom audience based on their prior interactions with your company.
You can achieve it with the aid of Meta Pixel. Visitors who clicked on goods and even added them to their shopping carts but did not finish the transaction will have their information recorded.
If you configure your catalog, you may utilize the information supplied by your Meta Pixel to run dynamic product advertisements that display the exact same items these customers left in their abandoned carts in an effort to persuade them to make the purchase.
Dynamic product ads have been found to be incredibly effective at recovering lost sales. They are also great for increasing the average order value of your customers.
Track conversions and ROI
The Facebook Pixel can help you track not just ad clicks but also website purchases and other actions taken on your site that result in a conversion.
This data is essential for measuring the return on investment (ROI) of your Facebook ad campaigns. In order to calculate ROI, you need to know how much money you've spent on ads and compare it to the value of sales generated by those ads.
By tracking website purchases, you can attribute a value to each conversion and determine the exact ROI of your Facebook ad campaigns. Doing so will allow you to make better decisions about where to allocate your advertising budget in order to get the most bang for your buck.
Create lookalike audiences
One of the great things about the Facebook Pixel is that it can be used to create lookalike audiences.
A lookalike audience is a group of people who are similar to an existing customer base but who have not yet interacted with your company. This is an incredibly valuable way to expand your reach and find new customers.
The Facebook Pixel can help you create a lookalike audience by providing you with data on the interests and demographics of your current customers. With this data, Facebook can find people who share similar interests and demographics to those of your current customer base.
This is a great way to find new potential customers who are likely to be interested in your products or services.
Optimize your website for better performance
The Facebook Pixel can also help you to optimize your website for better performance.
By using the data from the Facebook Pixel, you can determine which pages on your website are performing poorly and need improvement.
You can also use Pixel data to determine the most effective placements for your Facebook ads.
This information will help you to improve the overall performance of your website and increase the number of sales it generates.
How do I set up the Facebook Pixel (Meta) on my WooCommerce site?
In this section, we will discuss how to set up the Facebook Pixel (Meta) step-by-step on your WooCommerce site.
First, you need to have a Facebook Business account. This is very important. A Facebook business account and a personal account are two different things. If you don't have one yet, follow this guide:
-
Go to business.facebook.com/create and select Create Account.
-
Enter your name and confirm your identity with Facebook login credentials.
- Follow the prompts to create your business account.
**Next, you need to create a Facebook Pixel account if you don't have one. **
-
Click on the "Create a Pixel" button.

For the Pixel you're going to make, you may choose a name. To make the setup process simpler, you may also give your website name here. Adding your domain name to the pixel name is also highly advisable as it will be easier for your future co-workers and agencies to understand to which account a pixel belongs.
Be aware that by clicking the Continue button, you are consenting to Facebook's terms.
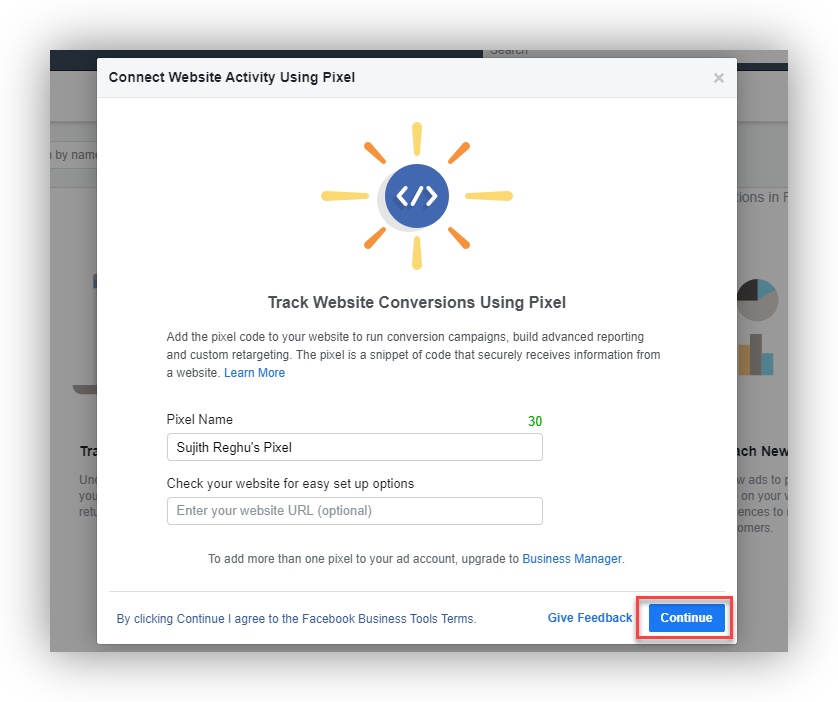
Before moving on, it is best to carefully read the terms if you have any questions.
-
If you have an existing pixel, you can also find it by going to Ads Manager and selecting Pixels under the Measure & Report column.
-
If you have any questions while creating your pixel, you can find help by clicking on the question marks next to each step.
Now, on to setting up your pixel on WooCommerce!
-
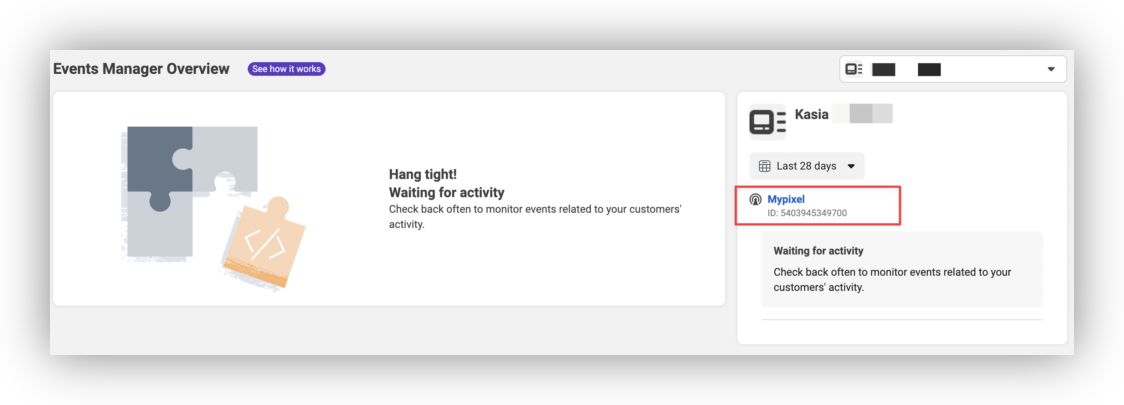
The first step is to go to Facebook Events Manager, where you see Partner Integrations.
-
Choose "Add code using Partner Integrations".
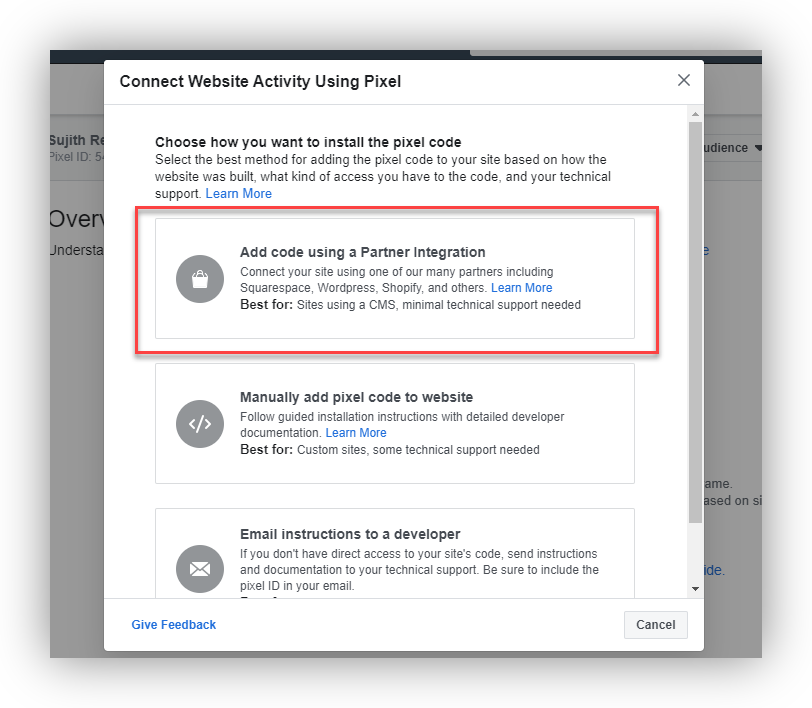
- Scroll down to find WooCommerce.
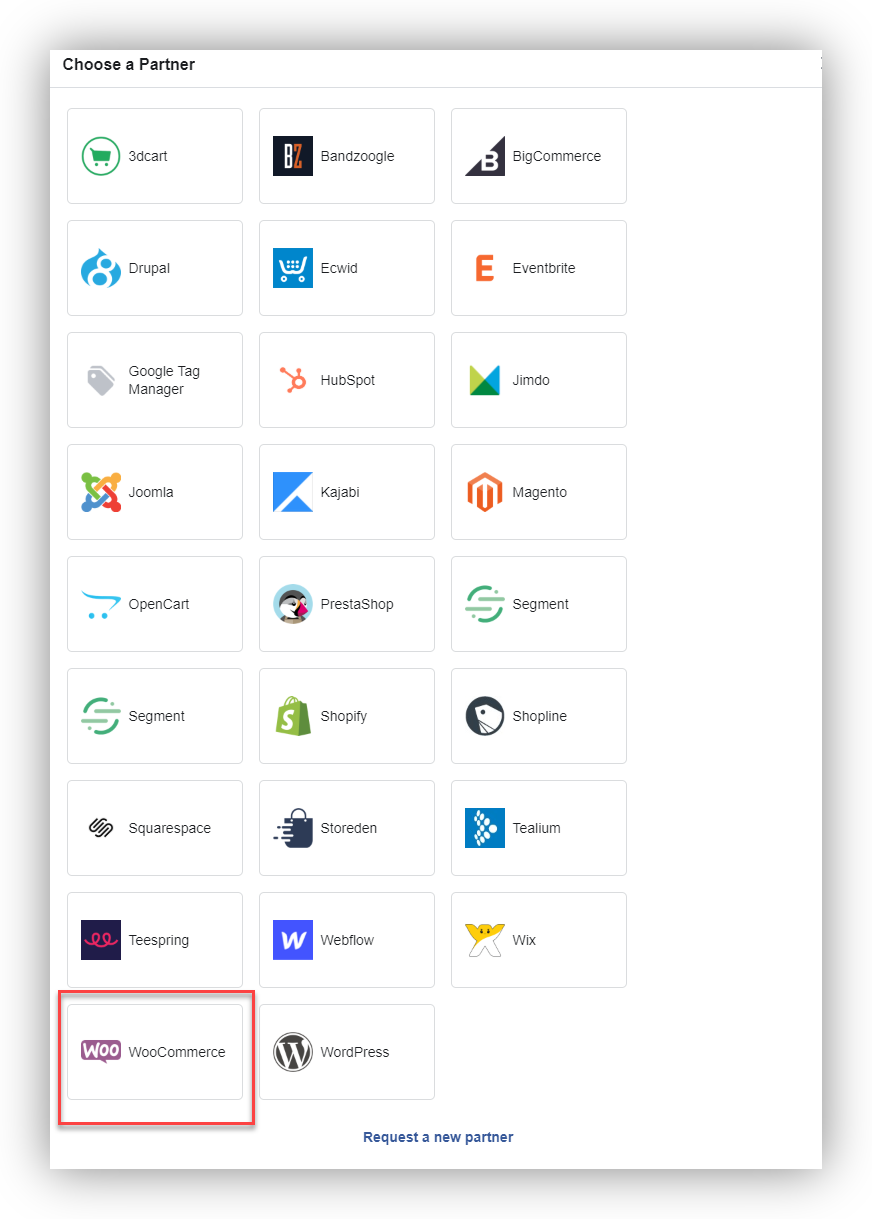
- Your WooCommerce store may now be connected, and you'll be prompted by Facebook with on-screen instructions.
Another option is to manually add your website code. Be aware, however, that this poses a risk; it can break your website if done incorrectly.
Thankfully, there is an easier and more effective way to integrate Facebook Pixel with your WooCommerce site and get the most out of it: using a free plugin like Pixel Manager for WooCommerce.
Easily integrate the Facebook Pixel in WooCommerce with Pixel Manager for WooCommerce
Pixel Manager for WooCommerce is a plugin that allows you to manage the Facebook Pixel and its data on your WooCommerce site with ease. It was created with the idea of providing an easier and more accurate way for online store owners to collect and use the Facebook Pixel data to improve their sales funnel and marketing strategies.
For example, with Pixel Manager for WooCommerce, you can:
- Create Custom Audiences and Lookalike Audiences directly from your WooCommerce data.
- Track purchase events from every customer who lands your store from Facebook Ads, and other platforms too.
- Retarget customers who have abandoned their carts or viewed specific products on your site.
- Import product data into Facebook Ads to create dynamic ads and more!
The premium version is packed with key features, such as:
- Advanced order duplication prevention
- Conversion API (CAPI)
- Tracking accuracy reports
Install Pixel Manager for WooCommerce in a few easy steps:
First, get The Facebook Pixel ID from your page.
Note: Follow this step only if you have an existing pixel. If you don't, follow the steps above (how to set up my Facebook Pixel)
- To get your Pixel ID, go to your Facebook Ads Manager

- Select Events Manager, then “All Tools”
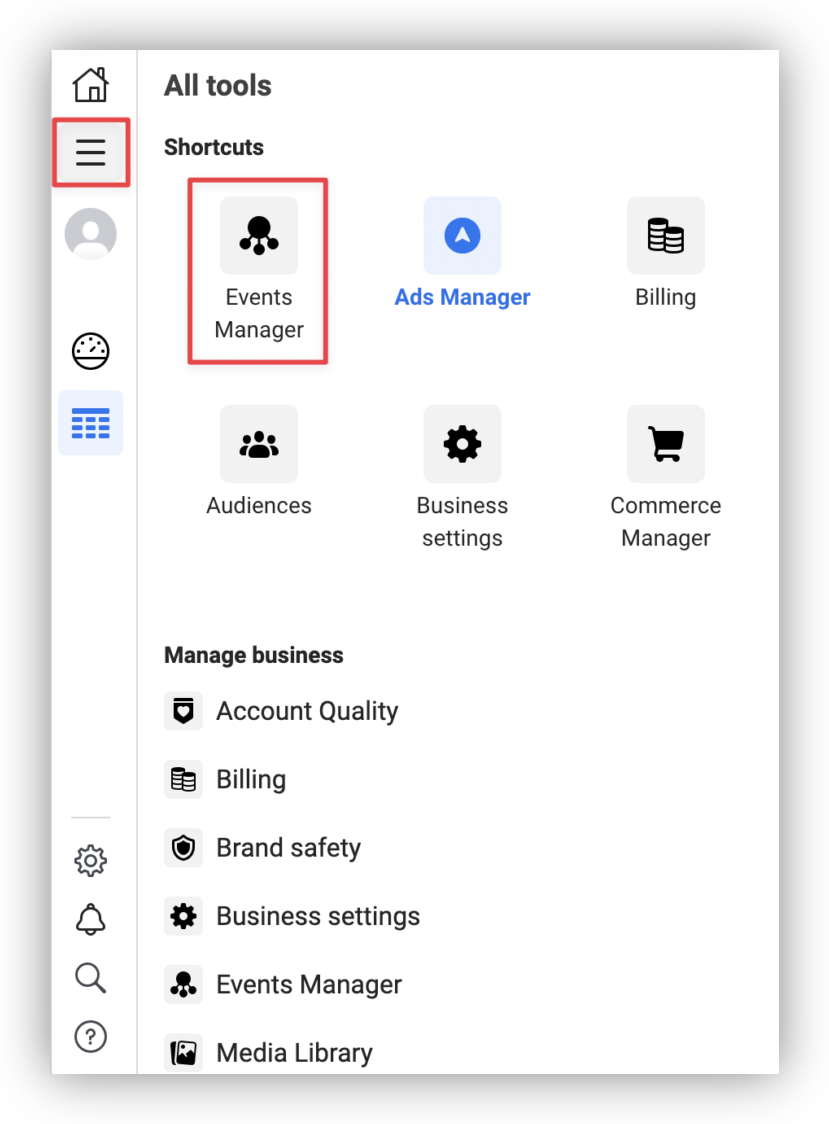
- Click on the “Copy Pixel ID” button and paste it into the Pixel ID field in the Pixel Manager for WooCommerce plugin settings.
Next, install the plugin and activate it.
- On your WordPress site, go to Plugins > Add New. Search for “Pixel Manager for WooCommerce” and install the plugin.
- You can find the plugin settings under WooCommerce > Settings > Integration.
- Enter your Facebook Pixel ID and you've now successfully installed the Facebook Pixel on your WooCommerce site!

After installing and activating the plugin, you will need to enter your pixel ID in the settings area. You can find the settings area by going to WooCommerce > Settings > Pixel Manager for WooCommerce.
That's it! You're now ready to start tracking your website data with the Facebook Pixel to improve your marketing strategies.
Use Pixel Manager for WooCommerce to get the most out of the Facebook Pixel
Now that you know how to install the Facebook Pixel on your WooCommerce shop and you installed Pixel Manager for WooCommerce, you're probably wondering how to get the most out of it. Here are some tips:
Use event tracking to track specific actions on your site.
With event tracking, you can track things like add-to carts, purchases, and lead generation. Sweetcode's Pixel Manager automatically adds the necessary code for the most popular events, so you don't have to worry about it. This will help you to see which actions are most effective in driving sales and leads.
Create custom audiences for retargeting.
By creating custom audiences, you can target people who have visited your site or taken a specific action on your site. This is a great way to reach out to people who are already interested in your products or services.
Use the Facebook Pixel to create custom conversions.
If you have a specific goal that you want to track, such as signing up for a newsletter, you can create a custom conversion tracking pixel for that goal. With Pixel Manager, you can easily use shortcodes to track these custom events (check this guide for help). This will help you to see how effective your marketing efforts are in driving that goal.
Experiment with different ad placements.
Not all ad placements are created equal. Try experimenting with different placements to see which ones work best for your shop.
Use the Facebook Pixel data to create targeted ads.
By using the data from the Facebook Pixel, you can create targeted ads that are more likely to be successful. This data can also help you to fine-tune your targeting criteria for future ads.
Conclusion
Integrating the Facebook Pixel into your WooCommerce shop is a great way to track your website traffic and conversions. By doing so, you can ensure that your advertising campaigns are effective and provide you with the most accurate data.
Not only that, but you can take advantage of its key benefits, such as creating custom audiences and retargeting, measuring the impact of your ads on sales, tracking conversions, and more.
Finally, there is no other plugin like Pixel Manager for WooCommerce that can help you with the Facebook Pixel integration on your WooCommerce shop. Although the Facebook Pixel is a powerful tool itself, it lacks the ability to properly manage and configure it for a WooCommerce shop. Pixel Manager fills that gap and makes the integration process much easier.
It has all the features you need to get the most out of this powerful tool, such as filters to fine-tune your Pixel data, conversion tracking for different types of products, and more.
This will make you more confident in your marketing decisions and help you improve your WooCommerce shop's performance. Check out Pixel Manager for WooCommerce today and see for yourself how it can help you take your business to the next level.