How to Set Up Conversion Tracking on WooCommerce: Complete 2022 Guide

TLDR
- Conversion tracking can help you get a much more granular overview of the customer journey, such as tracking abandoned carts, rate of successful checkouts, and conversion rates.
- You can track conversions from Ads and organic traffic.
- The Pixel Manager for WooCommerce conversion tracking plugin is the most advanced plugin for your WooCommerce store.
Once you set up your WooCommerce site, you need to know how your visitors are behaving. Conversion tracking will let you measure whether your visitors have been effectively converted to customers. It can identify whether you're losing visitors at any point in the customer journey and help you figure out how you can optimize your site to improve your conversion rate.
A conversion is what we call any event that you consider to be valuable to your site. For most WooCommerce stores, conversion events would be related to purchasing products, adding items to the cart, or any other item taken along the conversion funnel. However, we can include other relevant events here, such as email subscriptions.
This article looks at why you need to set up conversion tracking for your WooCommerce store, the benefits of conversion tracking, how to set it up for your WooCommerce store and how to implement it using Pixel Manager for WooCommerce.
Why Is Conversion Tracking Important for WooCommerce?
WooCommerce users can get some decent insight into their sales with WooCommerce Analytics, such as gross and net sales, number of items sold, average order value, etc. You can even see your top customers and their total expenditure.
While this data is useful, it's fairly limited. By implementing conversion tracking on your site and can get a much more granular overview of the customer journey. Here are some of the insights you can get through conversion tracking:
-
Tracking eCommerce shopping behaviors: Conversion tracking will help you monitor the behaviors of all your users. For instance, if you run Google Ads and Meta Ads, you can track which platform is generating the most ROI and use the information to improve your marketing ad campaigns and optimize your website for better conversion rates.
-
Cart item tracking: You can see your rate of cart abandonment, and which items customers add to or remove from a cart before checkout. This information is important for your eCommerce store because you can use it to develop new marketing strategies like offering coupons, discounts, and email marketing.
-
Rate of successful checkouts: Analyzing your checkout rate is vital as a business owner. You should be able to segment this data for each payment provider. If, for example, you see that many of your iDeal payments fail, then perhaps there's a technical issue you need to address on your site.
This level of detail is incredibly important because you can use this information to improve your marketing campaigns and optimize your website for better conversions.
For example, if you spend $500 on a Meta ad and it only generates a return of $300, then you need to decide whether to optimize that campaign or shift your focus elsewhere.
Similarly, if you find that most of your customers are adding items to their cart but abandoning it before completing the purchase, you might need to work on improving the checkout process.
What do you need to track conversions in WooCommerce?
Setting up conversion tracking in WooCommerce is easy and can be completed in a few steps.
First, you'll need to analyze your needs and decide on the data you want to capture. There are two main categories of data collection;
- Conversions coming from organic traffic: This will require you to connect your store/site to Google Analytics.
- Conversions coming from Ads: Whether you use Google Ads, Meta Ads, Twitter Ads, or any other Ad platform for your store, you'll need to integrate your site with each of them.
This means that you'll need an account for any platform you want to integrate with. For e.g., if you don't have a Google Analytics account yet, you'll need to create one.
To set up conversion tracking with any specific platform, you'll need to add a pixel to your site. A pixel is a piece of code that lives in your browser and/or server - this is what makes it possible to record conversion purchase events. You will need a different one for every platform you integrate with.
It's simple to add pixels to your WooCommerce site, and we're going to show you how to do this using the Pixel Manager for WooCommerce plugin.
Why Pixel Manager for WooCommerce is the best conversion tracking plugin
Although there are various pixel-tracking plugins available on the market, Pixel Manager for WooCommerce is the most advanced plugin available. It is really easy to set up and use, and it's designed to give you the most accurate conversion tracking possible.
Pixel Manager for WooCommerce plugin lets you set up conversion tracking for various platforms, which gives you plenty of options as a marketer. You can do this for Google Ads, Google Analytics, Meta (Facebook) Ads, Microsoft Ads, Twitter Ads, Pinterest Ads, Snapchat Ads, and TikTok Ads.
Your WooCommerce data is linked directly to the conversion reports of any platform you integrate with.
Many of the plugin's features are implemented across every pixel, such as:
- Purchase Currency
- Advanced order deduplication. This helps avoid duplicated user orders during report generation. Only the actual or original orders are tracked.
- Purchase transaction ID
- Custom conversions with shortcodes
- Marking events of lazy loaded products for further action
- Total order calculations
- Ignoring orders where payments failed
There are also features specific to each platform that Pixel Manager for WooCommerce integrates with. These are a few major examples:
- You can turn on Enhanced E-Commerce and cart tracking for Google Analytics.
- Set up dynamic remarketing for Meta Ads and Google Ads.
- Track server events for Meta using CAPI
- Add multiple conversion pixels and cart item tracking for Google Ads.
The plugin is compatible with all on-site payment gateways. For optimal tracking, SweetCode recommends against using off-site payment gateways. Off-site payment gateways can cause problems and impair conversion tracking. They usually redirect the visitor away from the shop domain to another domain belonging to the payment provider. They also try to redirect the user to the WooCommerce store once the payment has been made.
Here are some of the main reasons why off-site payments affect conversion tracking;
- It needs to be configured properly: When you use an off-site payment gateway, it has to be configured first to redirect the user to the WooCommerce purchase confirmation page after the payment goes through. When the redirect fails to work, it's not possible to track conversions. Conversion pixels are only fired from the WooCommerce purchase confirmation page.
- Customer behavior: Buyers may even stop automatic redirects to the eCommerce platform purchase confirmation page once they see that the purchase has been confirmed by the payment provider.
- It affects eCommerce tracking: Some off-site payment gateways will not automatically redirect the customer back to the purchase confirmation page until the buyer clicks on a button. Many buyers don't click that button.
The Pixel Manager plugin also offers various ways of dealing with visitor consent. By default, it's set to Implicit Consent Mode - it tracks cookies until permission is denied. However, you can change this to Explicit Consent Mode, which doesn't track cookies until consent is given.
Additionally, it integrates with many Consent Management Platforms such as Borlabs Cookie and Cookiebot. The plugin also offers a public API for developers who use custom-made cookie banners.
Pixel Manager for WooCommerce is quite simple to set up - you just need to add pixels to the backend to start tracking. There is plenty of documentation to help developers fine-tune the output if they want to, but everyone else can get started quickly.
How to set up conversion tracking using Pixel Manager for WooCommerce
It is easy to install and use Pixel Manager for WooCommerce plugin on your eCommerce site. This step-by-step guide walks you through how to integrate the plugin with Google Analytics to track organic traffic and Google Ads (as an example of a popular Ad platform you might want to track conversions from).
Installing and activating the plugin
- Choose the Pixel manager for WooCommerce plan that works for your business needs. There are five pricing plans that range from 1 site to 25 sites. You can try the plugin with a 14-day free trial.
- Go to WordPress > Plugins > Add New, and upload the plugin's zip file.
- Activate Pixel Manager for WooCommerce in the WordPress plugins menu.
Setting up conversion tracking for a new Google Analytics property
If you have created a new Google Analytics account, follow these four steps.
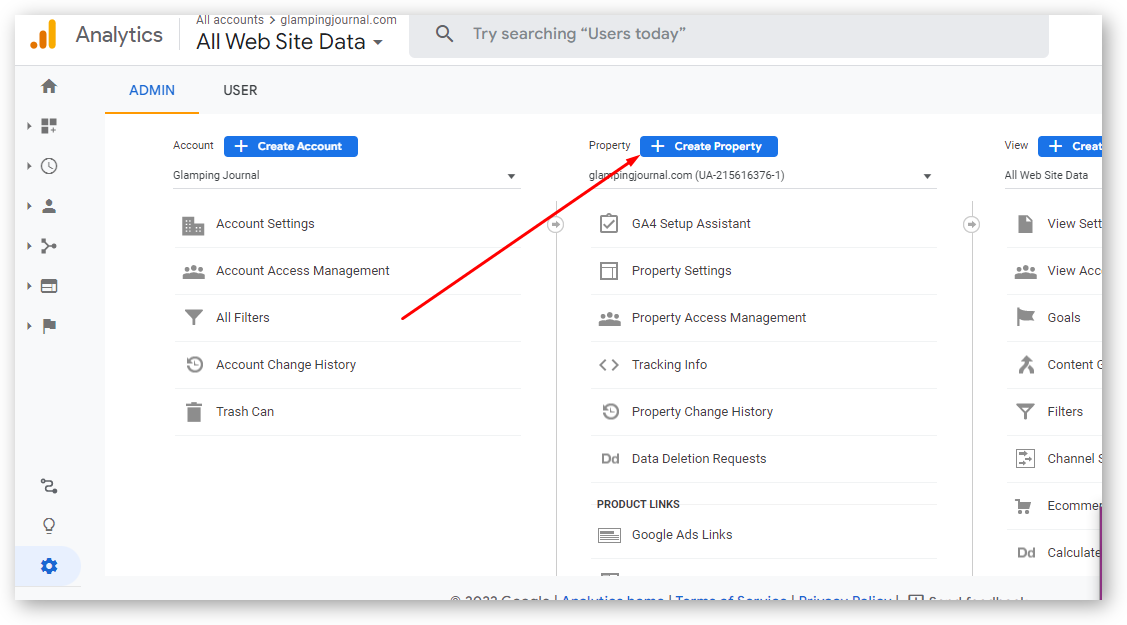
Step 1: Open your Google Analytics and head over to the Admin settings. Click create property to add a new property.
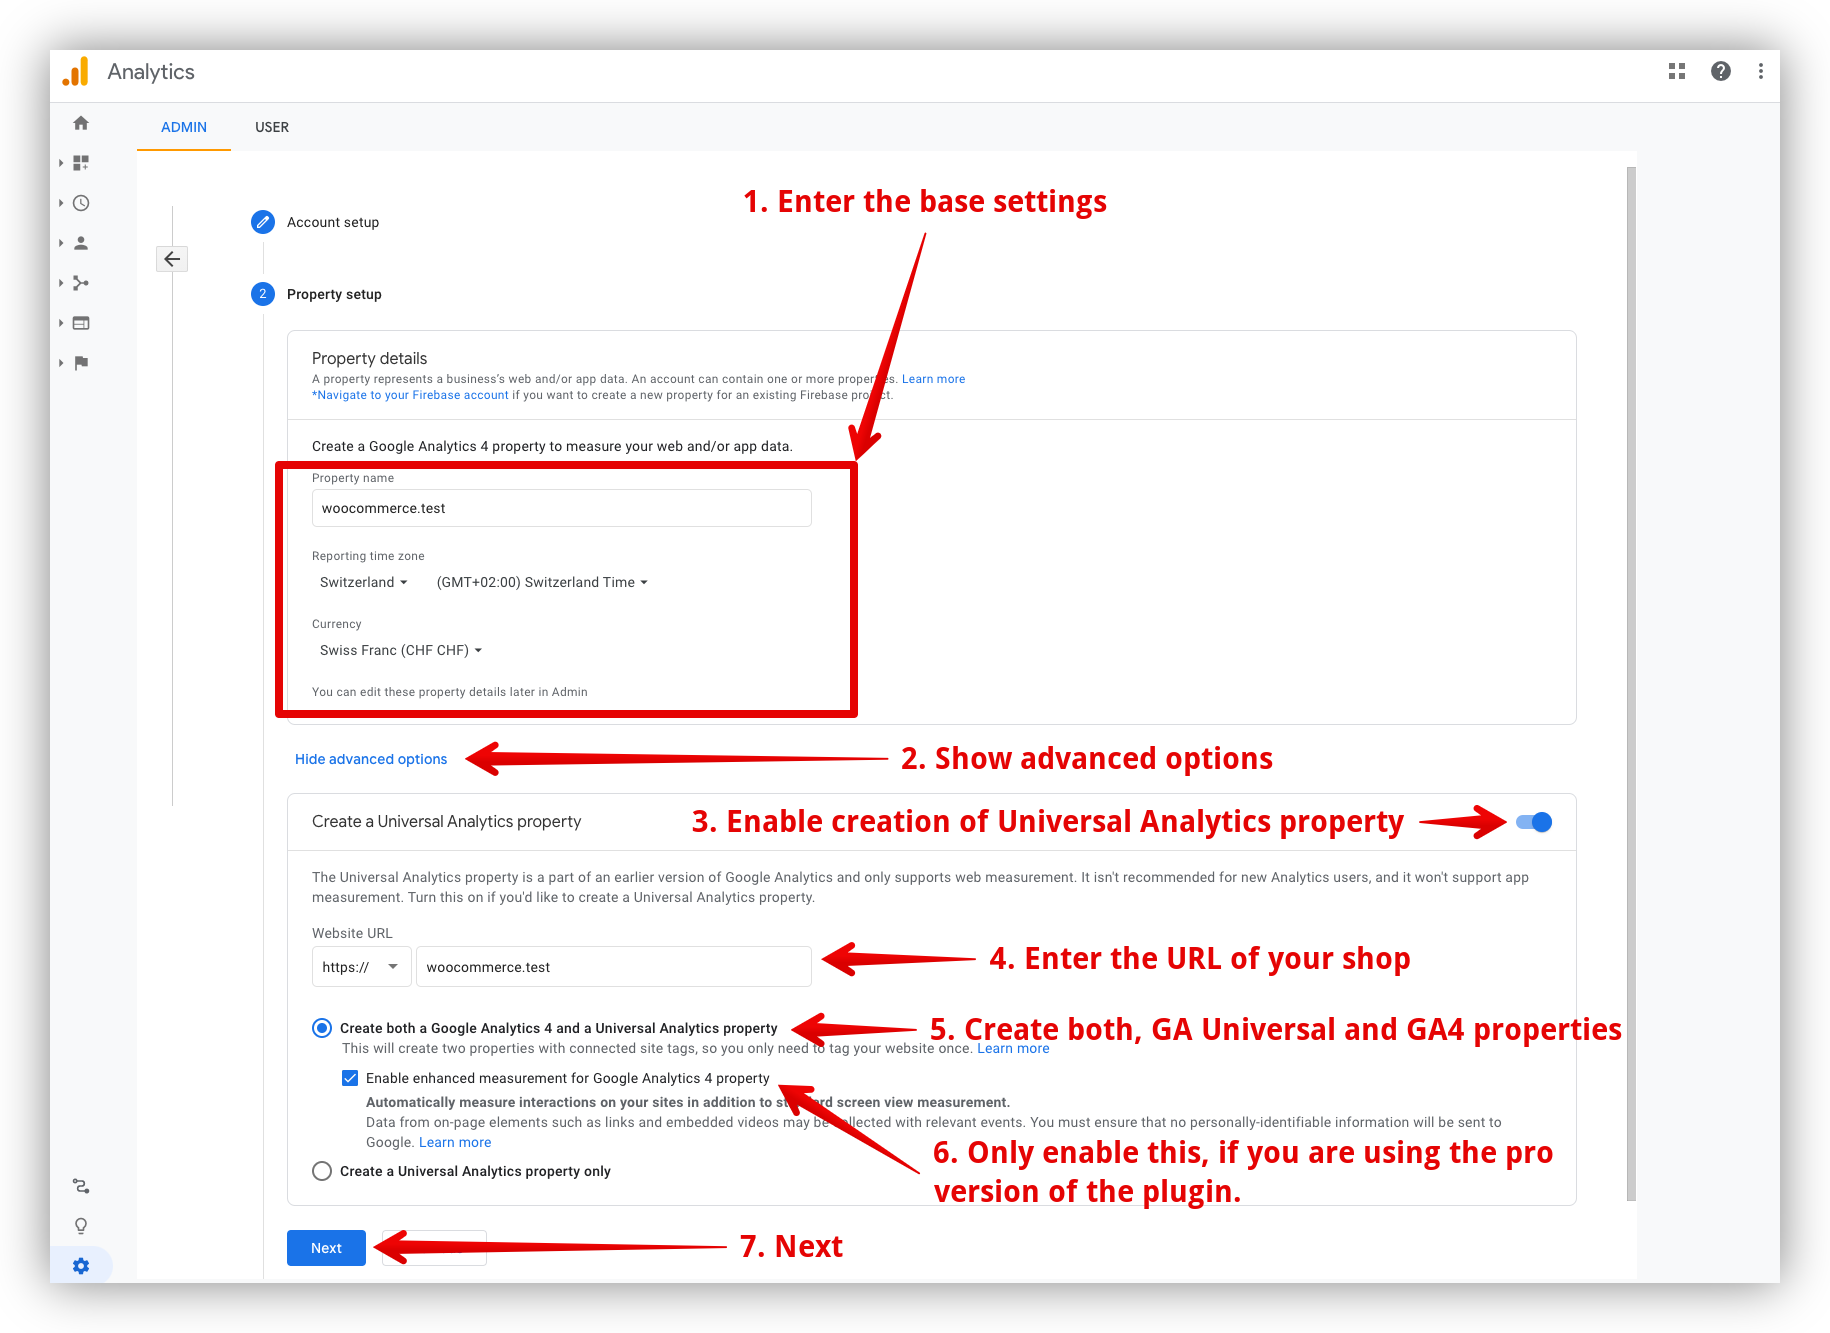
Step 2: Under the property section set up, enter your property name, your preferred reporting time zone, and currency. You can always come back and change these settings later.
Next, show advanced settings. In this section, you can opt to create both a GA4 and Universal Analytics property, but since Universal Analytics will be phased out in July 2023, Google recommends only creating a GA4 property. In the advanced settings, you can also enable enhanced measurement for Google Analytics 4.
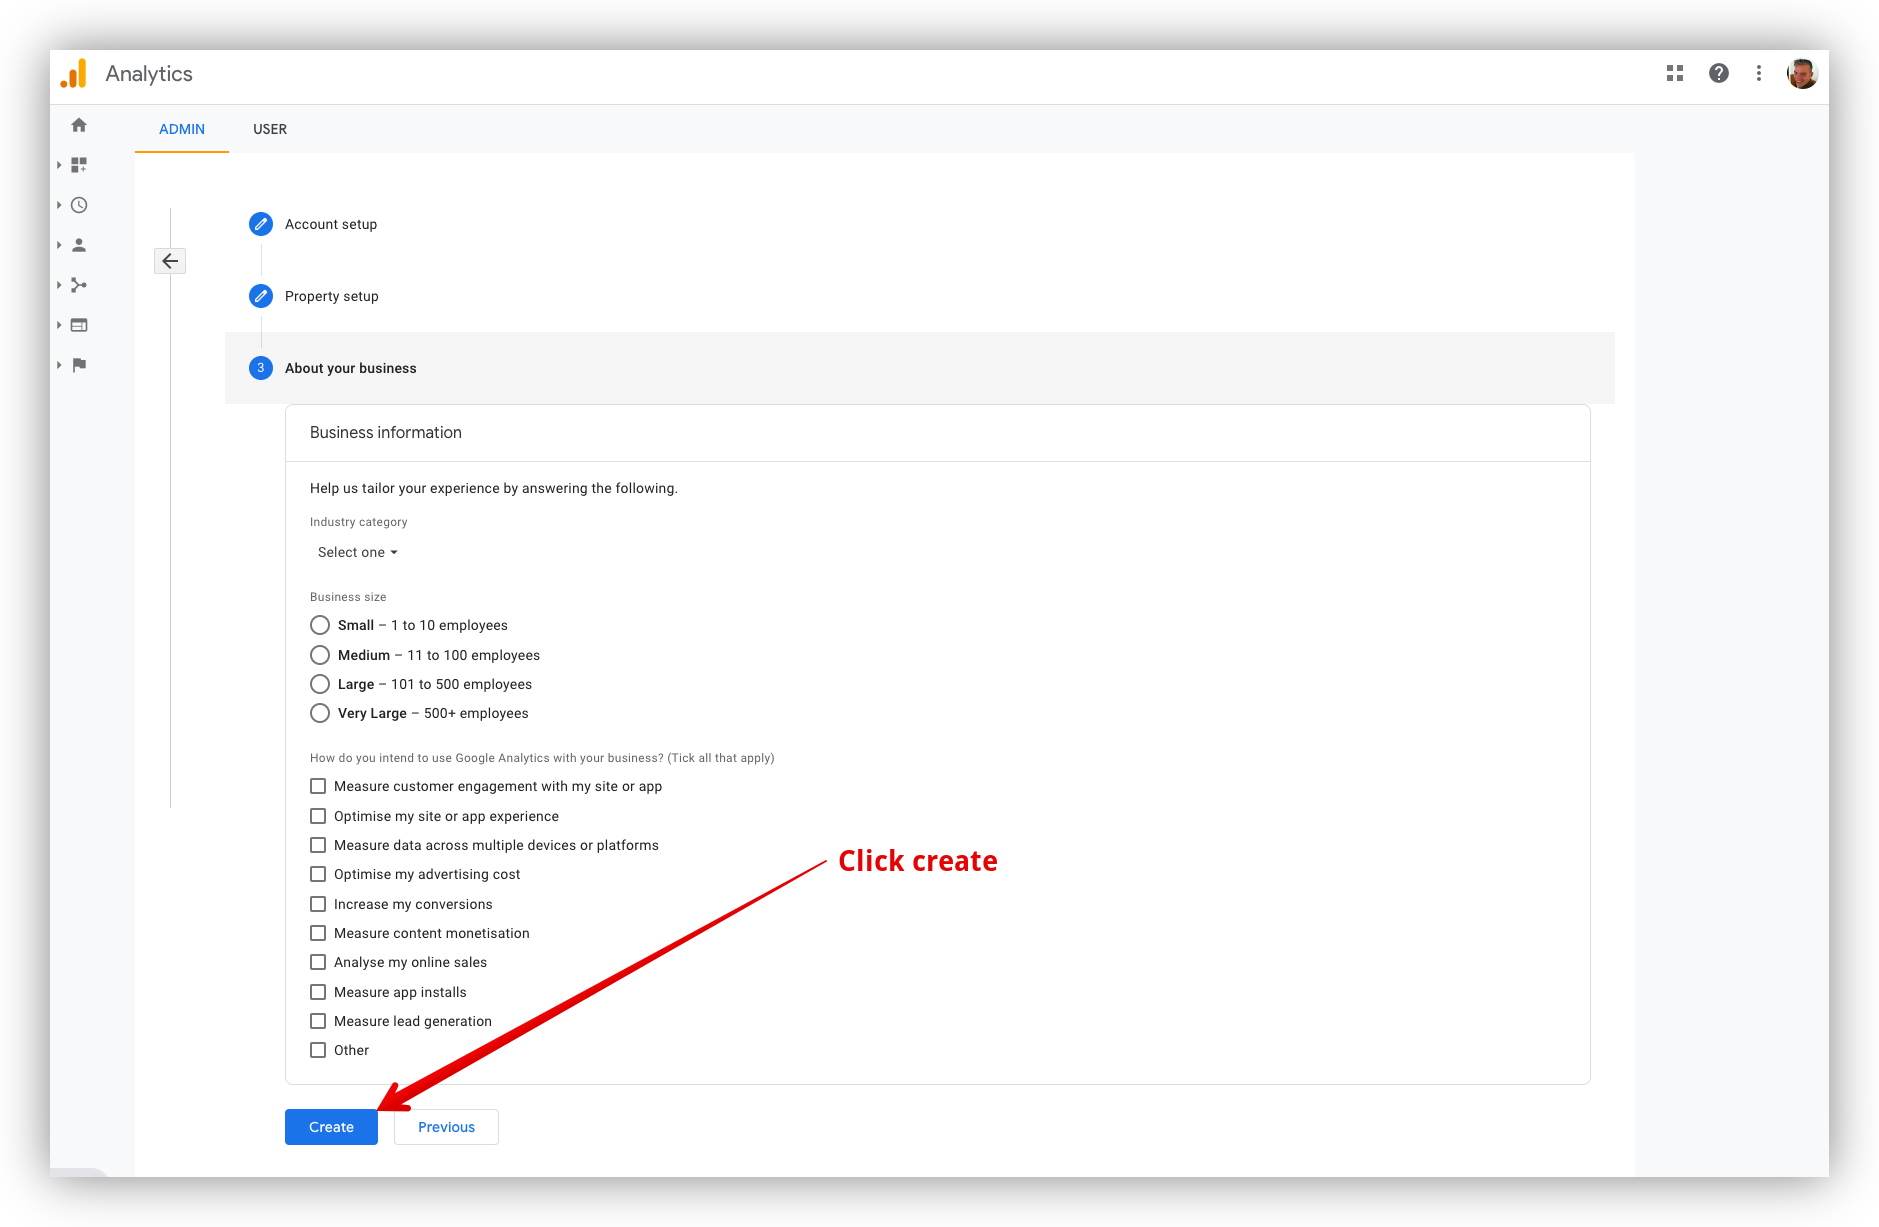
Step 3: In the “About your business” fill in details about your WooCommerce store to help Google Analytics tailor your experience. These details include the industry category you're in, the size of your business, and how you intend to use Google Analytics. Once you're done, click create.
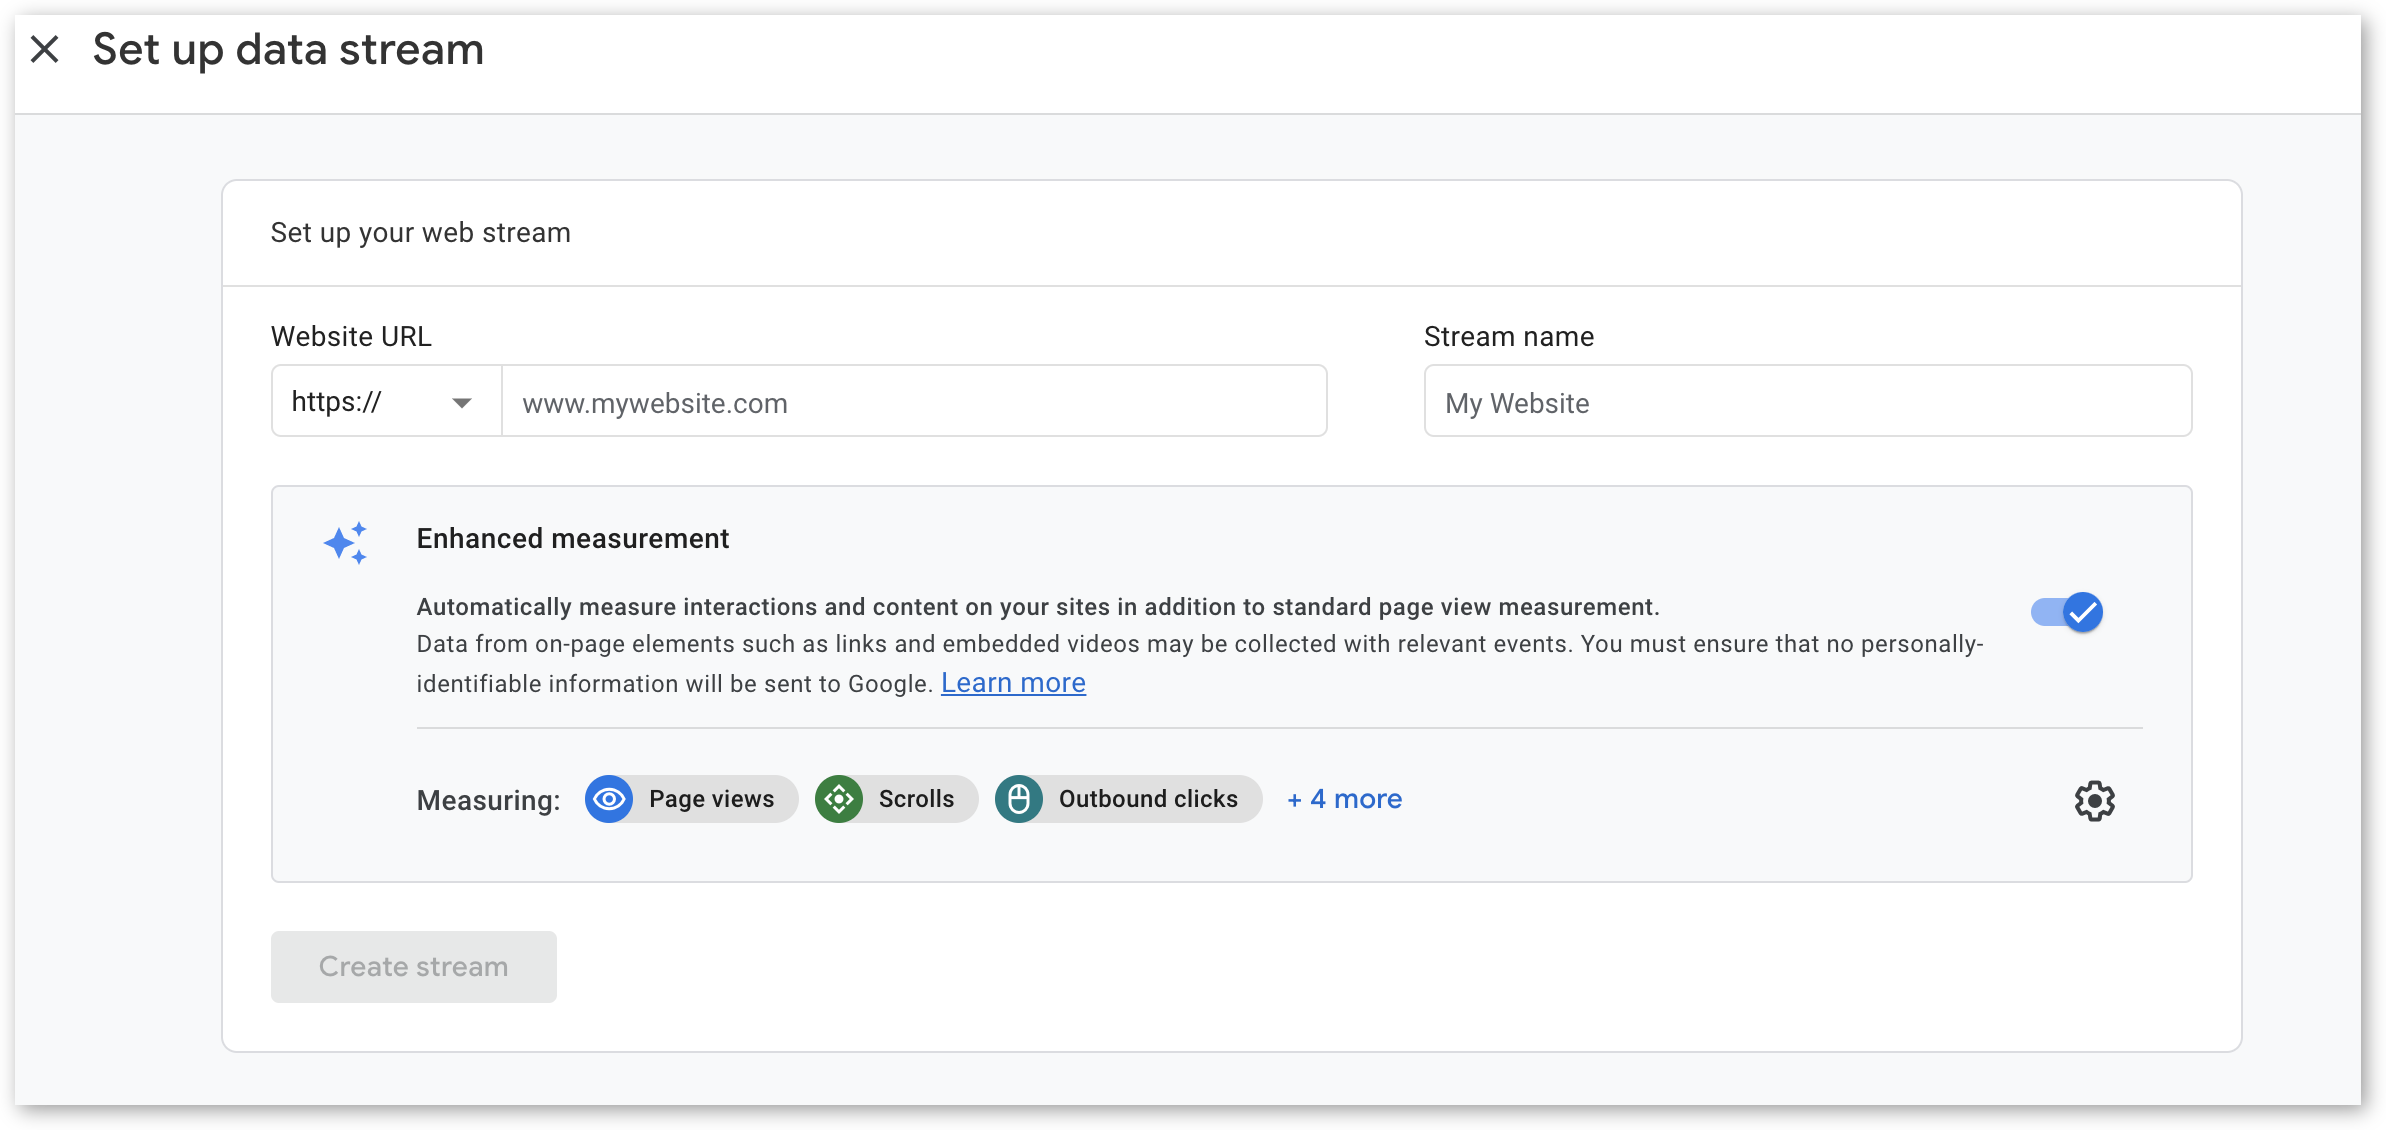
Step 4: You'll then be prompted to create a web data stream. Enter your Website URL, and enter the Stream name. When you're done, click Create Stream.
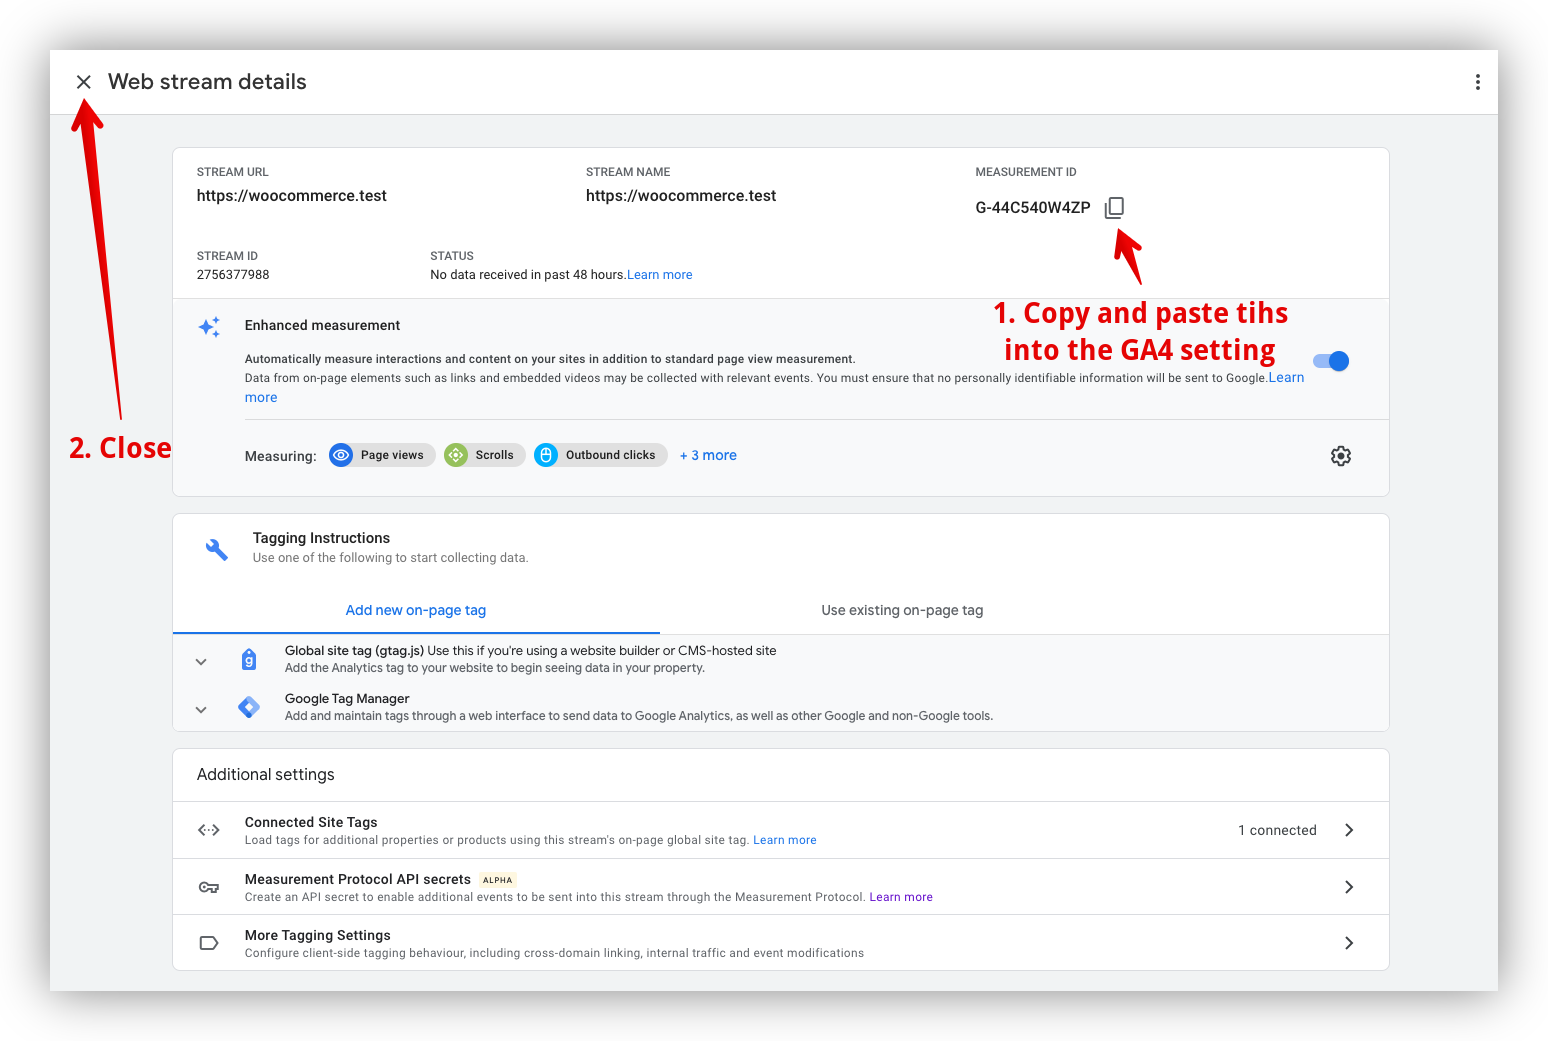
Step 5: Open the web stream details and copy the Measurement ID located in the top left corner of the screen.
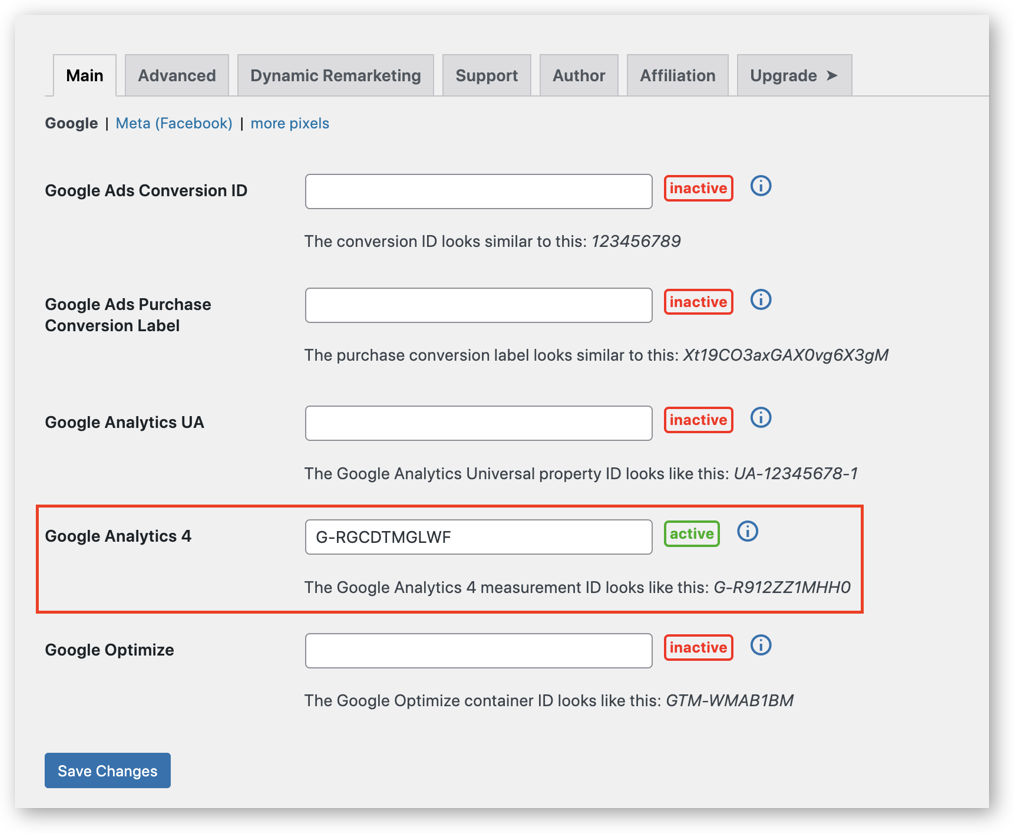
Step 6: Go to your WordPress dashboard and open Pixel Manager for WooCommerce. Find the GA4 field under the Main tab and paste the Measurement ID. Save your settings.
Setting up conversion tracking for an existing Universal Analytics property
If you already have an existing Google Universal Analytics property, here's what you need to do:
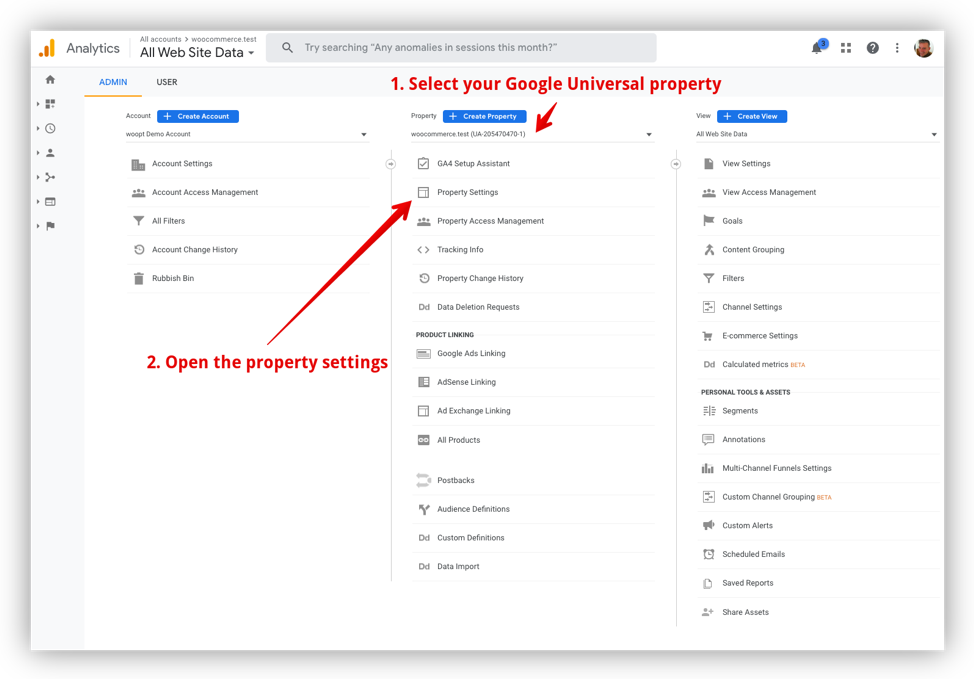
Step 1: Click Admin settings in Google Analytics and choose your Google Universal Property from the drop-down menu under the property column. Then, open your property settings.
Step 2: You'll find the Tracking ID in your property settings. Copy it as you'll need to add this to Pixel Manager for WooCommerce.

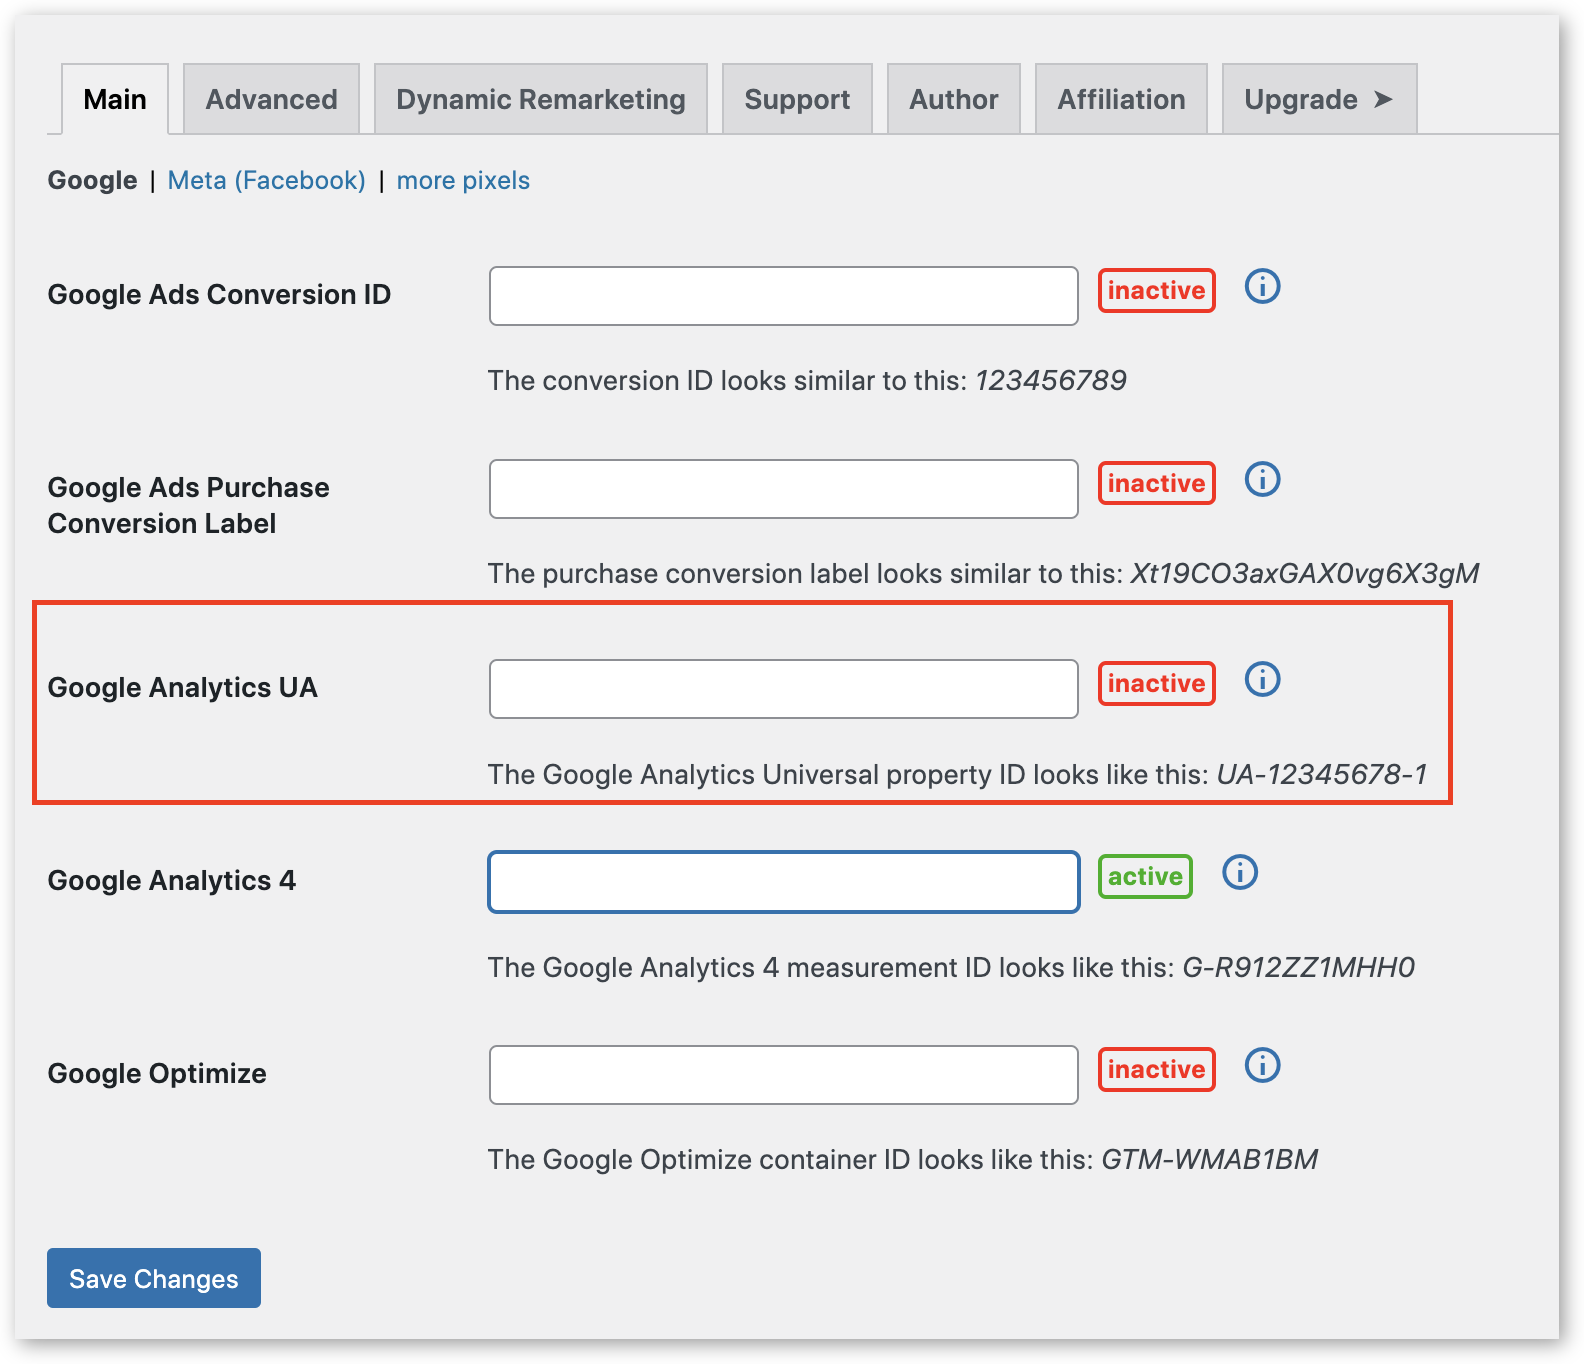
Step 3: Open Pixel Manager for WooCommerce in the plugin backend, and paste the Tracking ID in the Google Analytics UA field under the Main tab. Save your changes.
Setting up conversion tracking for Google Ads account
For this, you'll need the Google Ads conversion ID and purchase conversion label. Here's how to find them.
Step 1: If you haven't yet, you'll need to create a new conversion in Google Ads. We recommend following our guide on how to set up conversion tracking for Google Ads, but the basic idea is that you need to go to the Tools and Settings menu under Measurements, click 'New Conversion Action', and follow the setup instructions.
Step 2: Then, go to the Google Tag Manager tab. This is where you'll find the conversion ID and purchase conversion label.

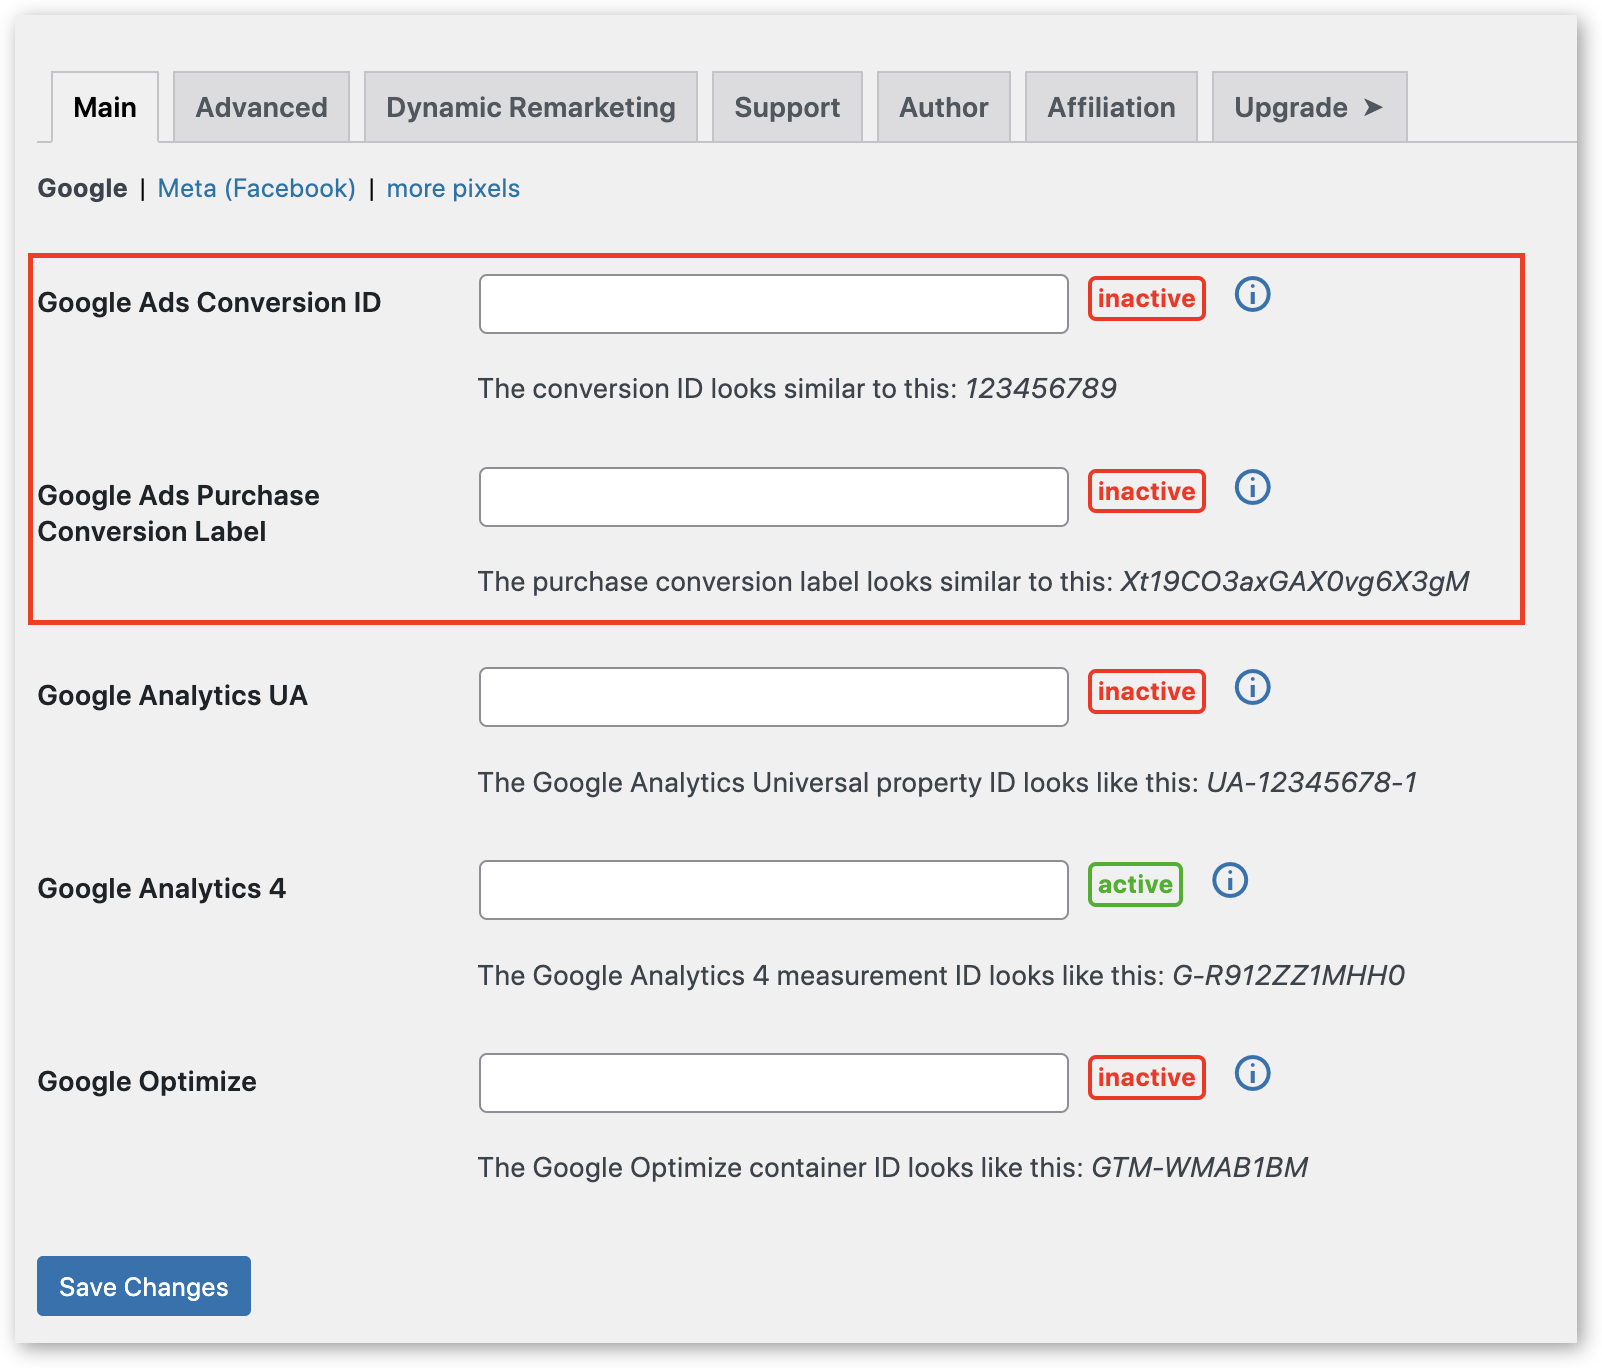
Step 3: Go back to your WordPress dashboard, and open Pixel Manager for WooCommerce. Under the Main tab, you'll find the fields for Google Ads Conversion ID and Google Ads Purchase Conversion Label. Paste the tracking codes into the right fields and save your changes.
Set up conversion tracking on your site with Pixel Manager for WooCommerce
Setting up conversion tracking allows you to understand the specific behaviors of your site visitors. You can see how many visitors are finding your site organically, and which Ad platforms are generating the most ROI for you. You can also track your carts and the rates of successful checkouts to help you develop retargeting strategies.
The best way to track conversions for your WooCommerce store is by using a plugin. The Pixel Manager for WooCommerce is a great plugin to use - it's the most accurate plugin available for WooCommerce and integrates with all major analytics and Ad platforms.
Get started with Pixel Manager for WooCommerce today. Every plan is available as a 14-day free trial, so try it out and see just how much the plugin improves your conversion tracking.