Here's The Best Plugin Alternative to Facebook for WooCommerce

TLDR
- Facebook for WooCommerce is a popular WordPress plugin used by WooCommerce store owners who run Meta Ads. The plugin promises to track conversion events that happen after customers land on your eCommerce website through a Facebook Ad.
- The reality is that Facebook for WooCommerce is buggy and can cause significant issues, which is why we don't recommend it even though it's free.
- Pixel Manager for WooCommerce is more accurate, offers more features, and respects data privacy. In this article, we discuss why this plugin is the best eCommerce solution for tracking conversion events coming from Facebook page ads.
Do you want to connect your WooCommerce store to Facebook and want an alternative to the Facebook for WooCommerce plugin?

Facebook for WooCommerce is a free WooCommerce plugin that enables you to install the Facebook pixel to your eCommerce store so you can track the performance of your ads and set up dynamic retargeting. You can also sync your WooCommerce catalog to Facebook.
On the surface, this probably sounds like the exact solution you need. However, when you take a closer look, you'll notice that the plugin only has a 2-star rating across more than 60+ reviews, and causes a lot of problems for WooCommerce store owners. That's why it's worth considering an alternative plugin that will do a better job than Facebook for WooCommerce!
In this article, we'll spend some time taking you through the best Facebook for WooCommerce alternative, Pixel Manager for WooCommerce, and show you how to set it up, step by step, in our tutorial.
Why do you need a Facebook for WooCommerce alternative?
Facebook for WooCommerce sounds like an enticing solution on paper, as it's free and promises to be easy to use - which means that WooCommerce store owners, especially small businesses who need to control their expenses, may be tempted to use this plugin to track conversions coming from their Facebook Ads. Unfortunately, Facebook for WooCommerce comes with a number of well-known issues.
Users have reported that the shop sync doesn't work correctly, and in some cases, the plugin has caused their WordPress website to crash. In many instances, it creates bugs, such as the Woo Cart not working.
Facebook for WooCommerce has compatibility issues with many popular themes and plugins, which can cause errors such as the White Screen of Death.
Furthermore, Facebook for WooCommerce ignores site visitors' cookie preferences, which means you risk breaching privacy laws by using the plugin.
If you are currently running Facebook Ads or considering it, you should definitely find an alternative to Facebook for WooCommerce. The features on offer are very important for your business, but it's worth finding a solution that offers the same functionality without bugs or privacy issues.
The most important feature you'll need is the ability to add the Meta pixel to your WooCommerce store so you can track conversions (i.e., the actions that visitors take on your eCommerce site after they click through from your Facebook Ads).
With this conversion data at hand, you can quickly and efficiently determine which ads are working or not and how to optimize them. You'll also find out what the typical customer journey is like for a customer that lands on your WordPress website through Facebook. If it's not in line with what you want, then you can make changes to your site to increase your conversion rates.
Introducing Pixel Manager for WooCommerce, the best pixel-tracking plugin
Pixel Manager for WooCommerce is the best alternative to Facebook for WooCommerce. If you're looking for a powerful solution for conversion tracking, you'll quickly discover that Pixel Manager for WooCommerce is more accurate than any other plugin on the market.
That's because Pixel Manager's compiled code ensures that it can run on most old and new browsers flawlessly, which maximizes tracking accuracy. All you need to do to get started is retrieve the Meta pixel and add it to the field in the plugin's backend (which we'll show you how to do in the next section).
Pixel Manager for WooCommerce uses the Meta pixel to track all major events that occur after visitors land on your site through Facebook, including:
- Adding payment info such as payment options selected and currencies used
- Adding items to the shopping cart
- Adding items to their wishlist
- Initiating checkout
- Purchasing
- Searching
- Viewing content on the site
The plugin will send all of this data to Facebook Ads Manager, so you can see your conversion reports there.
If a customer lands on your website through one of your Facebook Ads and makes a purchase, the plugin will use Order Total Logic to determine the Order Subtotal (the total minus the shipping costs, taxes, and discounts added) or the Order Total (what the customer has paid, including shipping costs and taxes). This information is sent to the pixel.
Pixel Manager for WooCommerce allows for a much more granular setup and output compared to Facebook for WooCommerce, which means you can track various types of order total calculations.
For even more accurate and complete data, you can set up Facebook's CAPI with Pixel Manager for WooCommerce. This way, you can record server-to-server events as well as browser events.
Pixel Manager for WooCommerce uses the REST API to communicate with the server (for CAPI), using much fewer server resources. The plugin uses CAPI to track the same events as it does with the browser pixel, but you can also track subscription renewal events.
Unlike Facebook for WooCommerce, which ignores users' cookie consent choices, Pixel Manager for WooCommerce detects user cookie consent and will act accordingly. You can configure the plugin for Implicit Consent Mode (which tracks everything until consent is denied) or Explicit Consent Mode (which doesn't track anything unless consent is given). Pixel Manager for WooCommerce is compatible with many Consent Management Platforms, so you can stay on the right side of data privacy laws at all times.
Because Pixel Manager for WooCommerce is a pixel-tracking plugin, you'll need a dedicated feed plugin, like Product Catalog Sync for Facebook, to upload your WooCommerce product catalog to Facebook.
Once you've uploaded your WooCommerce product catalog to Facebook, you can then use Pixel Manager for WooCommerce to set up dynamic remarketing. You can show personalized Ads to customers that have visited your store but haven't made a purchase to gently remind them about the products they've looked at. For example, if a customer lands on your store through a Facebook Ad and views a specific t-shirt, you can show him that t-shirt as a new Facebook Ad later.
Do you use other social media and search engine ad platforms in addition to Facebook? Pixel Manager for WooCommerce is an all-in-one solution for conversion tracking as it also integrates with Google Ads, Microsoft Ads, Twitter Ads, Snapchat Ads, and Pinterest Ads, so you don't need to purchase multiple plugins just to track your ad campaigns.
You can also set it up for Google Analytics, and Hotjar for even more insight.
How to set up and use Pixel Manager for WooCommerce
Now that you're all caught up on what Pixel Manager for WooCommerce is and what it has to offer, we'll show you exactly how to use it.
Purchase Your Plan
Start by picking and purchasing your pro plan. All plans offer the same premium features, and the only difference between them is how many sites you'll need to install Pixel Manager for WooCommerce on. The starter package is perfect if you only own and operate one eCommerce website.
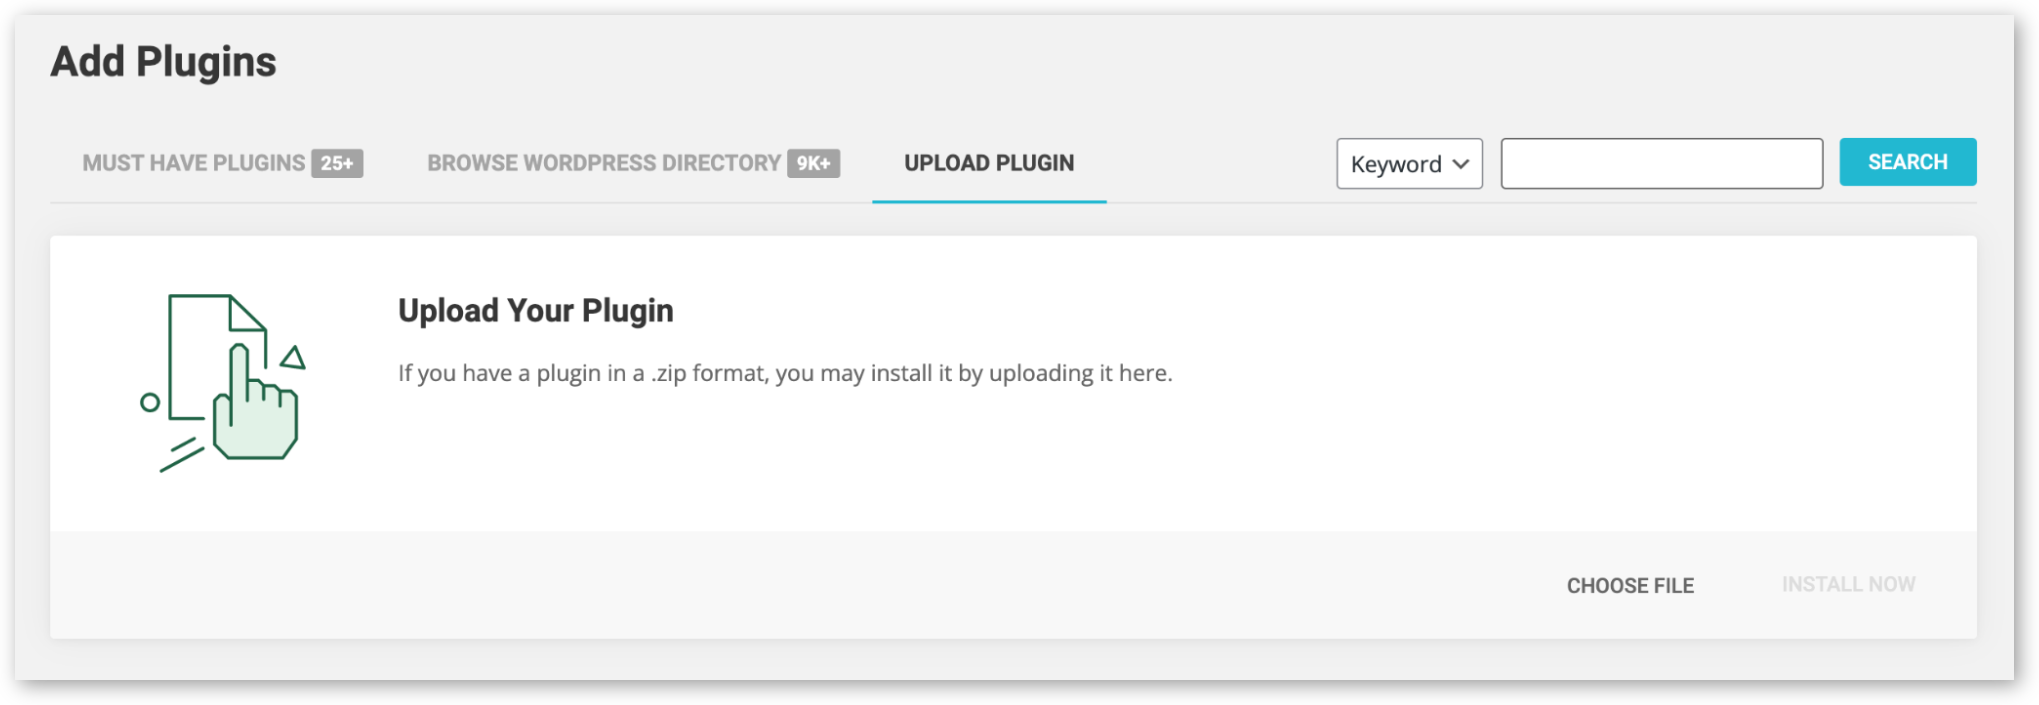
Next, upload the plugin to your plugins directory (/wp-content/plugins/) and activate it through the Plugins menu in WordPress.
Retrieve the Meta Pixel
Next, you need to retrieve your Meta pixel. Go to Facebook Events Manager and click the Plus sign to connect data sources. Select Web > Meta Pixel and click Connect. Add your pixel name and your website URL, and then click Continue.

Now, simply add your Meta pixel in the backend. Select WooCommerce > Pixel Manager and then Facebook (Meta). Enter the pixel ID and click Save Changes.

Setting up CAPI
Next, you need to set up the CAPI. You need a few things to set up the Conversions API:
- Your Pixel ID (which you've already obtained using the steps above),
- A Facebook Business Manager account (if you don't already have one, you can find out how to create one in this guide),
- An access token, which is the parameter in each API call.
There are generally two ways to get an access token, namely through your own app or through Events Manager. Events Manager is the recommended way of getting your access token. Just choose the Meta Pixel you want to implement, select the settings tab and click the Generate Access Token link under Set Up in the Conversions API section.
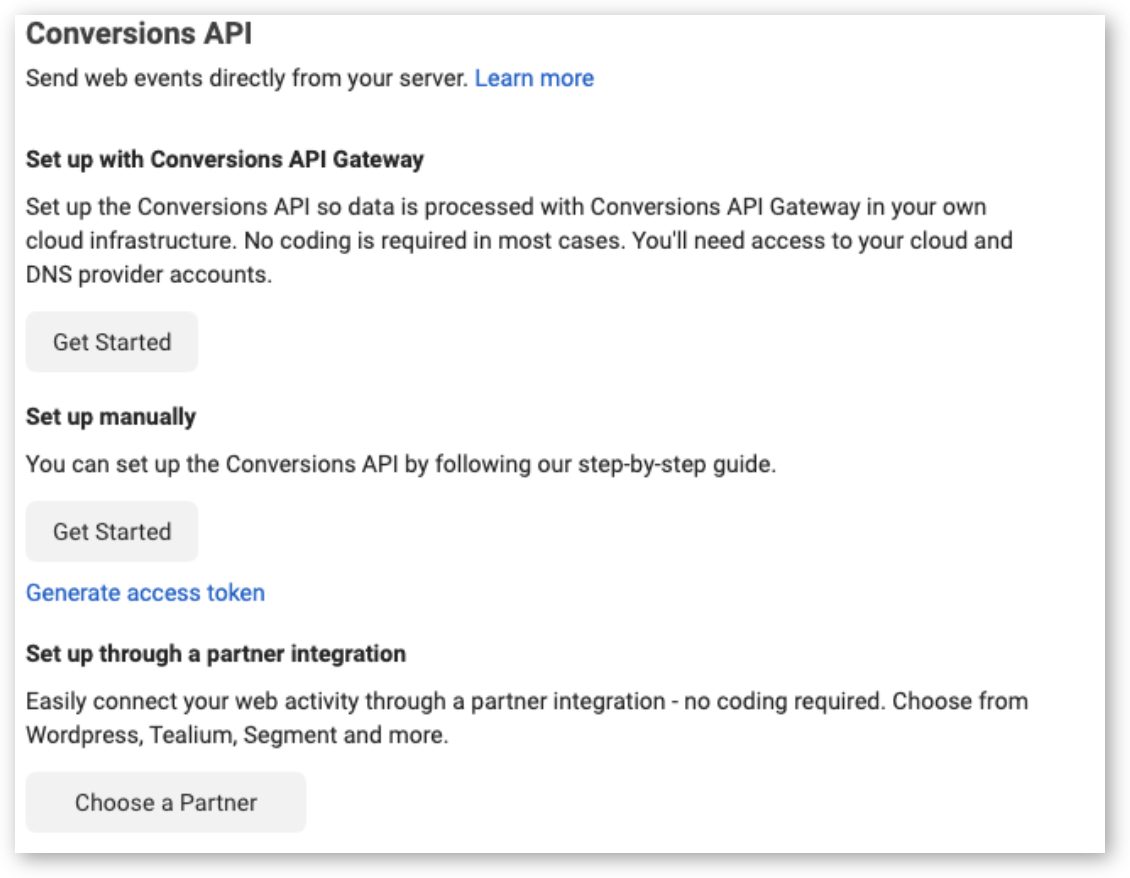
Follow the instructions pop-up to complete the steps. Just note that the Generate Access token link is only visible if you have developer privileges; it's hidden from other users.
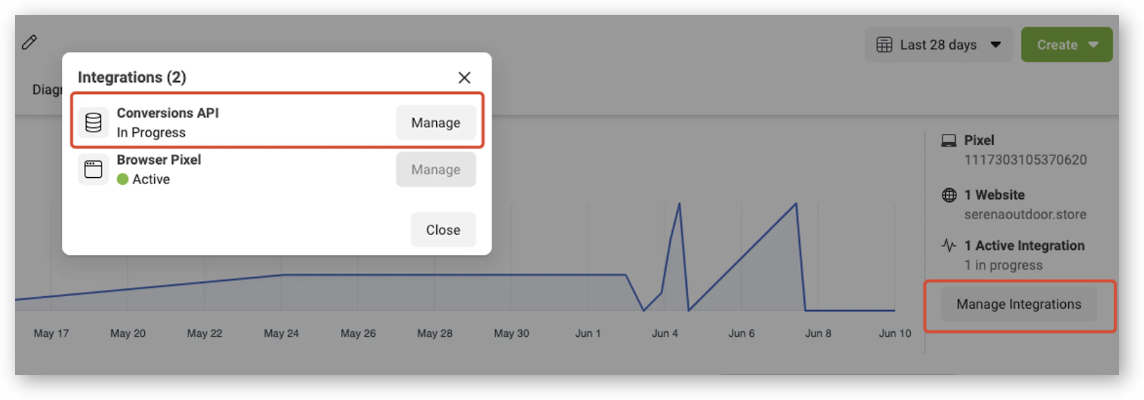
Once you have your token, click on Manage Integrations (in the Overview tab) and click the Manage button on the pop-up screen. This will create a Conversions API system user for you.
If you already have your own app and your own system user, you can generate your token inside Business Manager by going to Business Settings and assigning a pixel to your system user or creating a new system user. Select the assigned system user and click Generate Token.
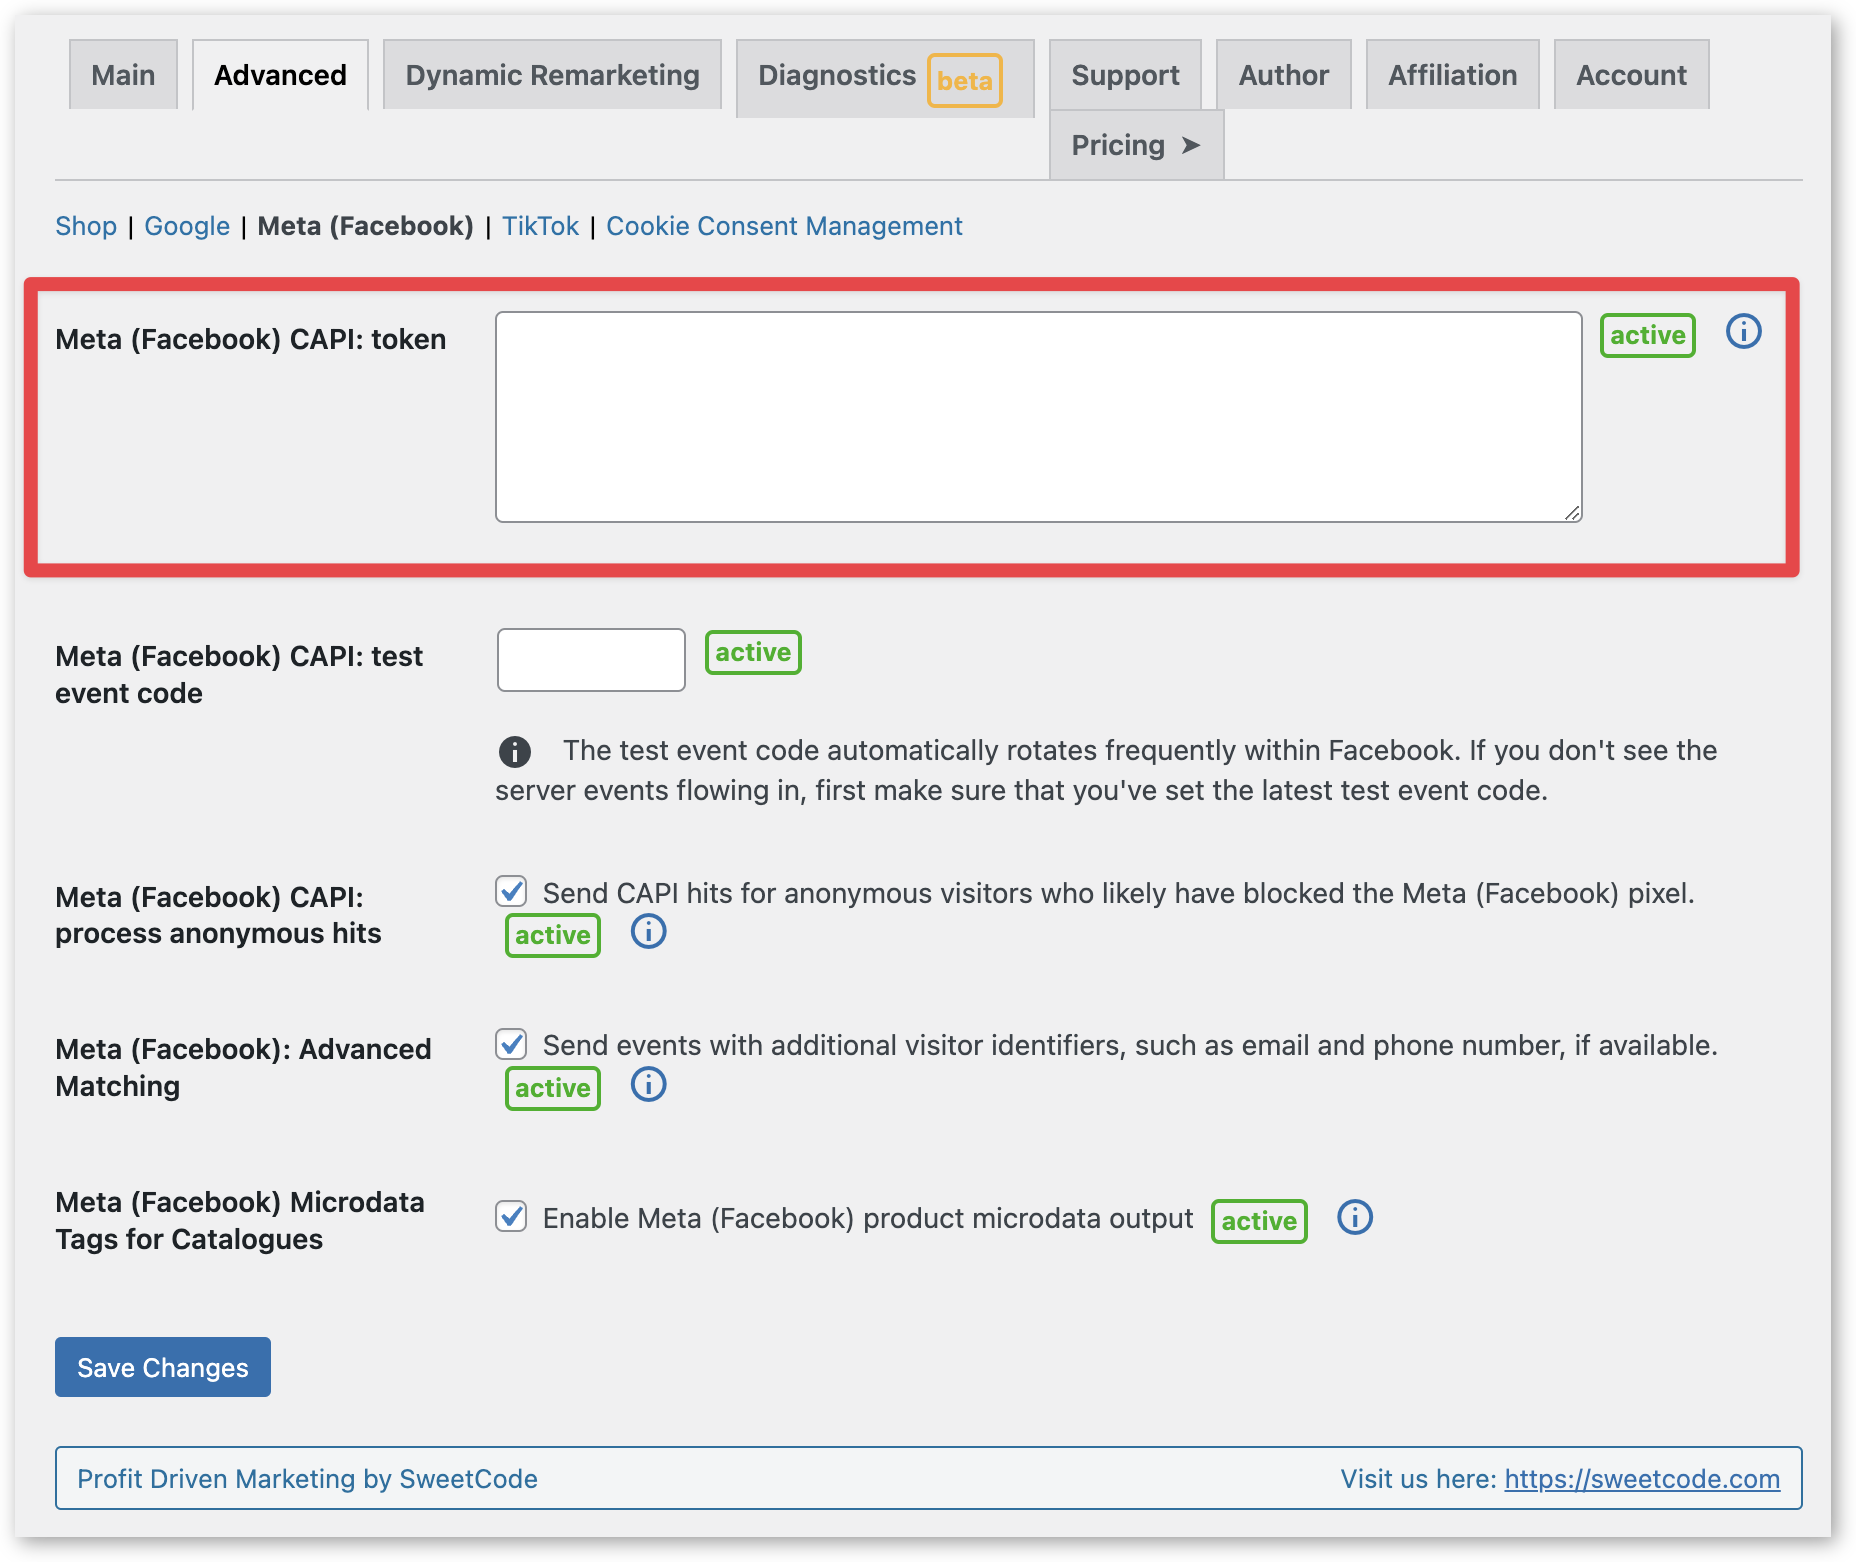
Now go back to your WordPress site. Paste the access token into the advanced section for Meta (Facebook) within the plugin. Once it's saved in the configuration, CAPI will be active.
Enable Dynamic Remarketing
For the final step, you may want to enable dynamic remarketing for Facebook Ads. For this, you'll need to use a feed plugin to upload your product catalog to Facebook. We recommend uploading your products with the Post ID as the identifier, as this is less likely to cause issues.
Go to the Dynamic Remarketing tab of your plugin. Enable dynamic remarketing audience collection by clicking the checkbox at the top.

Then, choose Post ID as the product identifier (if this is how you've uploaded your products as per our recommendation above), and check Enable variations output (unless you only want to upload the parent product of your variable products). Next, you can choose your business vertical, e.g., retail.
Get started with the best Facebook for WooCommerce alternative
If you want to add the Meta pixel to your online store and start tracking conversions from your Facebook Ads, Facebook for WooCommerce is not the best plugin for it. Maybe you've already installed it and found that Facebook for WooCommerce is not working or is not compatible with your theme.
Facebook for WooCommerce has been known to cause bugs and sometimes doesn't sync correctly to your site. The WordPress plugin also ignores cookie preferences, which may lead to data privacy issues.
There is an alternative to Facebook for WooCommerce that does everything Facebook For WooCommerce promises to do and more.
Pixel Manager for WooCommerce is the best alternative on the market for any online business with a WooCommerce store. It's incredibly accurate, easy to set up, and can track all the major events that can happen in your store. You can also set up CAPI to track server-to-server events and dynamic remarketing for Facebook Ads.
There are no data privacy concerns, and it comes with full support (even on the lowest tier plan) to help you get started.
Choose your plan and get started today so you can enjoy richer, more accurate insights into your Facebook Ads.